|
Return to Index for 2010 |
Miscellaneous Pictures
2010
This page contains pictures that don't involve a trip or something similar. It will include pictures taken around my house or Fred's, and the occasional event that did not result in much picture-taking.
January 25: An Experiment
We were hanging out around the house this evening, and we were working on understanding the aspect ratios for Fred's new camera. I got the idea to create a panoramic, 360-degree view of the den (computer room). I am sure I could have gotten better results had I measured accurately, made the lighting uniform and used a tripod, but I just swiveled around the room, trying to keep my little camera at the same level, and took eight or nine pictures. Then, I used Photoshop to "stitch" them together into one long picture. The software had some difficulty, and the pictures didn't align quite right, so I had to adjust some of them manually. When I got that done, I found that the individual shots "walked" up (I didn't keep the camera exactly level, and so I did some retouching at the top of the left-hand side and the bottom of the right-hand side of the long strip picture. I didn't take my time here, so you will notice some inconsistencies.)
In any event, it was fun to do and you can use the horizontal slider in the window below to have a look at the result:
April 26 - July 4: Master Bath Renovation
Background
As you may have seen earlier in this photo album (Miscellaneous, 2006), I had my master bath renovated in 2006. At the same time, I had my kitchen redone and my front stairway rebuilt. Of these three renovations, the only one that was satisfactory from its completion onward was the kitchen.
As far as the front stairway was concerned, I did not like the way it turned out. It was not what I had wanted in my mind's eye. It was quite usable, and the contractor did what I asked, but what I asked for was flawed. In the time since, I kept on the lookout for what I actually had wanted, and in 2009 I had found a number of examples of what I wanted. But because the stairway was usable, and because redoing it would be extremely inconvenient, I let it go.
The master bath was a different issue altogether. For about the first year, it seemed as if the renovation had been successful. I was not happy with some of the details, but I just never got around to changing them. It's not important now what those details were, but suffice it to say they weren't sufficient to cause me to have them redone. What DID cause me to think seriously about a re-renovation was the fact that about a year after the bathroom had been done, water started coming through the kitchen ceiling. I tried to get in touch with the original contractor, but he was no longer in Dallas. I called in a plumber who cut into the kitchen ceiling to tell me that the leak was coming from the shower in the master bath. We ran some tests and found that water was leaking through cracks in the grout in the base of the shower. The shower pan should have captured this water and routed it down the drain, but apparently the shower pan itself had a leak. So I had two alternatives. I could rip out the shower and redo it, or I could regrout the shower every nine months or so. For the next two years, that's what I did. But in my mind this was only a temporary solution; sooner or later I would have to redo the shower completely.
After putting up with a number of leaks under the carpet, by the beginning of this year I was ready to redo the entire bathroom once again. This time, I would correct all the problems from the first renovation plus I would do some things differently. This time, I contacted various bathroom renovation firms; relying on someone's handyman had been only partially successful in 2006. One contractor was the husband-wife team that had done some good-looking renovations for our friends John Toohey and John Lambert. I had them come out and they did some sketches and estimates. I liked their ideas, but I thought the estimate to be high. The third firm I contacted was I3 Construction. One of their contractors, Jack Jayswal (Indian) came out. I told him to give me an estimate for the same changes that the first firm had proposed so I could compare the two. Jack seemed to have a lot of his own ideas, but he agreed with the basics of what I wanted to do. As it turned out, his firm's estimate was about half of the first one.
Having been burned once, I thought that before I accepted his bid, I should look at some of his references. As it turned out, he was currently finishing up a major renovation in North Dallas, so I called the homeowner and was invited up to see how things had gone. The homeowner was very complimentary about working with Jack, and it looked to me as if the major work that Jack's firm had done was of high quality.
So in early April, I met with Jack and signed a contract for the renovation, the work to begin on Monday, April 26th. In this section of the Miscellaneous pictures for 2010 I will include the pictures taken of and during the bathroom renovation. The photo sequence is not complete; I was gone during the last part of the renovation for reasons that you can hear about in the section below on my front stairway project. Anyway, I'm going to include the pictures and movies I DO have here, and I will have a separate section for each day on which I took any. (As it turned out, Jack did such good work that I signed subsequent contracts for other "projects," but I will give each of them its own section here.)
So let's begin with the renovation of my master bathroom.
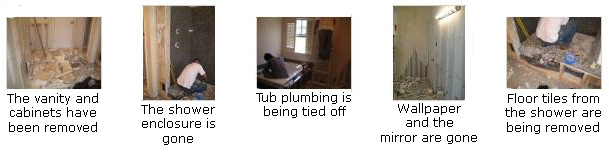
April 26
I spent the weekend moving everything out of the master bath. All the cabinets and drawers have been emptied, and I have taken the clothing I will need for a while into the guest room, where I will be living during the project. Early this morning, before the workmen arrive, I spent some time taking pictures of the bathroom as it is now. I want to show you these pictures and tell you what the changes are going to be.
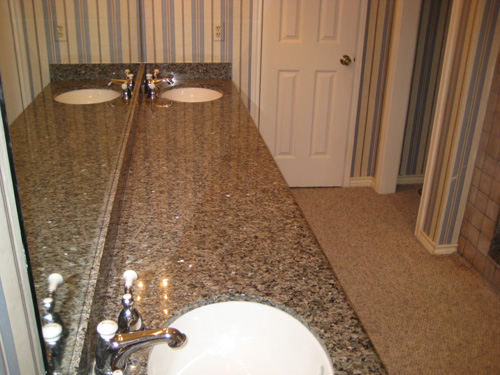
This picture shows the current state of the vanity. The crew will remove the granite vanity top and sinks and set them aside for re-installation later. All of the cabinets underneath will be removed, and new cabinets built. The kneehole in the middle will be eliminated, as one of the designers I'd talked to, a woman, told me that women no longer use that area for make-up, and so resale would not be affected. The new cabinets will be a dark cherry finish, with handles to match the faucets. The carpet will be taken up and tile simulating wood will be put down. The commode will be removed and a new, power-flush toilet will be installed. The cabinets above that commode will be removed and replaced with matching cherry cabinets. A new fan/light combination will be installed.
I will be reusing the same mirror, but there will be two new light fixtures installed, one over each vanity sink.
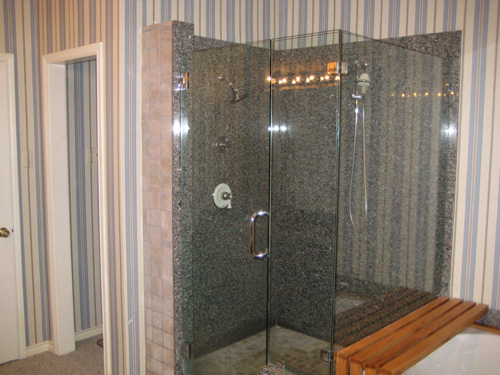
Here you can see the shower that was redone two years ago. I've decided that the blue granite on the walls makes the bathroom too dark. Since the granite has to be removed anyway to fix the shower pan, I am going to use large, neutral tiles instead. In fact, the entire area from the commode compartment all the way around to the window will be tiled from top to bottom. All the wallpaper, incidentally, will be removed in favor of a Williamsburg blue paint to go with the existing granite countertop and the new cabinetry.
Following the suggestion of one of the designers, the door to the shower will be moved to the right side and will no longer open out into the room. On the right side of the shower a raised platform will be built, and it will be topped with some of the granite that is removed from the walls. Inside the shower, both showerheads will be moved to the back wall, and an inside-shower bench seat will be built on the wall where the water control is now. This bench will be topped with more of the excess granite.
The little half-wall where the door hinges are now will be faced on this side with fake cabinet doors, and on the back side inset shelves will be constructed to hold shampoo and soap and stuff. (Right now, there are hastily-installed granite wedges serving as shelves.) The contractor plans to reuse all of the glass shower enclosure and fixtures, saving the cost of new. This means that measurements will have to be precise. The low wall will be extended across the current door opening and again faced with fake cabinet doors. The floor of the shower will be of a similar color, but the contractor has found pre-set sheet tiles that are little rectangles rather than squares and which look very nice. The wood shelf that was used to cover up the awkward transition from shower to tub will no longer be necessary.
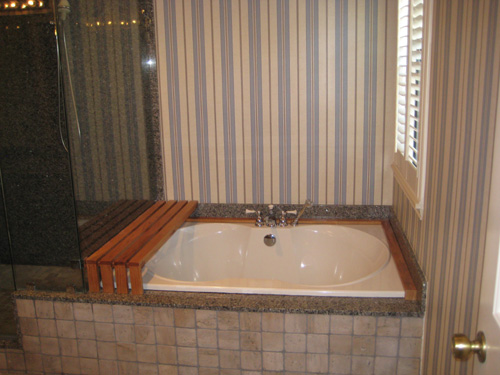
The area where the tub is now will change dramatically. Originally, I had to search for a small tub to replace the large one that had been there up until two years ago. At that time, I made the shower bigger, and the old tub would not fit. Again, after having talked with one of the designers who looked at the bathroom (a woman, as a matter of fact), I've decided to take the tub out entirely. At first, I thought that might affect resale, but the designer told me that not having a tub in the master bath was no longer unusual; most people don't take the time to prepare and enjoy a bath unless they are not feeling well. She, herself, had removed the tub from her own master bath years ago and never missed it. That made sense to me because, aside from the times when Grant was feeling poorly, the tub had been used a grand total of one time- when his parents came to visit in the late 1980s. So the tub goes.
In its place will be a platform approximately six inches high, topped with the blue granite. The shower door will open out onto this platform. As I already said, the entire wall over and around this side of the window will be tiled from floor to ceiling. When I did the Florida bathroom, Ty and I put a border around the wall of blue glass tiles just a few inches high and about halfway up the wall to add interest. I did some searching at the tile store and found the pre-made border you can see at right. It comes in long strips so it is easy to install. We will put it about shoulder height all around the room and right through the shower. On top and bottom I found a curved, light brown border for the border, and the whole thing is in the picture at right.
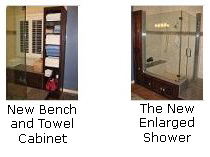
Underneath the window there will be a dressing bench. It will have cabinet storage underneath and will be topped with more of the granite reclaimed from the shower. All of the square facing tiles that you can see will be replaced with fake wood doors and/or drawers. Finally, between where I am standing and where the tub is now, on the right had wall, a floor-to-ceiling open-shelved cabinet will be built. It's glass shelves can be used for anything, but I will probably put towels on the shelves. This will eliminate the need for towel racks.
Just in case a future owner of this townhouse wants to reinstall a tub, all the plumbing will be left underneath the platform. As a final change, additional can lights will be installed in the ceiling- over the room, the shower and the raised platform.
|
The Current Master Bath
To cap off the "before" pictures, I made a movie surveying the bathroom as it appears this morning, just before the contractor and his crew arrive to begin the demolition. |
The crew arrived right about nine- Jack and five workers. I was to become quite familiar with most of them over the next few months as it turned out that the bathroom was only the first of many projects I undertook.
When the crew arrived they went right to work. Jack had a dumpster delivered and it was placed behind the garage. They carefully removed the shower enclosure and set it in the bedroom. They took out the vanity (separating it into the two pieces that it's made of) and stored that in the bedroom as well. And they made a lot of progress throughout the day removing wallpaper, cabinets and tile. By the end of the day they were working on getting the tub out. You can have a look at some candid pictures of this first day of demolition if you click on the thumbnails at right.
April 27
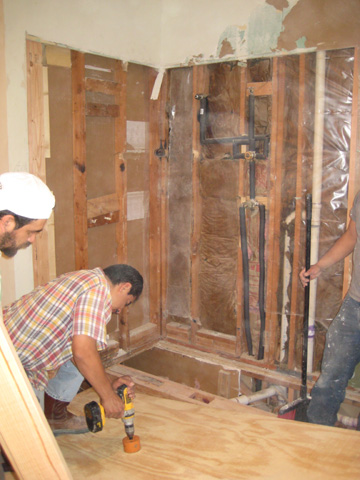
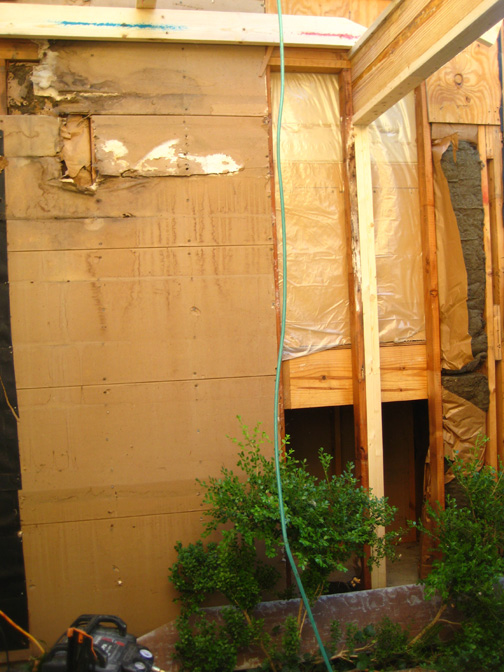
Today, the tub has been removed and all the rest of the tile and granite have been removed. In the shower area, the crew has already rerouted the plumbing to put it all on the back wall of the shower. They have removed all the wet boards from the back and side of the shower, showing me in the process where the shower pan had been leaking. That has been removed as well and the drain newly-positioned for the still larger shower that I'll be getting.
At the moment, in the picture at left, they are preparing some of the plywood that will cover the studs in the wall, cutting holes for the various plumbing fixtures. They will be doing the same thing for the subfloor underneath the shower. There will be insulation in the walls to replace the insulation that had gotten damp. The plastic will also act as another vapor barrier to protect the insulation in the future.
My bedroom is a mess, but I am not using it in the interim, but just using the guest room. All the supplies the crew is using, as well as anything we removed that will eventually be reused is being stored there. All my furniture as well as the carpet have been covered by plastic to keep as much dust out as possible. I took a couple of pictures of the current condition of my bedroom, and you can have a look at them
here
and
here.
April 30
Well, four days later a lot has been done. It's Friday afternoon and we are well into the process of rebuilding the major elements of the master bath. Take a look at the pictures I took today by clicking on the thumbnails below and you will see what I mean:
|
Laying Floor Tile
I thought that the process of putting in the rectangular floor tiles was interesting, and if you want to see this process, watch this movie. |
July 4
The bathroom renovation has been completed. I am very pleased with the way things have turned out.
I took a couple of pictures of the finished product; you can have a look at them if you click on the thumbnail images at left.
|
The New Master Bathroom
In this movie, I'll take you through the new master bathroom. |
June 2 - July 4: Kitchen Renovation
Background
Originally, I had only planned on fixing the kitchen ceiling; it had holes cut in it from when we were investigating where the water was coming from, and learned that the shower was leaking. Knowing that I would eventually have to fix the shower, I left the ceiling as it was for quite a while.
But now that the shower is being fixed, it was time to fix the kitchen ceiling also. The problem was that just fixing that area would be difficult- trying to get the new "popcorn" to match the old. So I decided on something a bit more radical. We would remove the popcorn ceiling all throughout the kitchen, and also take down the wallpaper that had been damaged when the kitchen was renovated. We'd also fix a couple of issues from the original renovation. Then we'd install a chair rail all around the kitchen and eating area, painting above and putting wallpaper below. We'd finish off by painting all the trim. I also decided to fix the issues with the door to the patio, one of which was that it opened inward and made it awkward at parties and gatherings. Jack and I decided to install an actual set of real French doors that would open outward, providing a smooth flow from the kitchen area to the patio on nice days.
May 6
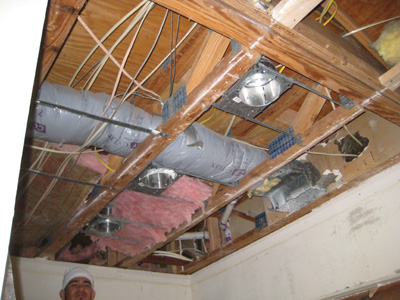
Now that the master bathroom renovation is coming to and end, the crew moved down to the kitchen to begin work there. The first thing they did was to remove the entire area of kitchen ceiling that had been patched in 2006. It was necessary to do this to clean up the problems caused by the leaking shower and also so that the rest of the ceiling could be smoothed. Today, I took a few pictures of the opened kitchen ceiling, one that you can see at left and a couple more that you can look at if you click on the thumbnails below:
June 22
There is a large gap in time between the prior pictures of the kitchen renovation and these. There were two reasons. One was that we had been on a couple of trips in the interim, taking advantage of being away from the mess. In particular, we wanted to be gone while the front stairway was being rebuilt, as it would have been difficult to get up and down while that was being done. The other reason was that most of the kitchen renovation involved painting and wallpapering, not activities that needed a lot of photographic documentation.
Today, though, the new double French doors that Jack had built are being installed. You can see one of the crew securing the framing to the kitchen walls
here.
Once the frame was secured, then we could test the doors. You can see how they both open outward
here.
July 4
|
The New Kitchen
In this movie, I'll take you through the changes that have been made in the kitchen. |
June 10 - July 4: Entry, Front Stairs and Guest Bath Renovations
Background
One of the next projects I wanted to undertake was to rebuilt the front stairs. I may have mentioned before that I had not been satisfied with what I got out of the last renovation in 2006, and that since then I had found examples of exactly what I wanted. So when the master bath was done, and the kitchen was winding down, I had Jack entirely redo the front stairs.
The problem was that for that redo, the wallpaper along the bottom part of the stairway had to come down, because we were putting in chair rails on one side of the stairs and new banisters on the other. After looking at the plans, we decided that putting a chair rail throughout the entry would tie it all together, and for that, the rest of the wallpaper in the entry would be coming down. This wallpaper wrapped around into one wall of the living room, and that came down as well. We would be painting instead, with complementary colors above and below the chair rail.
Since we were redoing the entry walls, this was a good time for me to get something else that I have wanted for a long time- a new front door. My current one stuck a lot and looked terrible. It was either plane it down and repaint, or get and entirely new one. The cost of a new one, a richer-looking wood and glass door, was only a bit more than fixing the old one, so that's what we decided to do.
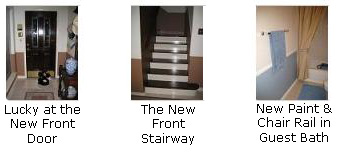
Finally, the guest bathroom ceiling needed to be repaired to fix the stains from some leaks from the air conditioner condensation lines. It didn't look terribly bad, but I liked the color in the kitchen so much, and the idea of chair rails so much, that we continued them into the bathroom, taking down the old wallpaper and removing the popcorn from the ceiling.
So I consider all of this to be one project. As I said, we were gone for a good bit of the time that these things were being done, so I don't have pictures of the work in progress.
July 1
When we returned from our Florida trip, the renovations in the entry area were almost complete, but I waited until the mess from the painting had been removed and I had moved some of the furniture and accessories back to take some pictures.
If you will click on the thumbnails at left, you can see some pictures of the finished stairs, front door and guest bath.
July 4
This evening I have taken some more pictures and movies of the completed entry area renovation. First, you can see a picture of the outside of the new front door
here.
Inside the house, you can look up the first flight of new stairs
here.
Finally, from the top of the stairs you can see Bobbie Lee going down them
here.
|
The New Guest Bath
In this movie, I'll take you through the changes in the new guest bathroom. |
| The New Entry and Stairs
In this movie, I'll start with the new paint in the living room, take you into the entry and to the new front door, and then take you up the new stairway. |
September 24: A Visit from Steve Lee
My old college friend, Steve Lee, has come to Dallas for a function at SMU where he got his degree and, as he has done before, he has come a couple of days early so we can visit. He and Fred and I had dinner on Friday, but Fred had to leave for his mother's in DeLeon on Saturday, so Steve and I spent the weekend together.
I took him over to his hotel Sunday night, and we planned to meet on Monday when he had a break in his functions at the college. When I met him on campus, I also had a chance to meet another friend of his, Torrey Curtis, with whom I have been corresponding occasionally and having political and philosophical discussions. We met outside the Chapel on campus, where we had a chance to sit and visit for a while. I took my camera as I hadn't yet gotten any pictures during Steve's visit, and we took some pictures to record the day. You can have a look at them by clicking on the thumbnails below:
November 1: Patio Renovation
In this section of miscellaneous pictures, I want to record the work that I had done to renovate my patio area.
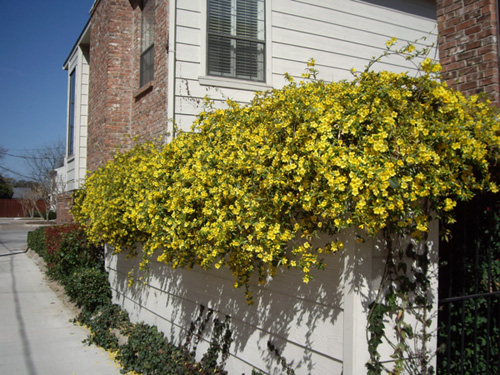
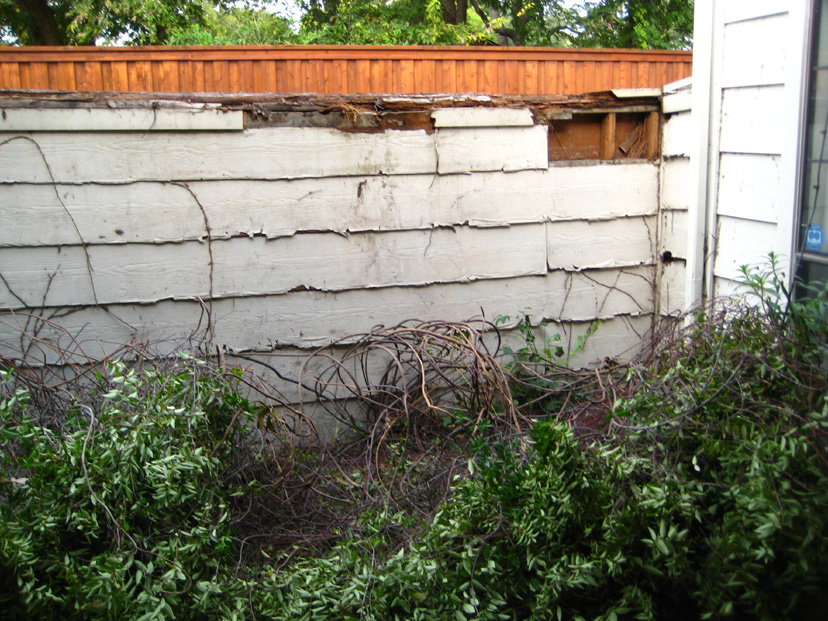
I have been postponing rebuilding the patio wall, the one that my Carolina Jasmine has been so happy on, and the one you can see in the picture at left, which was taken in 2006. I knew that it would be a real job. Not only did the fence have to be entirely rebuilt due to the fact that some of the posts had rotted so much that you could move the whole fence with just one hand, but the gate had to be remounted as well, since it is very hard to close now due to the shifting of the fence. This meant that I would have to either uproot and discard the jasmine, or somehow taken it down off the fence and lay it in the patio while the rebuilding went on. I didn't want to the former (you can see that the Spring color is really spectacular), and I knew the latter would be difficult- both for me and for the jasmine.
But the project had to be done, and since I had finally found a contractor whose work was very good, I decided to go ahead with it. When I talked with Jack Jayswal about the project, we got onto a discussion of the rest of the patio. As you have probably seen in earlier pictures, the patio has no roof above it- just a trellis-like affair supported by two massive beams that stretch across the area about six feet out from the house wall. When it rains, of course, water comes right through the slats of wood, and so you can't use the patio in inclement weather. Add to that the fact that the beams and smaller trellis pieces are very hard to maintain and you might understand why I was receptive to Jack's suggestion that we do something different.
The plan he came up with was to extend the actual roof of the house outward about eight feet, creating a solid barrier to the weather. With the roof in place, you could sit out on the patio even if it was raining. There would also be a place to install an outdoor ceiling fan and light. Jack further suggested that we install two skylights to allow more light to come in under the roof. Finally, I had the idea to ask him to fabricate a mesh screen system that could be installed in the summertime to keep bugs out and make the patio actually usable as a sunroom. We agreed on a design, and included this work in with the fence rebuilding.
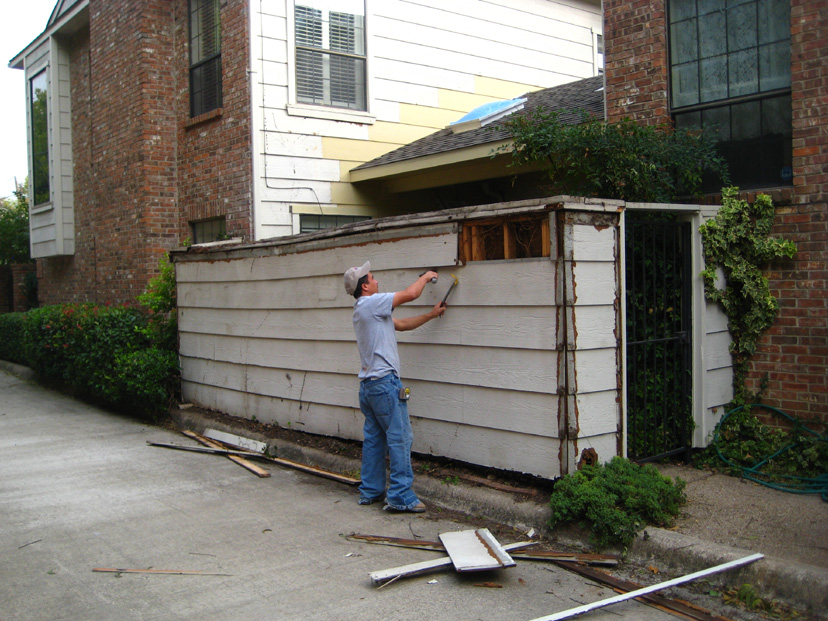
We discussed two further issues as well. The windows from the living room and upstairs bedroom that look out onto or down onto the patio had lost their seals years ago, and now there was always condensation in the interior of the windows. We decided to replace all three of them. Finally, due to the fact that I was not conscientious about keeping climbing vines and ivy from crawling up the walls, many of the boards around the patio had warped due to the pressure of vines growing behind them, and many of the boards still had the stickers from where I had pulled the vines down over the years. It wasn't worth sanding and repainting the boards, so we decided to replace them with the newer "Hardy Board" product- the same product that would be used on the fence. Since we would be doing that, it made sense to have Jack's people replace the boards around the rest of the outside of the townhouse that had deteriorated over the years.
So the patio fence project turned into a general patio renovation as well as a repair and repainting of most of the rest of the non-brick surfaces on the outside of my unit. The work began on Monday, November 1st, and most of it was completed over the course of the next three weeks. We left the screen system until the end, and Jack still has to finish fabricating and then installing it and we will be done. Since the new roof was the first thing the crew tackled, that's where we'll begin with the pictures.
The New Patio Roof
Probably the easiest thing to do for this part of the project is to simply give you a thumbnail for each picture along with a description. Then, if you want to see the full-size picture, you can just click on the thumbnail. The various movies that I took will be interspersed with the pictures so that everything is in time sequence. To orient you, the north side of the patio borders the living room, the east side borders the kitchen and the south side borders the garage/family room. I'll refer to those rooms frequently.
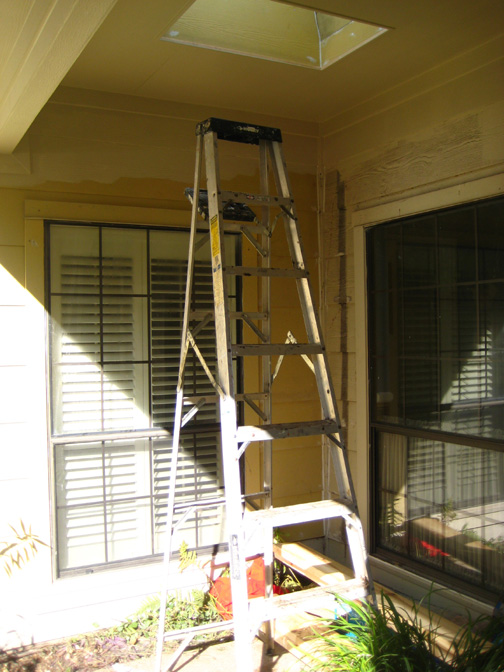
November 1
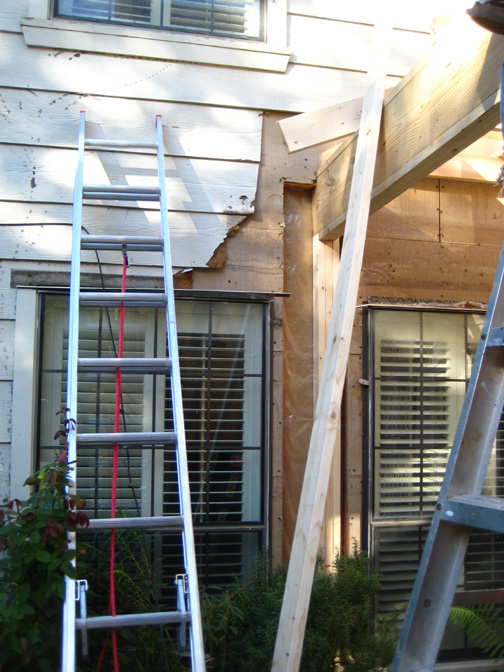
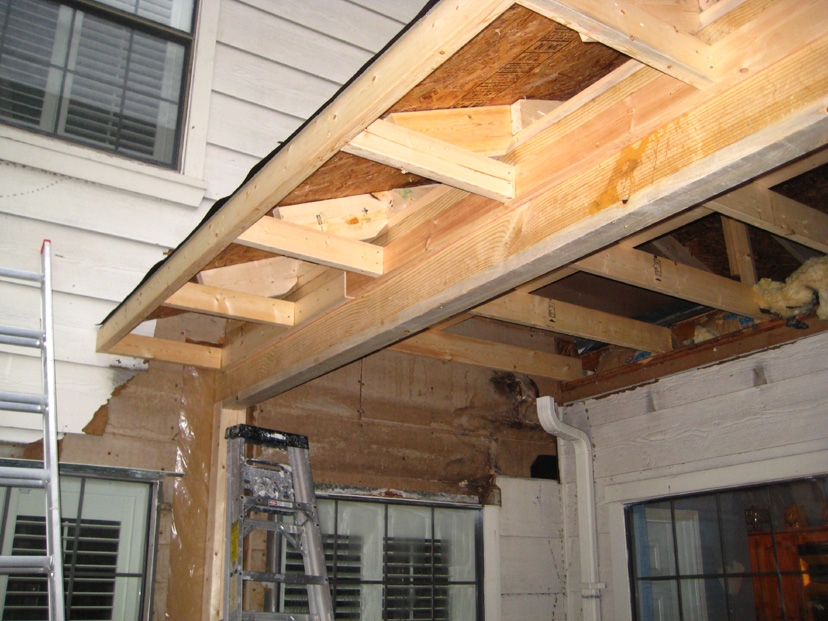
This is the south side of the patio. The damaged boards have been removed, and some of the supports for the new roof added. The water damage in the upper left was caused a few years ago when the flashing on the existing roof developed a leak, and I got water coming into the kitchen just by the back stairway. The flashing was repaired, but you can see that there was some damage behind the siding. This will be repaired before the new siding is put on. The space under the stairs has been opened up, and we've decided to make a small storage room out of it, accessible through a locking door that will open out onto the patio.
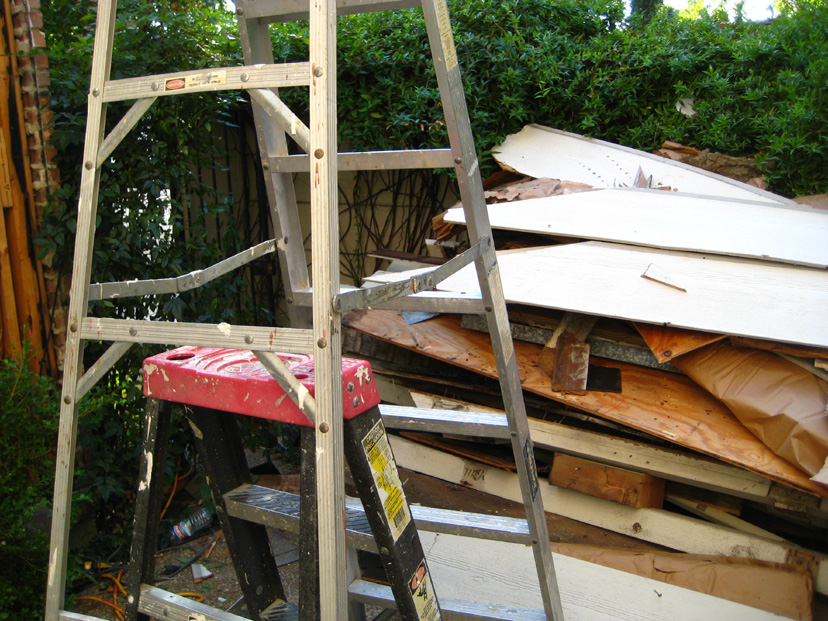
Jack has arranged for another dumpster to be delivered, but it is not here yet, so they have had to pile all the latticework, the original patio beams and the damaged siding here, inside the patio. As you can see, the fence has not been taken down yet, so the jasmine is still up. This was taken mid-morning on the first day of work.
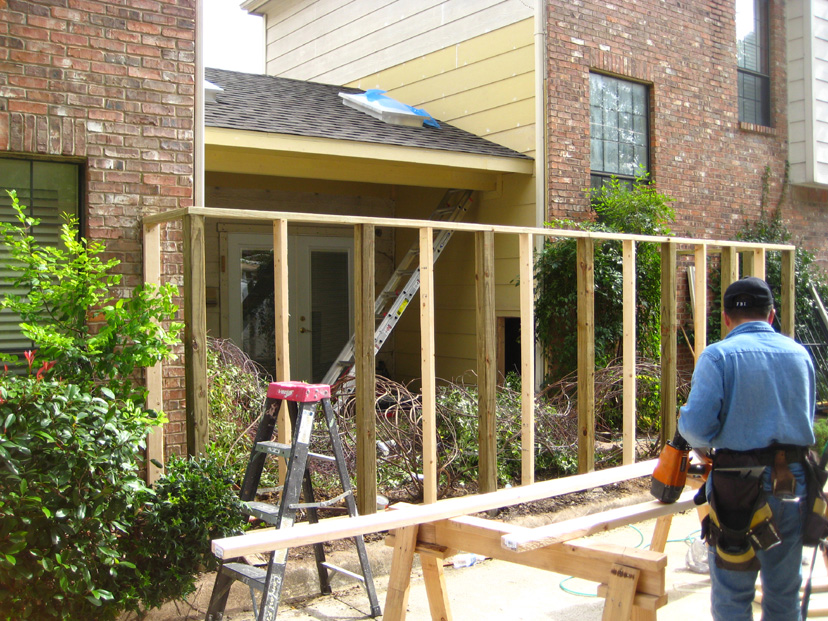
The north wall of the patio, showing the new support stud for the roof beam that has been installed in the wall there. Some of siding has been removed, but basically just where they need to work on the new roof and the area underneath it. The windows have not yet been replaced, although they have been ordered.
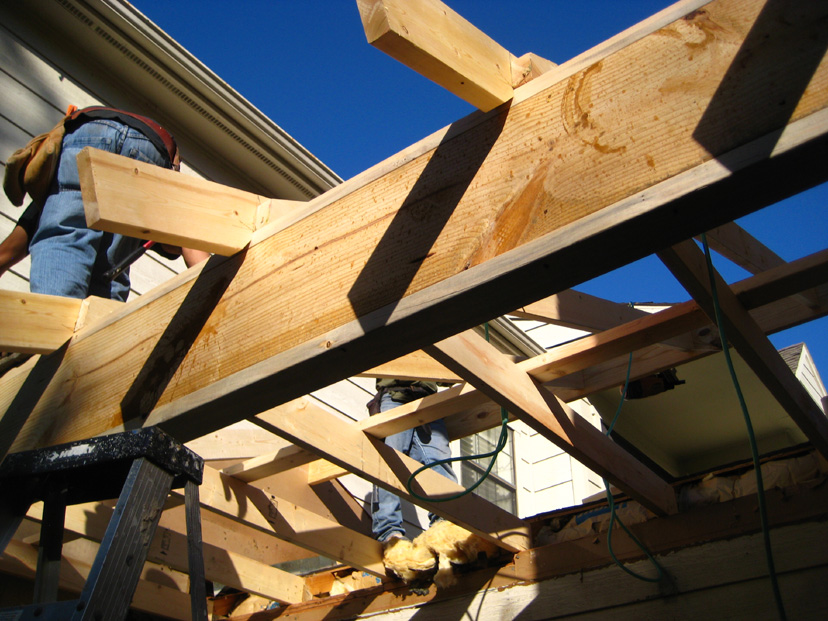
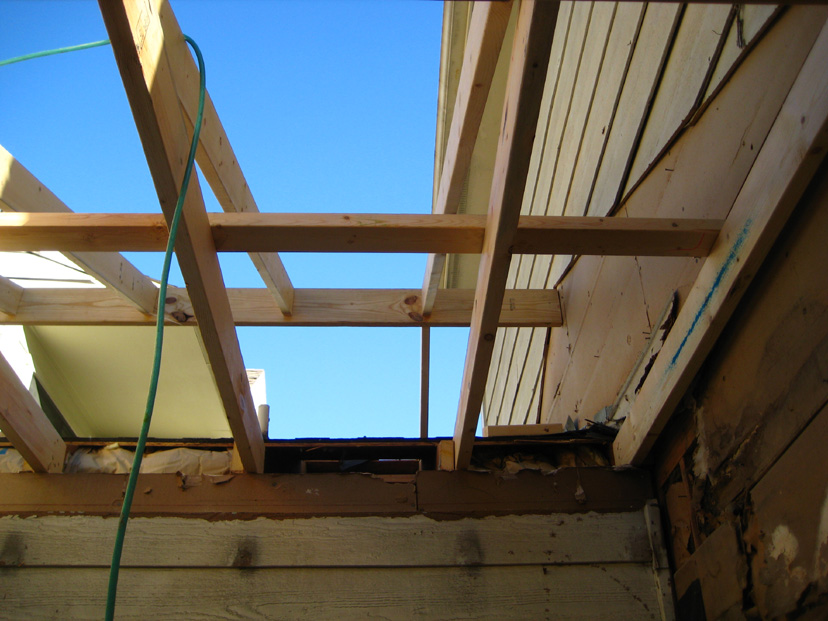
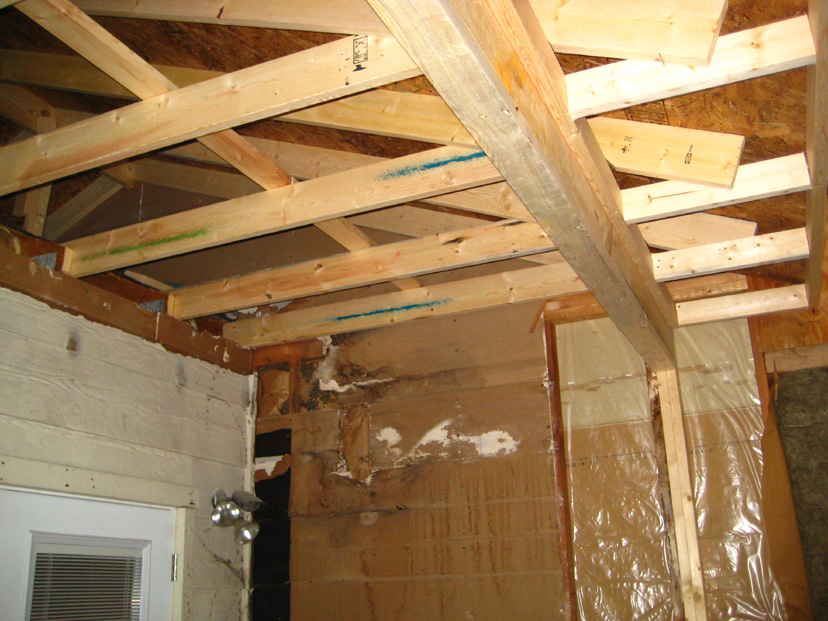
The slight drizzle that we had this morning has ended, and the day has cleared up. This view, taken early in the afternoon, looks up onto the framing for the new roof where the workers are putting that framing together. You can see one of the placeholders for one of the new skylights at the lower right. The ugly, massive beams that used to hold up the trellis will be replaced by something a good deal more finished-looking.
This picture looks up alongside the garage wall on the south. You can see that the siding has been removed to follow where the new roof line will be. That siding wasn't damaged, but the roof needs to tuck under the remaining siding so it can be sealed. Here again you can see where the skylight will be positioned. They haven't yet taken down the siding along the kitchen wall.
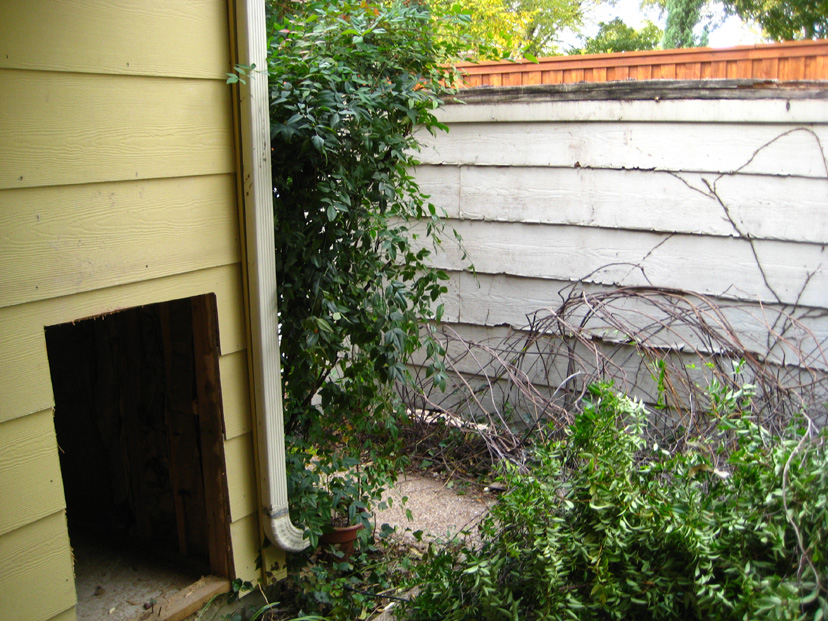
When Jack arrived that afternoon, we went out to look at where this space had been opened up under the stairway. Although Jack had already had a support stud put in, he told me that if I wanted to use the space under the stairs for storage, he could easily put in a header to allow a usable door to be installed. We decided to do that, and, eventually, the stud that you see in the center of the picture was cut at the top, a new header installed to link up with the existing studs on either side, and an opening created where the door would eventually go. I am going to use the space to store stuff that is used on the patio- like the patio chair cushions.
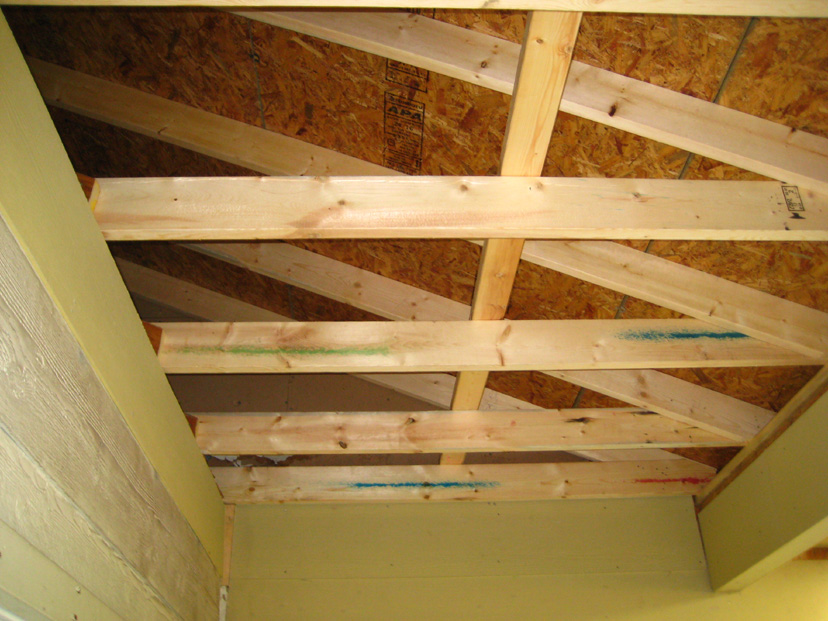
Looking towards the living room again, the workers are finishing the framing for the new roof. The trellis used to have an opening along the living room wall to allow a downspout to carry water from the gutter that was there originally. The gutter will be much further out, now, and that area totally sealed. I believe Jack is going to reuse that downspout when he moves it further out. It is interesting that they know just where the studs in the living room wall are; they have attached the roof beams to them.
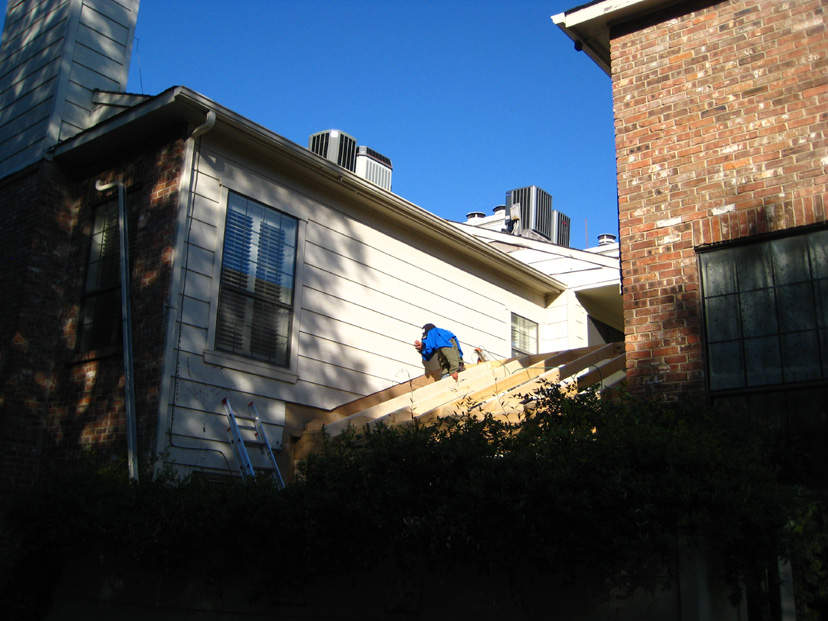
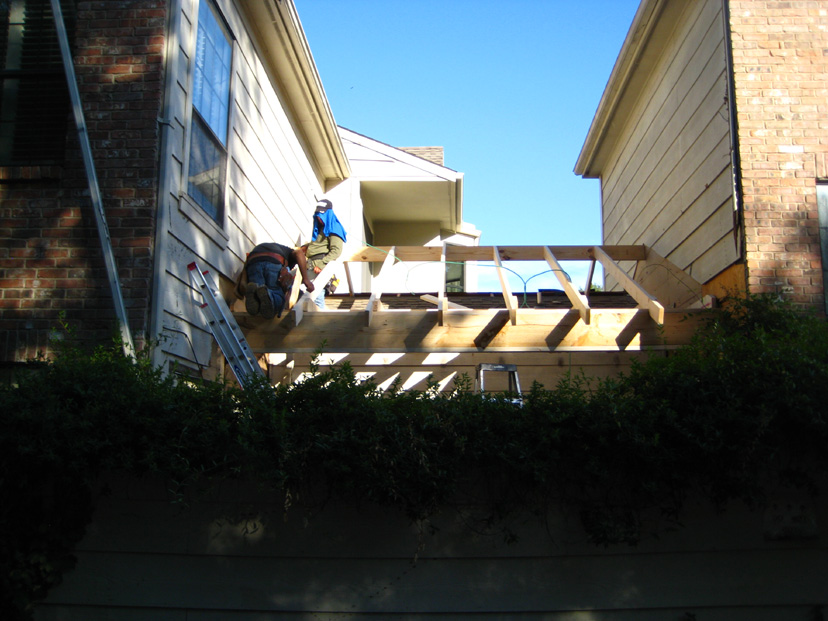
We are coming to the end of the first day, and I have stepped out into the driveway to give you a better view of the progress of the roof thus far. The crew has already done some prep work on some other areas where boards will be replaced.
Here you can see that the framing for the roof is pretty much done, and already that frame is solid enough to support at least a couple of guys. They are planning to leave the old roof in place, and just raise the peak of it. The space between the new and old roof will simply act as more insulation. They took off the downspout from the gutter at the top of the garage and have put it out of the way for the time being.
|
Working on the Patio Roof
In this movie, taken from the driveway, you can get an idea of what's involved in redoing the roof, and I'll also talk about some of the other work that will be done as part of this project. |
| Inside the Patio
In this movie, taken inside the patio, I'll show you up close the progress that's been made on the new roof, and you can watch the guys work as well. |
November 2
The work is continuing on the patio roof today. The weather is threatening, so I hope they are able to seal up the roof before it rains.
Looking towards the living room, you can see that the crew has got the plywood up on the new roof, and they have put tar paper down on top of that so that the rains that are expected shortly won't damage the new plywood. They have also put some temporary sealing at the edges of the roof where it meets the two walls of the two sections of the house.
Here is a view looking towards the garage wall. You can see that they have already put up some sealing plastic behind the new support stud along the wall. They still have to repair/replace the area in the corner where the old water damage was, but that can wait until the weather clears.
|
The Roof is Up
In this movie, taken in late morning, shows that the plywood roof has been put in place. The crew has gone to get some lunch and some additional paper to seal the crack at the peak of the roof. The movie pans around the patio to show the current state of construction. I can report that the crew returned and sealed up the peak before it started to rain and they knocked off for the day. |
November 4
It rained all day yesterday, November 3rd, but it cleared up last night and guys arrived here very early this morning. They have been hard at work all morning, putting up the new siding in parts of the patio and also shingling the roof.
|
The Major Roof Work is Done
I took this movie after the crew had been here for a while today working on the roof. In it, I'll survey around underneath the new roof, and partway through the movie you'll hear them working up above me. The only major thing left to do with the roof is to put in the skylights. They have arrived, but the crew has yet to cut the holes in the roof for them. |
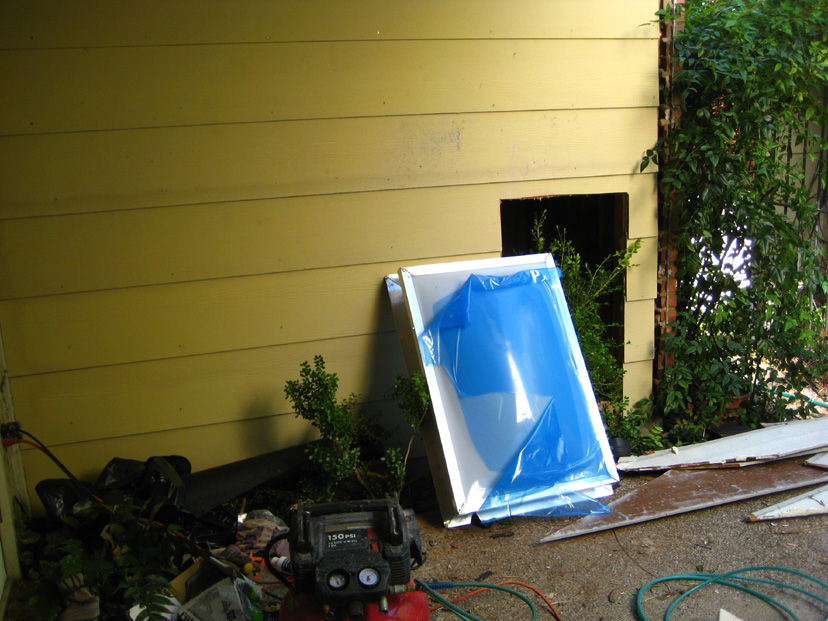
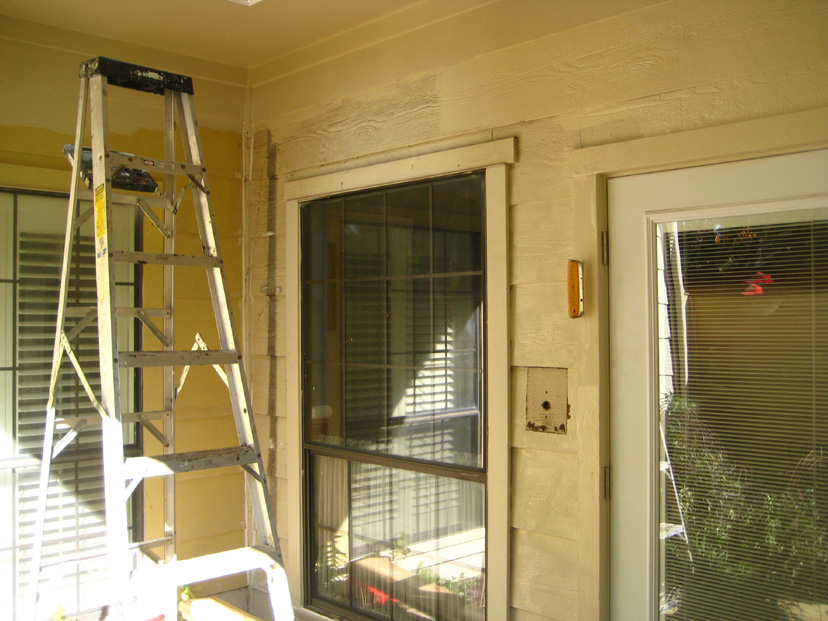
In this picture, you can see that the new boards are up along the garage wall, and the stud has been cut from the opening where the door to the new little storage area will be installed. You can also see one of the skylights that is going to be installed on the roof.
Here we see that the damaged boards in the upper corner of the garage wall have been removed and the new siding installed. (It will all be painted, of course, to match the existing color of the house>) You can also see the underside of the new roof before it is closed in.
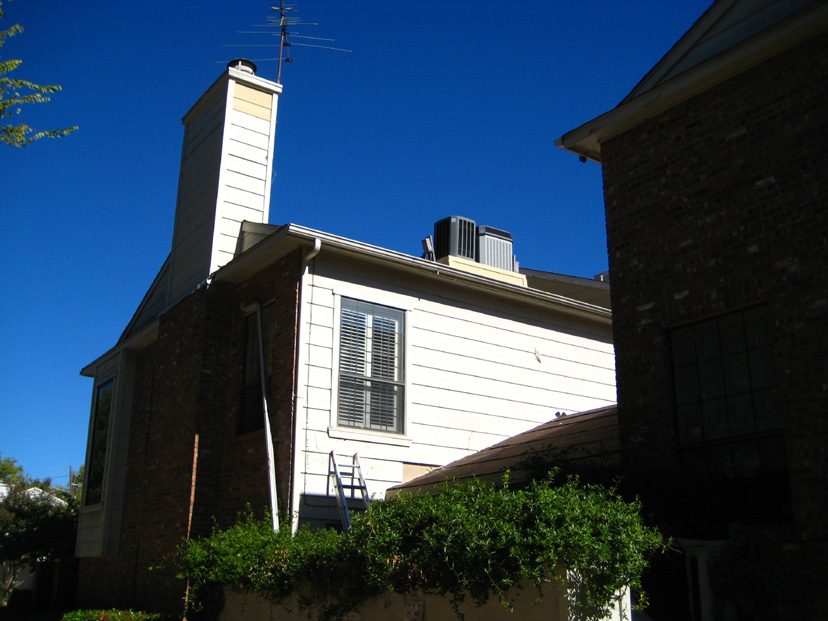
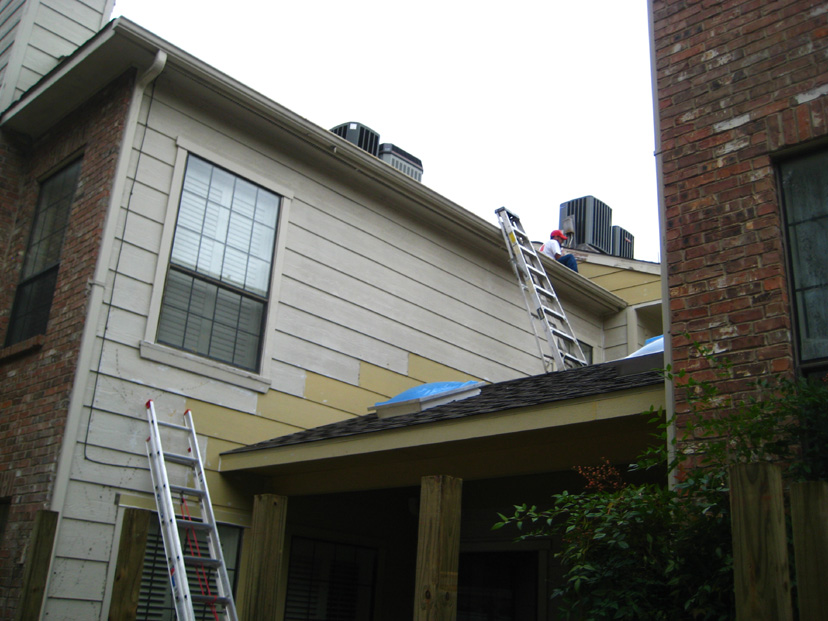
I took this picture from out in the driveway to show you that in addition to putting in the new patio roof, other members of the crew have been busy repairing and patching all the places I'd pointed out to Jack where the existing siding had deteriorated. Look towards the top of the chimney enclosure and you'll see some of these new boards. The box on which the air conditioning units sit has also been repaired.
And here is a shot of the patio roof. It is pretty much complete, except for the skylight installation. Jack wants to be here for that, since there had been a problem with the skylights that were ordered. They won't be installed for another week or so. You can also see that I had the boards replaced on the side of the roof of the unit next to mine. They were falling down, and water was going to be getting in, so, even though I'll have to eventually seek reimbursement from my neighbor, I wanted to go ahead and do it to ensure that no water damage would get started. (I've asked Jack to break out the cost of that bit of work so that the next time the townhomes do siding repair and repainting, I can get my reimbursement- since that wall is part of my neighbor's unit.
April 29, 2011
There is a long hiatus between the last pictures I took of the patio roof part of the exterior project and the pictures that I took today. I suppose that recording the finishing touches just wasn't important enough to warrant lots of pictures of the process; after all, painting is not that interesting a subject. It took a while for the windows to arrive, and I had Jack back a couple of times to touch up some missing items. He also had to return to install the little storage room door that he built. So although the work on the patio was actually completed late in November, but I just never got around to taking pictures of the finished product until now.
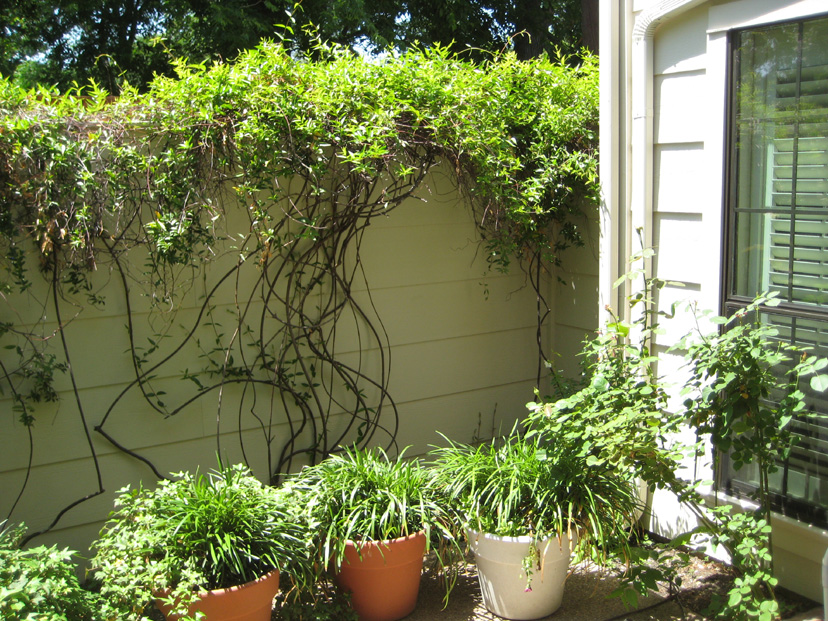
This first picture looks towards the northwest corner of the patio, where the Carolina Jasmine has done best. When it was laying in the patio, the portions nearest the gate got the roughest treatment from the crew, and so that end of the wall isn't going to be fully covered again until next year. Fred has already been helping me plant new things in the patio.
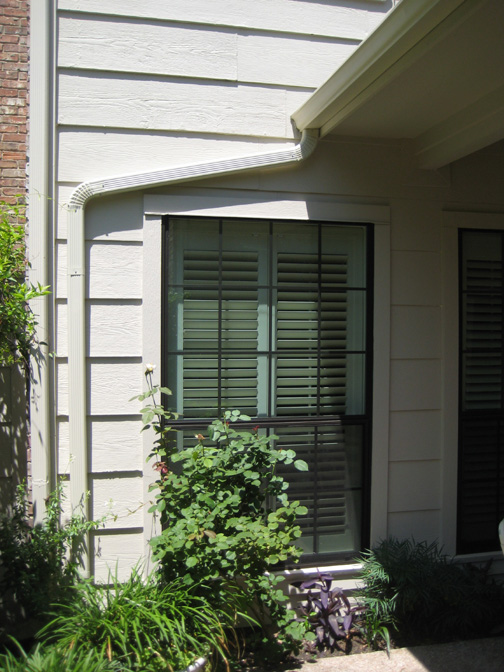
Moving clockwise around the patio, this one of the new windows that have been put in. They are much easier to open and close, and of course the seals are intact so there is no condensation inside them. You can see that there is a new gutter at the outer edge of the roof and a new downspout to carry water from it out to the driveway. There is one more thing Jack is going to do- install a screen system at the outer edge of the roof line reaching down to the ground. He has been busy on a job in Houston for the first part of this year, but when that is finished we'll deal with the screens. I want to be able to close them in the summer to keep bugs out, and end up with something much like the screen-covered pool areas you see all over Florida and in the Dallas suburbs. I want some system that would enable me to easily put the screens up in the spring and take them down in the fall, and also open and close them to allow access to the part of the patio where the planters are and also the back gate. I hope this gets done in the next month or so.
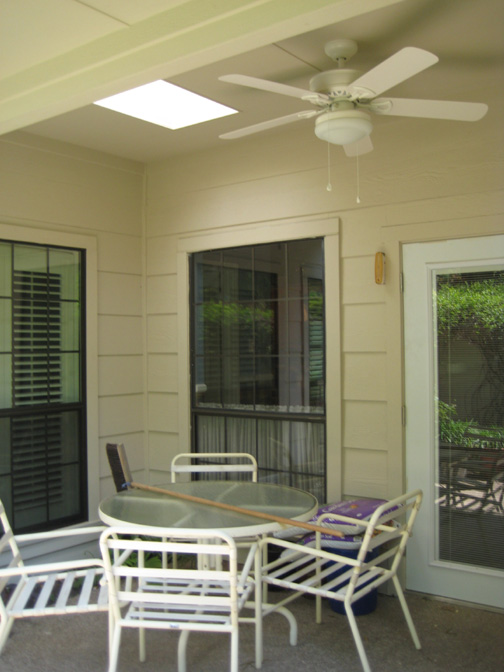
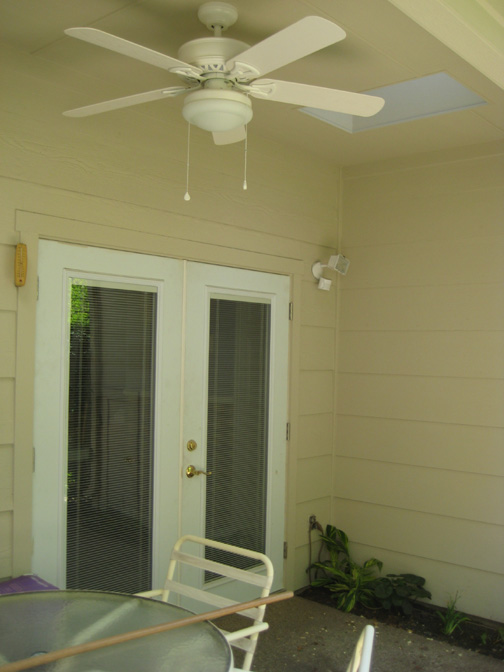
This is the front corner of the new covered patio area. You can see one of the skylights and the new ceiling fan. I have brought the patio furniture back out here, although it still needs a good cleaning.
Continuing on around, this is the southeast corner of the patio. The security light is new and there is another skylight. And, of course, all the boards damaged by the ivy that used to climb up that wall have been replaced.
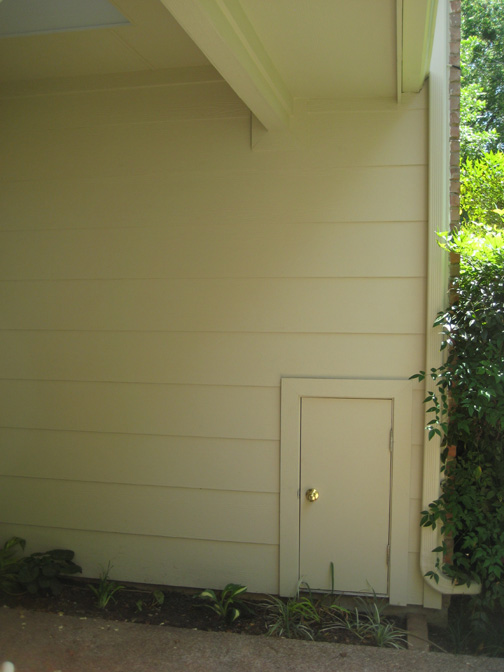
There is the new door that Jack had made to allow me access to the storage area under the back stairs. It locks, so that things I store in there (patio cushions, gardening stuff and the like) will be secure.
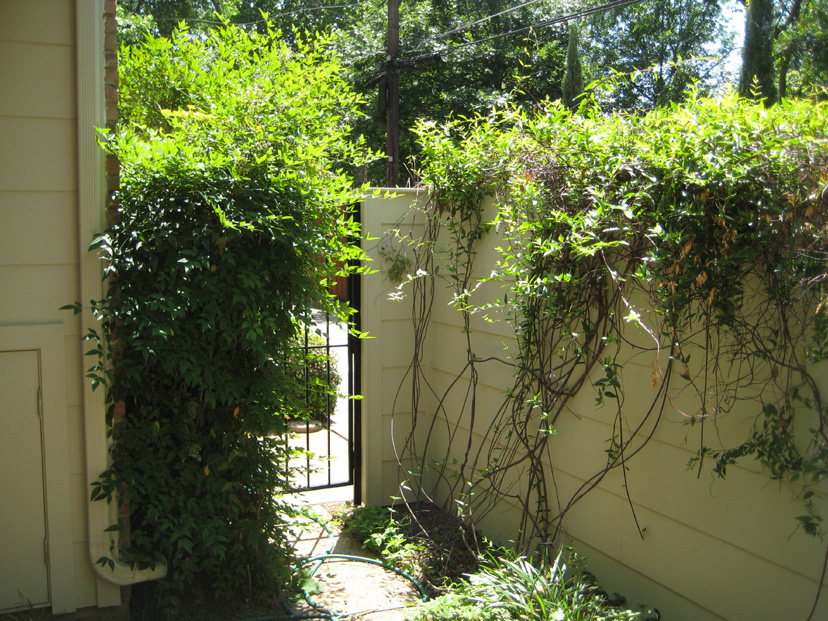
Finally, here is the southwest corner of the patio- the other end of the new wall from the first picture. The gate was installed quite nicely and it works fine. The Carolina Jasmine is making a good comeback; it is already much more full than it was when we put it back up in January.
|
A Tour of the New Patio
Perhaps this movie will make all the changes to the patio a bit easier to grasp, as it begins where the last picture was taken, at the gate, and goes counter-clockwise around the patio showing all the elements of what's been changed and added. |
The New Patio Fence
Once the new patio roof was essentially done, and most of the siding repair elsewhere on the house completed, it was time to tackle the patio fence. As I said before, the old fence will be entirely removed and a new one built in its place. This necessitated that I take down the Carolina Jasmine from the fence, and I did that on Sunday, November 7. It was quite a project and I needed Fred here to help me lower the vines onto the patio as carefully as I could. It was quite a job, and I just hoped that the jasmine would survive the trauma.
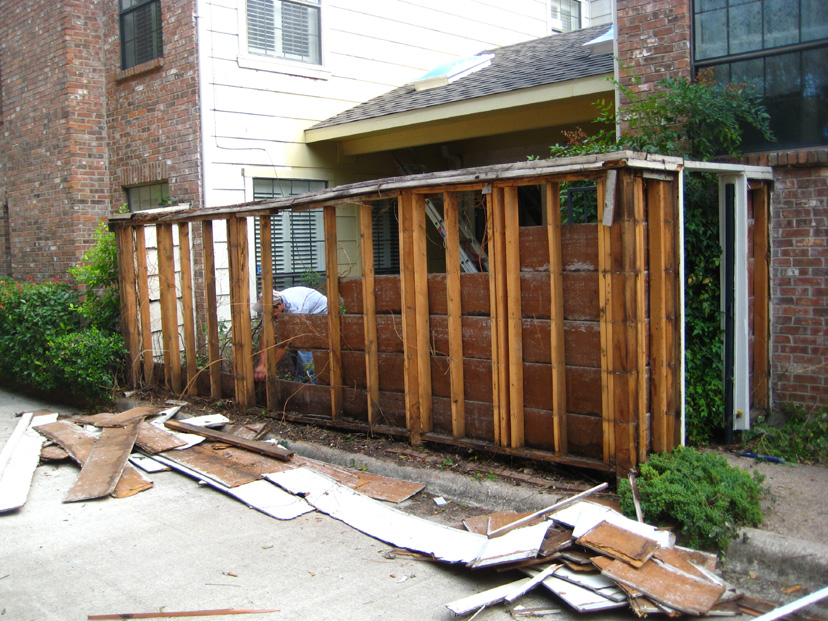
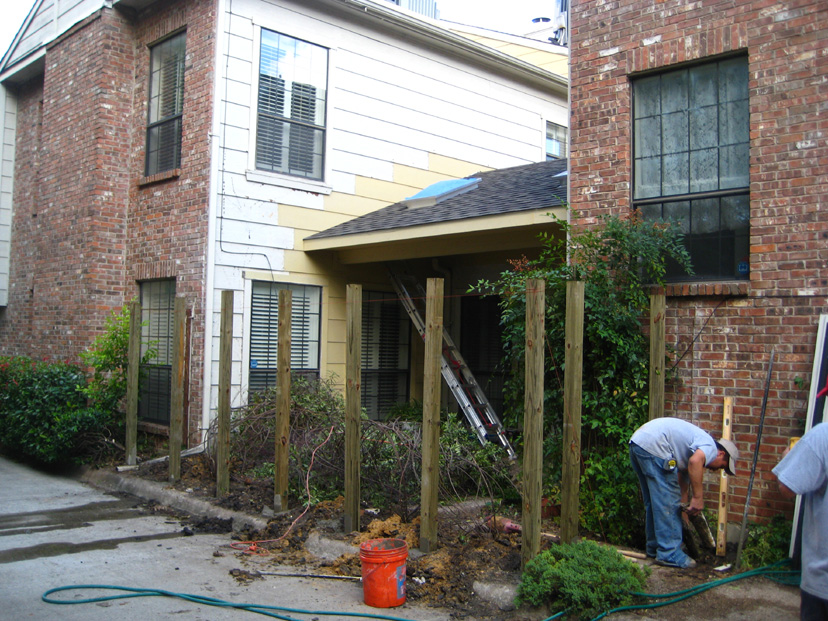
November 10
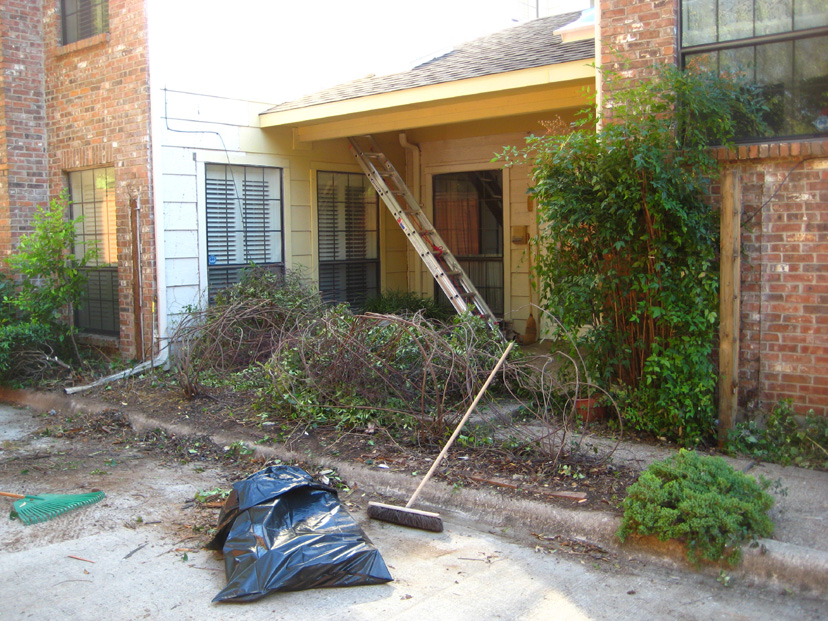
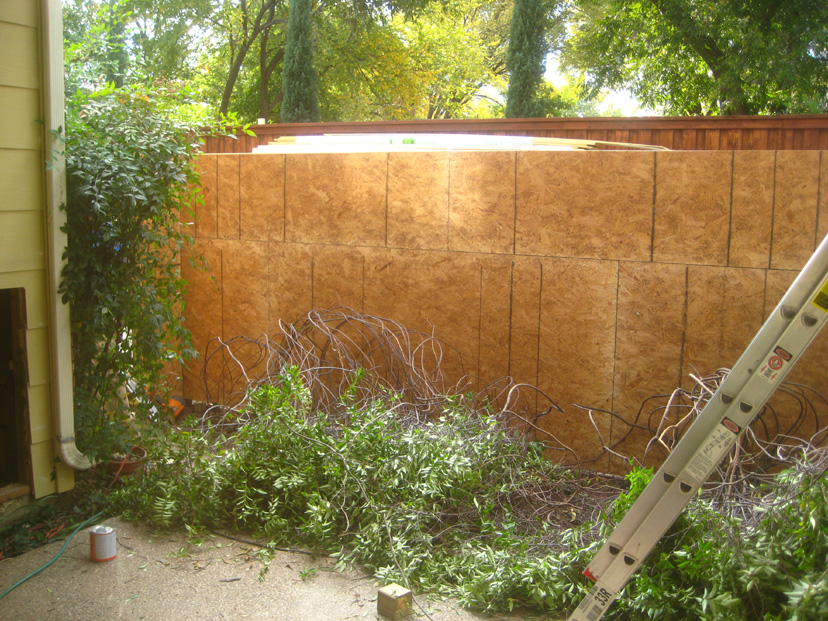
It is early on the morning of Wednesday, November 10, and I have come out to take a couple of final pictures of the old patio fence before the crew arrives. This view looks towards the northwest corner of the patio, and you can see how I've taken down the vines and laid them on the concrete floor of the patio. When Fred and I were pulling them down, we found that some pieces of the rotten fence literally came off in our hands- just another indication of how needed this new fence has been for some time.
This view looks towards the gate to the patio. I know it is going to be tough to try to keep the foliage out of the way of the crew, as they are still having to come into the patio to do work on the underside of the roof. They will eventually be inside the patio replacing the three windows as well, and all of that will need to be done before all the painting is done. And since I can't put the Carolina Jasmine back up on the fence until it is painted, this means that it will be well into December until I can rescue them from their ordeal. Fred says they are tough plants, but we shall see.
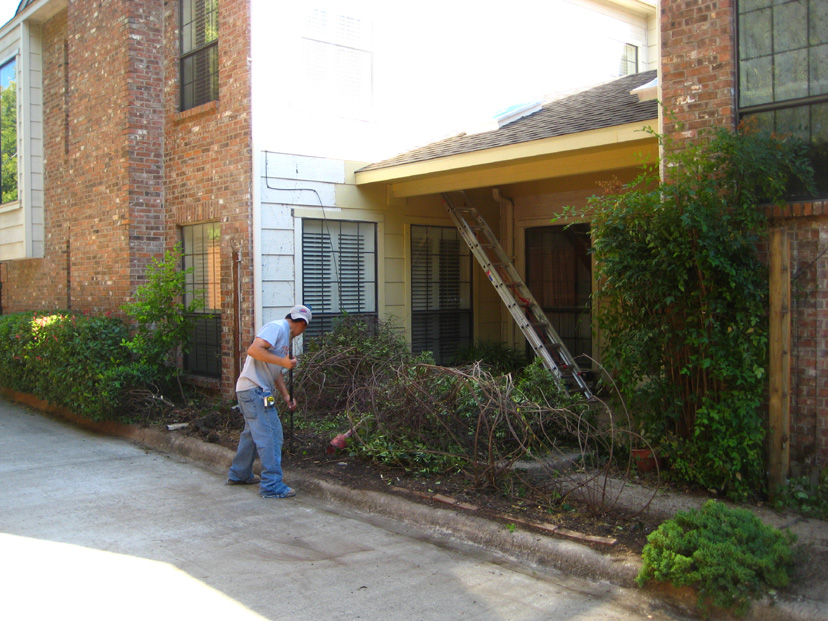
The crew has arrived and a couple of them are beginning to take down the fence. In this picture, you can also see the patio skylights that were installed on Monday. They still have their protective film on top, and that will remain until all the painting is done and the project is almost completed. There was no way I could move the juniper ground cover that you can see at the bottom of the near corner, so I don't know how well it will do either. Once I take a few more pictures, I need to go over and take down the variegated ivy that is climbing up where the patio fence meets the wall of the garage. I'm not worried about that plant; Fred says it will come back from its roots quickly enough.
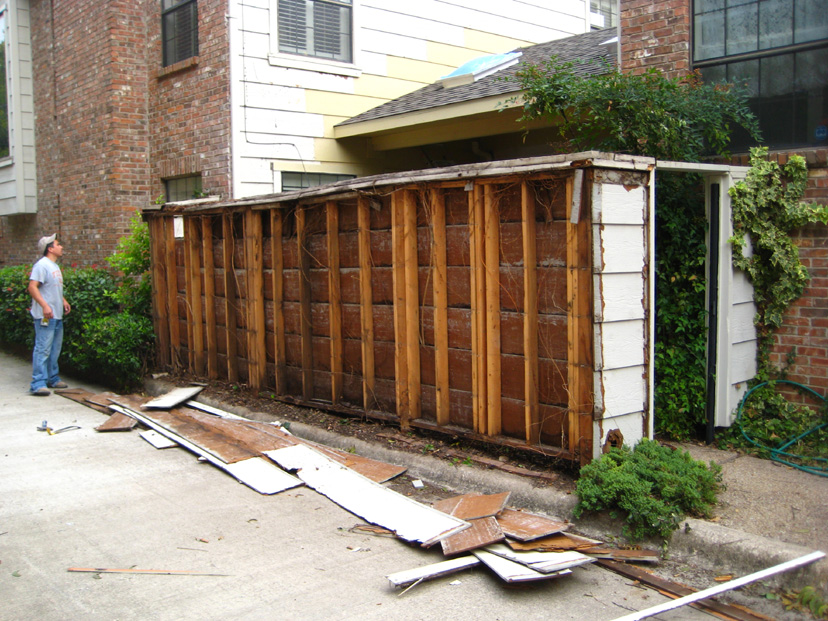
All of the outside boards have been removed, and you can see the structure of the fence. None of the studs you see were actually anchored in the ground. They sat on a 2x4 that stretched from the two corner posts which were anchored in the ground. But they were just buried in a small amount of cement, and twenty-five years had caused all that to deteriorate. You can also see how the Carolina Jasmine had sent vines actually inside the fence, working its way through the deteriorating siding boards.
Now they are removing the inside boards. You can see how rotted the top of the fence is; in places it is just falling apart as they take off the siding. In between pictures, I am helping them get the dead vines out of the way, and haul off the debris to the dumpster which is again parked behind my garage.
All the boards are off, now, and when they went to start taking the vertical studs down, one whole section simply fell outward. It had actually been held in place by the horizontal siding boards. As you can see, the gate and gate brackets have not been taken off their wood posts yet. I think they plan on simply taking the whole assembly off at once, leaving it attached to the wood so that later on they can match the height to the new fence and reinstall it.
There. The entire fence is gone, save for one post near the garage that they have left as a starting point for measuring the position of the new posts. Now you can get a better view of the Carolina Jasmine laying forlornly inside the patio. If you are wondering about that cable dangling in front of the living room window, that is my television cable. When we had the switchover last February, I got cable for the first time, and they had to run it all the way from the back corner of the garage to the attic to connect up with the house cable system. It had snaked along the garage wall, around the corner into the patio, up along one of the old trellis beams, and then along the side of the front of the house and up by the downspout to enter the attic under the eaves. It, too, is laying in the patio; when they are done, it will go across the top of the new roof where it can't be seen.
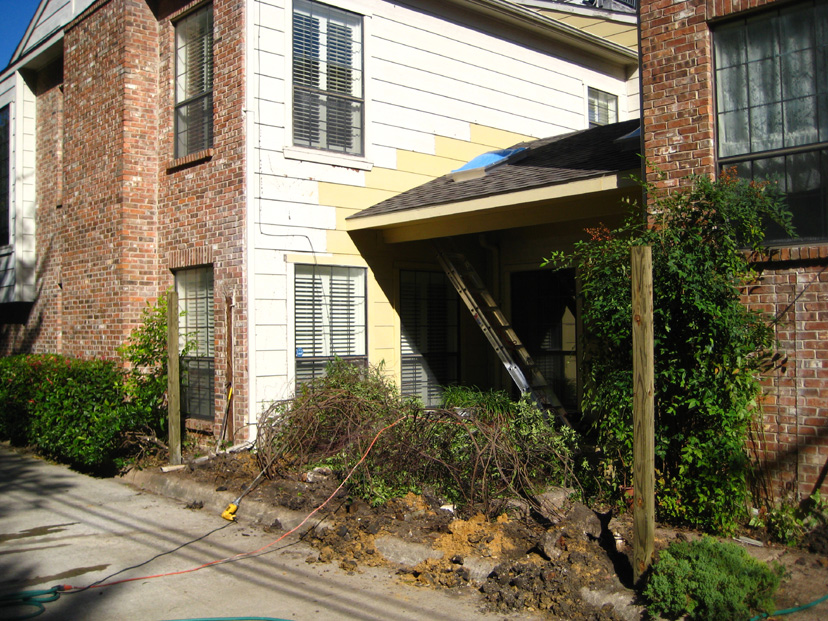
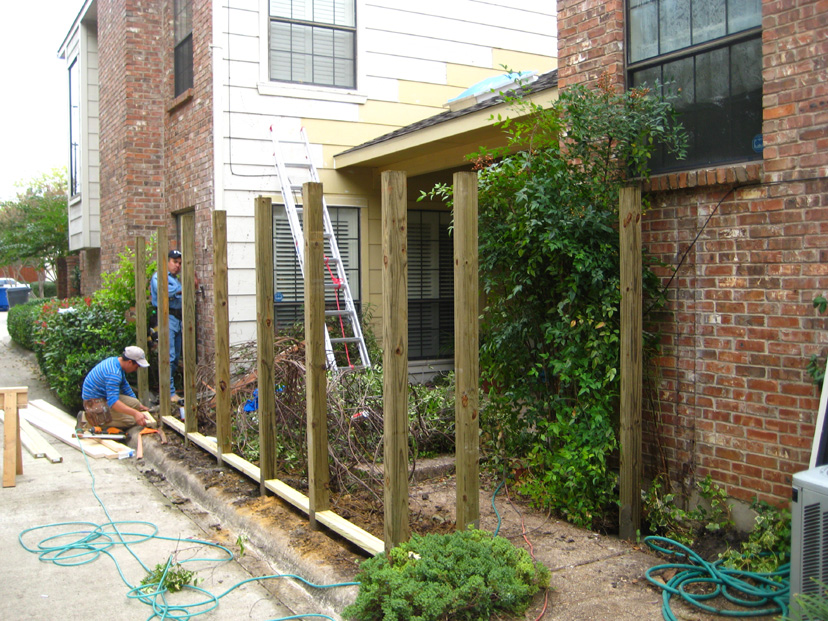
All the debris has been removed and one of the crew is loosening the soil in a line where the new posts will be installed.
It's late afternoon now, and they have begun positioning the support posts by measuring where the two corner posts will go. For now, they are just digging holes and dropping the posts into them. Later on, they will align them precisely and set them in concrete.
This is the last shot of the day. All the posts have been positioned, although they have not been set in cement yet. But each one of the posts that you see will be anchored in the ground and set in concrete. Jack assures me that this new fence will last the lifetime of the house, and won't be going anywhere no matter how much you try to move it. The crew has done a lot of work for one day.
November 11
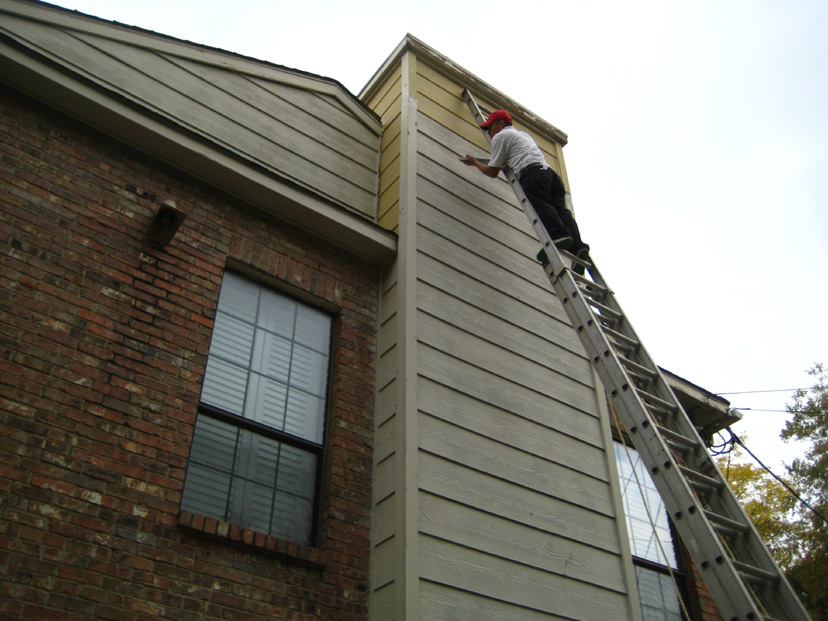
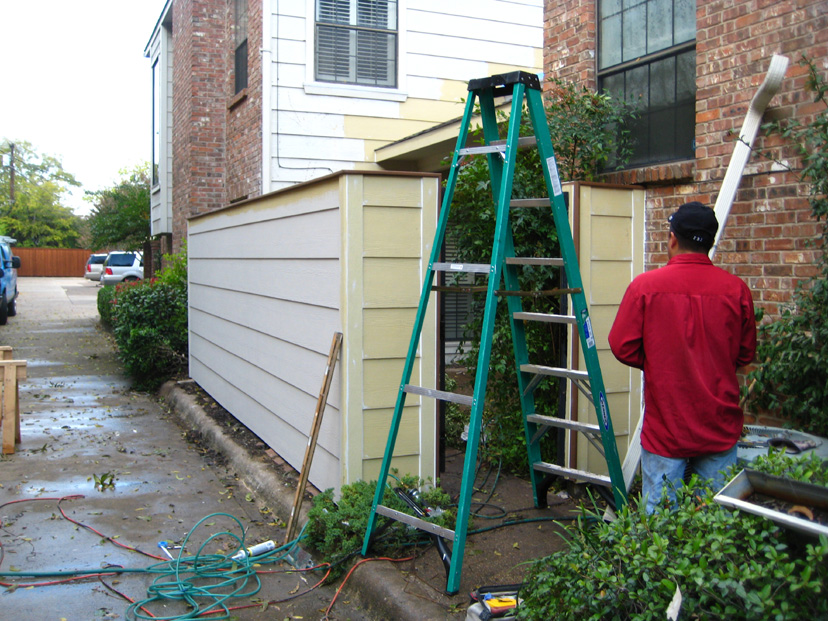
Today, work on the new fence continues. The crew is simultaneously working on repairing or replacing siding elsewhere on the house, in preparation for painting.
The crew has done a lot of work this morning. Each of the posts that hold up the new fence has been cemented into the ground and, as you can see here, they have also put in the spacers at the bottom of the fence. These spacers are raised up off the ground, and the siding will be too.
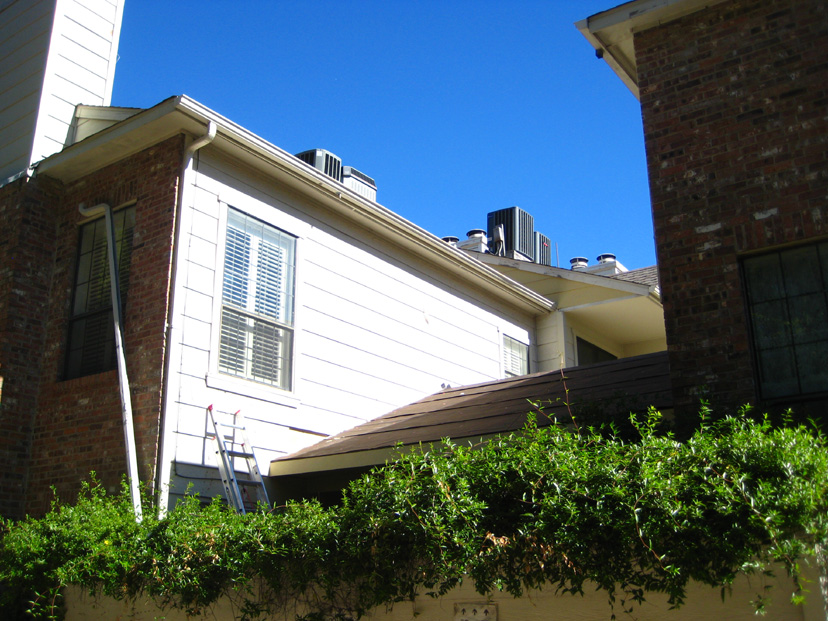
This picture shows one of the crew up on top of my roof, working on the new siding that is actually the facing part of my neighbor's roofline. You can also see the new siding that has been installed because of the new patio roof.
Here is yet another crew member working on the deteriorated siding near the top of the family room chimney enclosure. They did an excellent job of finding all the place where repairs were needed.
The crew is finishing the framing for the fence. They have added more studs in between each of the posts anchored in the ground. These are supported by the wood spacers at the bottom. They have also put the top board on the fence. This top board will have an additional treated piece on top of it. In the background, on the side of the garage, you can see more of the siding that has been installed.
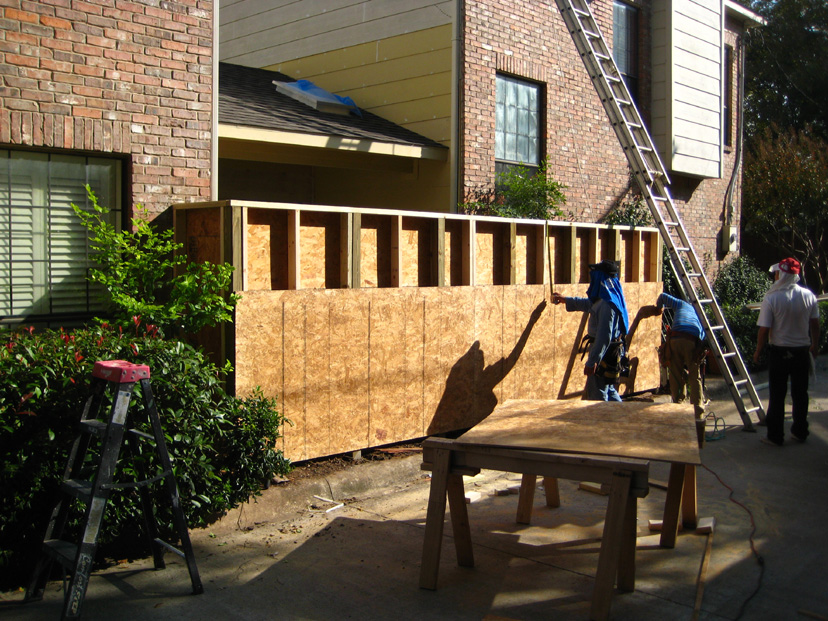
Instead of just nailing the new siding to the support posts of the fence, as was done with the original construction, Jack is installing plywood on both sides of the fence to seal the interior. If I am a bit more diligent that I have been about keeping the tendrils of the jasmine from getting between boards, which will be an easier task since the fence does not get close to the ground, I should never have interior invasion again- which is what contributed to pulling the old fence down.
The fence structure is almost complete, and when the crew comes back from lunch, they will be working around by the gate side of the fence.
Here they are working around by the gate. They measured precisely so that the old gate and hardware can simply be reinstalled. Others of the crew are still working on siding elsewhere on the house.
Here is what the new fence looks like from the interior of the patio. I guess I shouldn't really be calling it a fence, since it is much more a solid wall now. The jasmine seems to be holding up well, although it is impossible for the crew not to step on it occasionally.
Jack is really being thorough here. At the bottom of the fence, they have installed a u-shaped fitting of galvanized aluminum. This piece wraps around the entire bottom of the fence, and will ensure once again that moisture, dirt and vegetation will have a very difficult time causing deterioration at the bottom of the structure. All of this will eventually be covered with siding, of course.
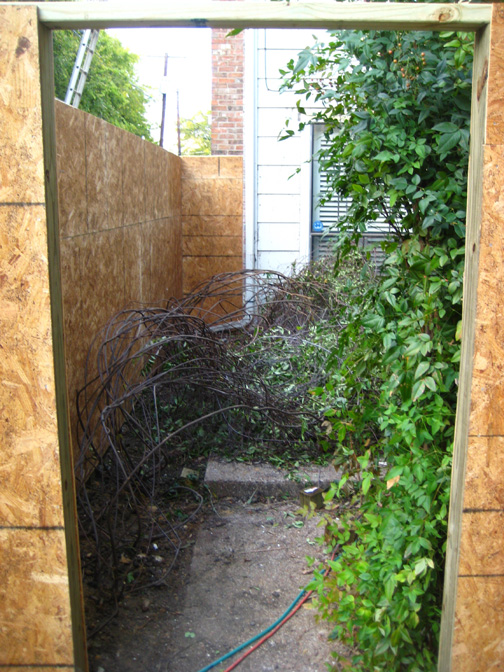
This last shot for today, I am looking through the gate opening into the patio, showing the other side of the fence. You can also see the jasmine and how it takes up a good portion of real estate inside the patio.
November 12
This is the last day of major construction work on the patio-siding project. All that will remain will be to do the electrical, including the ceiling fan, move the TV cable and paint everything.
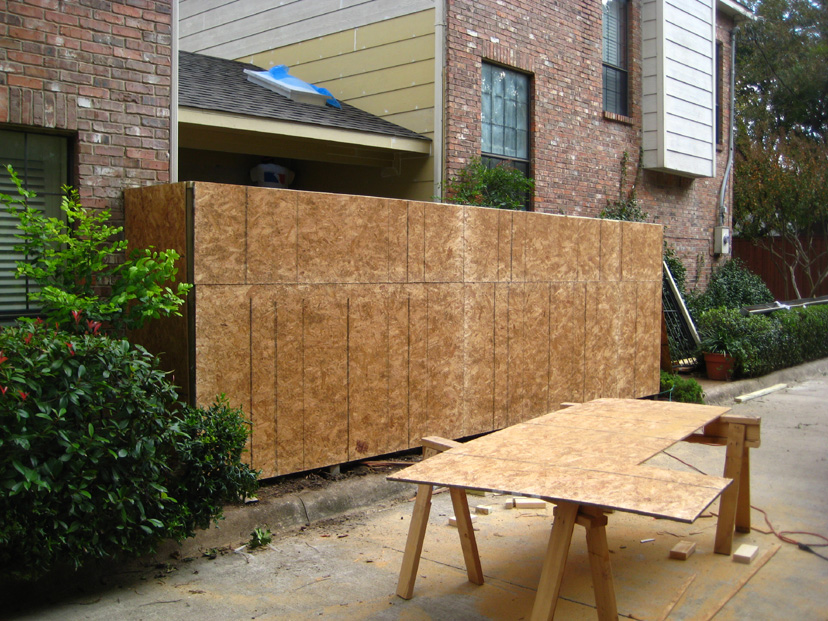
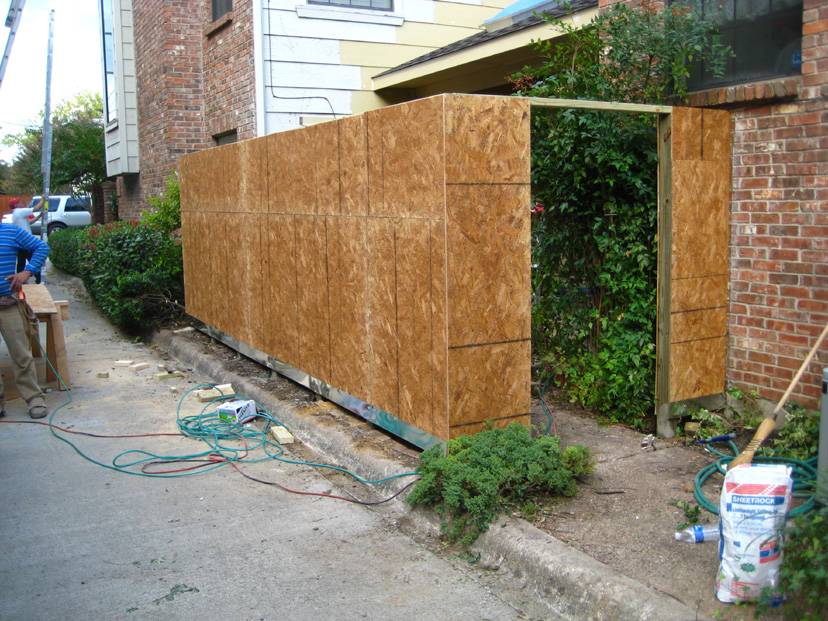
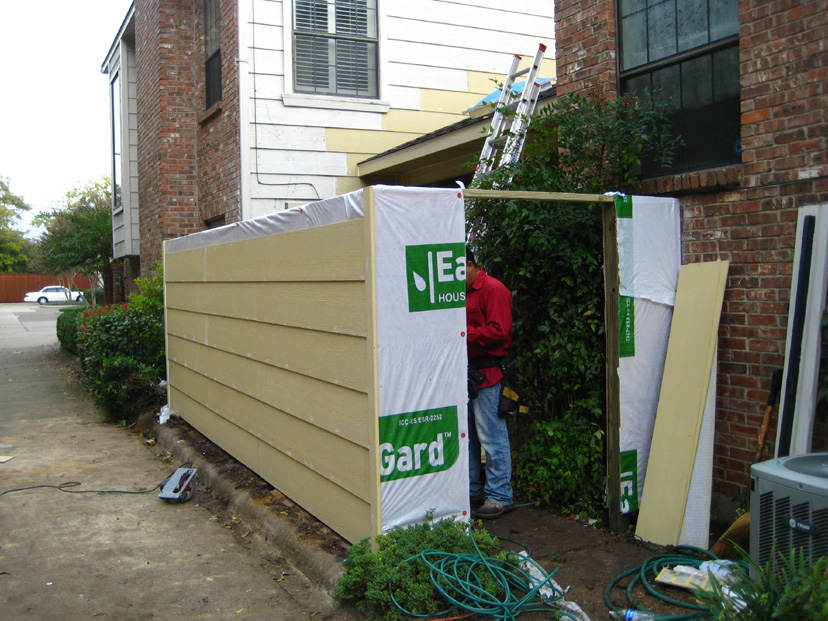
I volunteered at KERA this morning, and when I returned I found that the crew had finished the outside of the fence. Jack had them put some of that plastic housewrap material over the entire fence save for the bottom. I think it acts as a moisture barrier for the inside structure. Then they installed the HardyBoard panels- just like those on the house itself. They also did some of the trim work on the outside. Now they are working around by the gate and on the inside.
Here is the outside of the new fence. It is clouding over now, and it looks like we may get a rain shower. You can see the second skylight in the patio roof here, and they are also working on some of the siding repairs on the side of the garage and family room.
This picture was taken inside the patio. I wanted to show you the finish-out that they've been doing on the ceiling underneath the new roof, and how the skylights are being finished. Jack is being very meticulous here, preparing for a time when the covered portion of the patio might actually turned into a room. He wants the ceiling to look as nice as possible. We still have to install the new windows; there was a snafu at the factory and they had to be redone, Jack tells me.
Here is more of the inside of the patio. They've done a lot of replacing, and I've had them remove the intercom that I never used much. I'm debating on the French doors, whether they should be painted to match the siding, but I think I will leave them white for now.
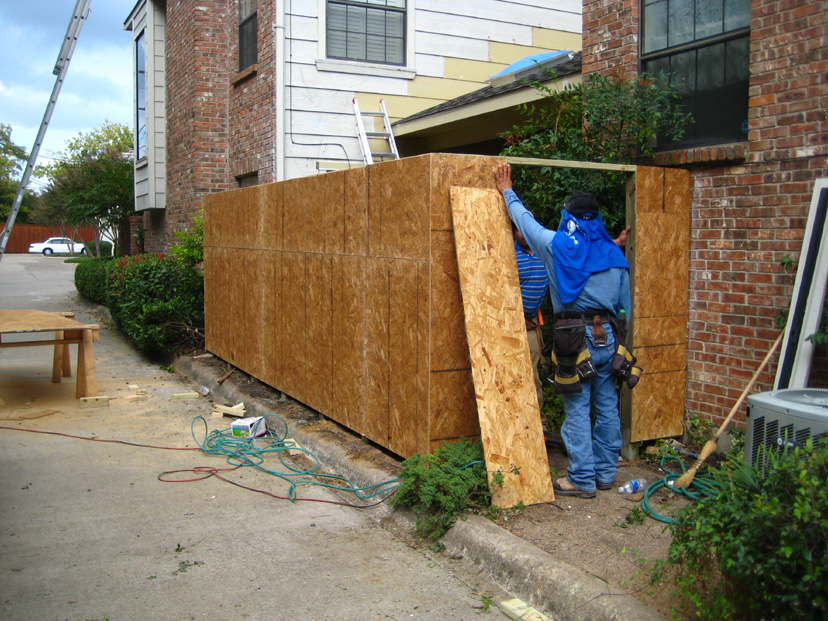
On the garage wall of the patio, they've finished the board replacements, and the opening for the new storage area is ready for it's door and trim work. They have not begun on the frame and the actual door yet.
Well, we did have our shower, but it moved off quickly, and when the crew got back from lunch they continued work on the patio wall. It is getting late, but they have done an incredible amount of work, finishing the wall and putting the treated top board on it. Now they are working on reinstalling the gate; they have to measure carefully to get it to fit and get the mechanism to line up.
This is the last shot of the day, and the patio wall and gate are essentially complete. There is painting to do, of course, but they are going to wait on that until all the finish work inside the patio is done. But since this brings to a close the actual construction phase of the renovation, this will be the last picture I take until I take a set of the completed project. I'm told the windows will be another week or so, and so the crew will be leaving for a while until they are ready.
April 29, 2011
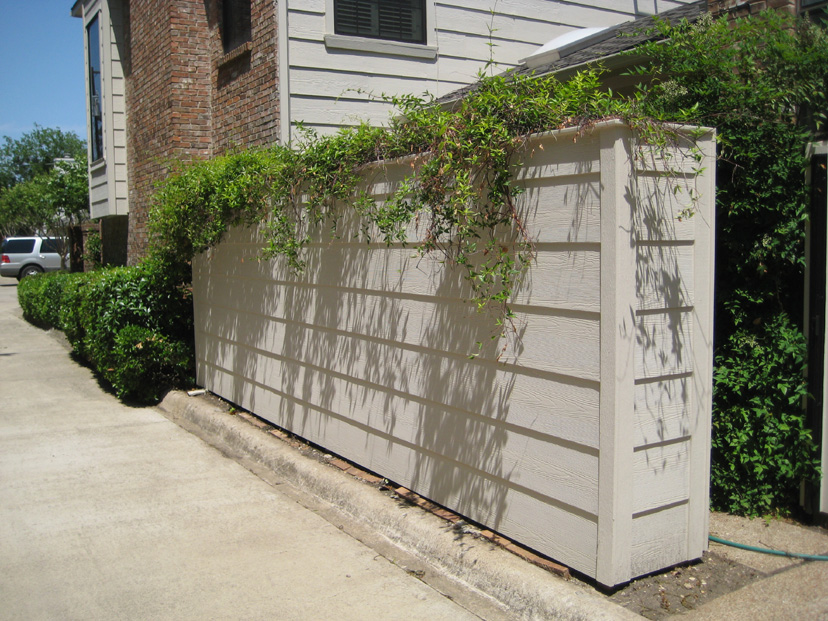
Once again, there is a long period of time between the last picture I took of the actual construction of the fence, and the pictures I took today of the finished product almost four months later. Even though these pictures were taken in 2011, they belong here, so you can see how the project was completed.< P>
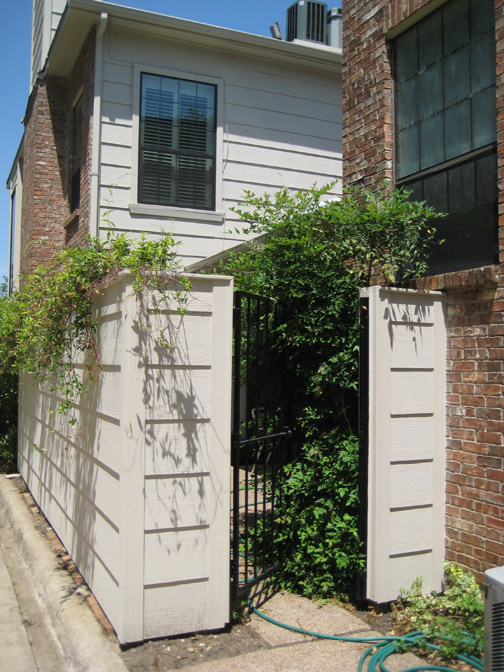
This picture looks in to the patio through the gate, which has now been reinstalled. You can see that the trim is a little different than it used to be, but it looks much better. In the background you can see one of the new windows on that side- the upper one in the master bedroom.
Here is the new patio wall. It looks very good and is much sturdier than the old one. You can see that the Carolina Jasmine is back up on top of the fence. I had Jack drill some holes in a row on either side of the top board so that now, to secure the vines to the top of the fence, I have only to thread some coated wire through the holes, wrap it around the portions of the vine I want to hold on top and then thread it down through the hole on the other side. This means I won't have to nail in brads to hold the vines up, and I can hold a large amount of foliage more securely.
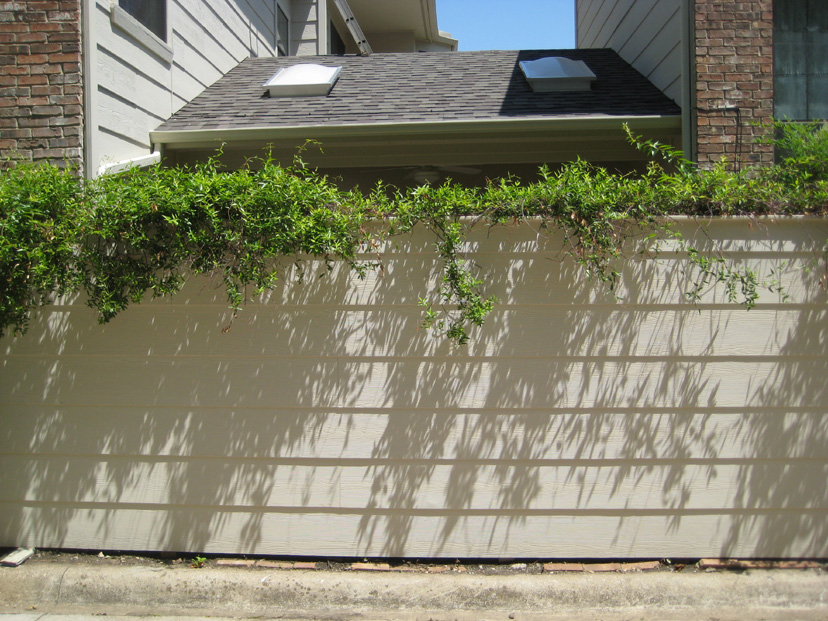
Here is a picture of the wall with the new patio roof and skylights in the background. My neighbor is having his own chimney enclosure rebuilt today, and his workmen are using my patio roof as a stepping stone to get up on the high roof. I told them to go ahead since their ladder wasn't tall enough to reach all the way to their roof from their patio.
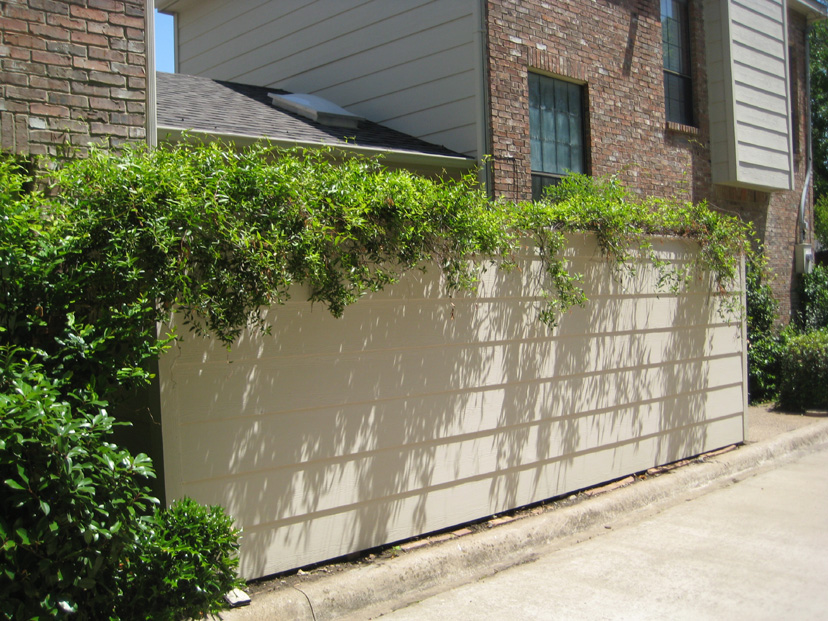
Finally, here is a view of the new patio wall looking from the front of the house towards the garage/family room. Some of the jasmine is already coming back, but I suspect it will be next spring before the rest of it fills in.
November 8: My Automobile Accident
It has been a long, long time since I've been involved in an automobile accident with another vehicle; this would be the third time in my life and, as it turned out, the only time that both vehicles weren't simply repaired. The first time was in high school, when I was leaving a shopping center driveway; I began my right turn as a car coming along slowly had his turn signal on to enter the driveway I was leaving. He decided not to turn and ran into me. The second time was in the late 1970s in Chicago; I slowly rear-ended the car in front of me when I couldn't stop on ice. The third time, and by far the worst, was Monday, November 8, this year.

|
The stretch of Stemmons Freeway between Inwood and the I-35/Airport Freeway split can be a treacherous one; Fred and I have seen accidents- bad ones- occur here before. The problem is that drivers coming from downtown have to decide whether they want to continue on I-35 North or go towards the airport and Fort Worth. Cars in the fast lanes going to I-35 have to merge three lanes right; cars in the slower lanes wanting to go to the airport have to merge three lanes left. Even though drivers have plenty of warning, most seem to wait until the last minute to make their switches, and Fred and I have seen at least two bad accidents right near the split because drivers waited too long. It is trickier for those of us entering the expressway at Inwood. Once we have merged into the slowest lane from the onramp, we have only three-quarters of mile to merge left to head to the airport. That is what I was doing this Monday night; I was heading to the airport to pick up Steve and Mario who were returning from a trip to Florida.
|
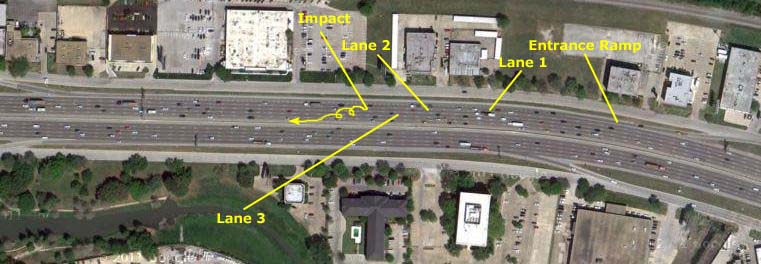
I had made my entrance onto the freeway successfully, and I was in lane 1. (The entrance ramp lane continues until it becomes the exit lane for the next exit.) I checked to see if I could move into lane 2. There was a car coming up in that lane but nothing behind it. So I waited for it to pass; when it did, I checked again and the lane was still clear, so I began to merge left into lane 2. I was most of the way into the lane when I glanced in my driver's mirror- all I could see was a gigatic headlight. Then I was hit. As is usual in these situations, it all happens so fast that it's a blur. Only later was I able to reconstruct what happened. There was a lot of banging and I recall being hit again and spinning; seconds later I found myself at rest a couple of feet from the concrete divider in the center of the freeway, still pointed in the right direction and, fortunately, entirely on the shoulder. My first recollection was of cars zipping past me on my right, when seconds earlier they'd all been on my left.
What happened was this:
I was probably halfway into lane 2 when a semi that was merging right to get onto I-35 hit my left rear quarter panel. As my motion was to the left and his to the right, the impact pushed the rear of my car to the right and caused me to start to rotate. He was going only a little faster than me, so when I began to rotate I rotated in front of his truck, where he hit me broadside on my left. But instead of pushing me in front of him sideways, the fact that I had already started to spin and the fact that he was moving rightward simply accentuated my rotation and I spun out from in front of him to our left- the other three lanes of the expressway. I recall making two full rotations before coming to rest against the divider. Luckily, the traffic was only moderate for the time of evening, and no other vehicle hit me as I spun across the other three higher-speed traffic lanes. Had one done so, I would have been much, much worse off.
When I got my wits about me, I called 9-1-1 and reported the accident. The trucker, who had pulled over to the shoulder a quarter mile ahead did the same, and in a few minutes there were two patrol cars at the site. One pulled behind me and helped me get across the freeway to the right shoulder. The other met us where the trucker was parked. We did all the usual statements and, as it turned out, no tickets were issued. Texas being a no-fault state, it really didn't matter much. In any event, the trucker had lost a couple of lugnut covers and a few of the small lights across the front of his truck, and the left side of my car was pretty banged up. The tow truck came and picked up my vehicle and the police helped me get my belongings out of it and then they took me home. I'd called Mario and Steve to alert them to the fact that they'd have to take a cab home, and I called Fred to volunteered to come down. He did come down a day later; we drove up to his house so I could borrow his other vehicle to use until my vehicle was either repaired or replaced. I could have gotten a rental through USAA, but as we were going down to San Antonio in a few days anyway, I didn't see the need to have one sitting in my garage while we were gone.
By the time we got back from San Antonio, USAA had decided to total the car. Since I had left just a couple of things in it, Fred and I went down to the impound lot to get them, and I took the opportunity to take a few pictures of it. You can have a look at them if you click on the thumbnails below at left.
I mentioned to my USAA rep that I would probably buy another Hyundai; she hooked me up with three Dallas dealers that USAA has pricing agreements with. One was Freeman Hyundai where I had always taken my car when it needed service. After a few trips out there and one to a second dealer, I settled on a new 2011 Elantra. I had it by the first week in December, and I like it a lot. It's first trip was over to Natchitoches, Louisiana, on December 9th to visit Justin and Gary.
You can use the link below to return to the Index for 2010.
|
Return to Index for 2010 |