|
Return to Index for 2005 |
February 25, 2005 to March 29, 2006
The Florida Condo Renovation Project
For a long time, Ty and I have been discussing a possible renovation of the condo here in Florida. We first started talking seriously about it last summer. The major elements of the discussion were to completely gut and renovate the bathroom (replacing the tub with a large glass-enclosed shower), completely gutting and rebuilding the kitchen with all new appliances and cabinets and with granite countertops, moving the refrigerator across the room to recess it in the bedroom closet, reclaiming part of the alcove to build a new closet for the bedroom, new floor tile throughout the condo and, finally, new furniture and wall and window treatments. Basically, we'd have to gut the apartment to the walls and build everything new.
The budget would be about $25K, but both of us thought that it would, conservatively, add twice to three times that amount to the value of the condo. The time estimate was about two months.
Fred and I were here in November, and I suggested that we might start the project immediately after we returned to Dallas. This would give us about 70 days before we returned with Frank and Joe in February. But this ambitious schedule didn't leave any room for problems or delays and, in the end, we decided to wait until this year, and until Fred and I had gone home from our February trip down here with Frank and Joe.
So when that visit was over, and Fred and I returned home, I immediately booked a return flight so I could clean out the condo and put everything that I would be keeping in storage. That trip was scheduled for the end of February and the first part of March.
I might note that postponing the project until we'd completed our February trip turned out to be one of the best decisions Ty and I ever made. The project, instead of taking 70 days, took over six months!
On this album page, I have put the pictures I took when I was preparing the condo and then on my monthly trips down here to monitor progress and help make decisions. I have organized the pictures by date, and have supplied descriptions and a thumbnail for each picture. To view the full-size image, just click on the appropriate thumbnail.
February 25 - March 4, 2005
My first trip down here for the renovation project was Friday, February 25 through Friday, March 4. I flew into Miami and rented a pickup truck from Enterprise. I knew I would be hauling a lot of stuff from the condo to a storage unit, and a car just wouldn't do. As it turned out, they upgraded me to a larger truck, and that worked out even better.
Ron Drew insisted that I stay with him during the weeks I was down here, and I was grateful for that, for it meant that I could go ahead and get the condo all cleaned out as quickly as possible and not have to worry about leaving anything.
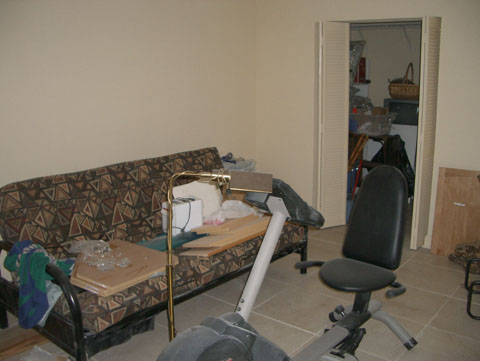
I rented a storage unit about halfway between my condo and Ron's house, and began the process of moving everything out. The major pieces of furniture that I was not going to keep were donated to Poverello, and they made a couple of trips over here to pick stuff up. The smaller items donated I took there myself. Everything else went to the storage unit, and it must have taken me ten trips at least to get everything moved. A few things, including the exercise bike, were left in the condo. The renovation crew would cover them and then work around them, but there weren't many of these things in any case.
My first set of pictures show the condo in various stages of getting everything cleaned out.
|
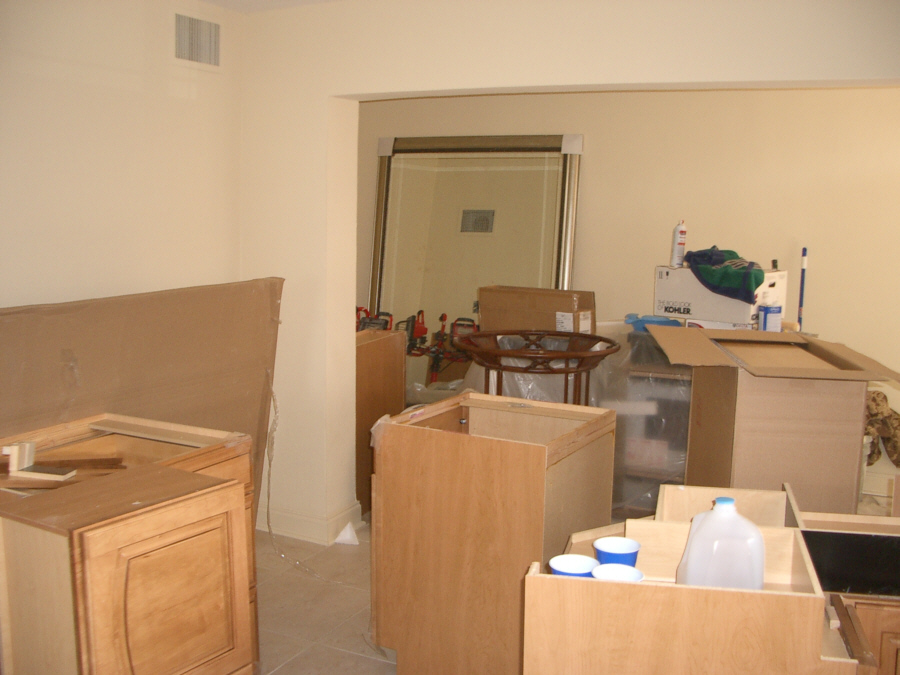
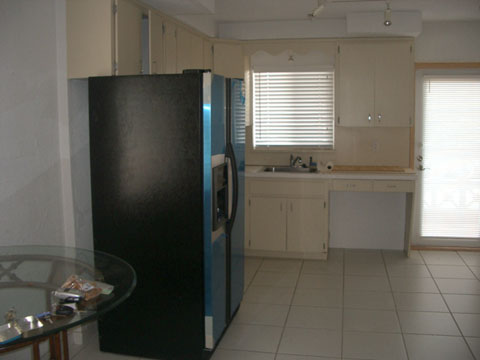
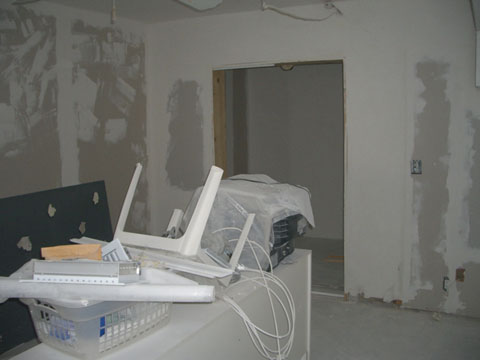
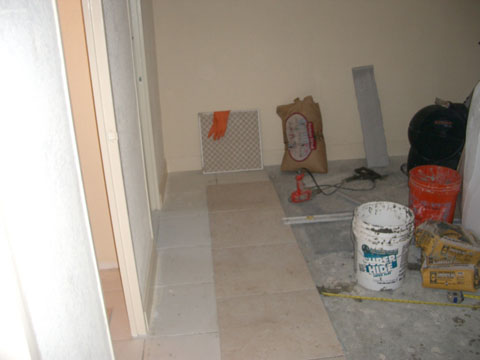
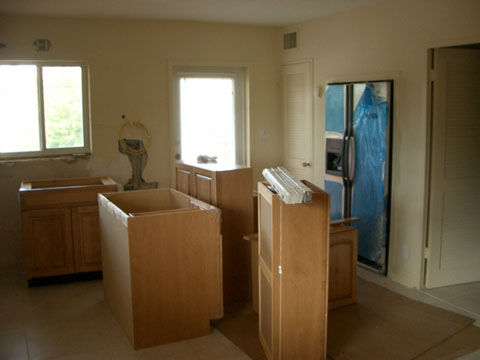
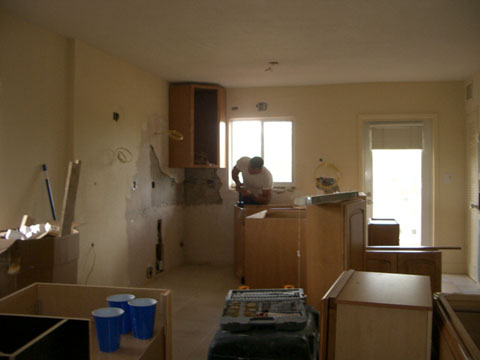
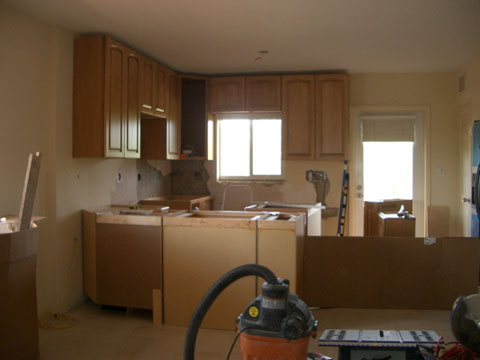
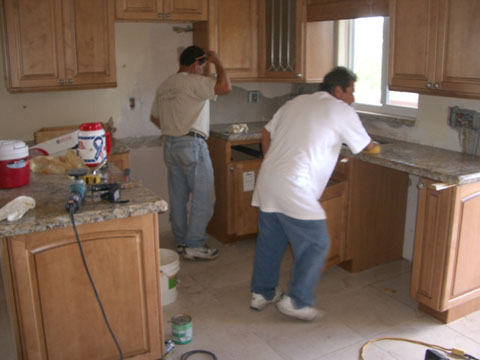
Here is the kitchen now that I have cleaned everything out of it. That's the new refrigerator already, since the old one had gone out a month or two ago, I had the new one delivered early. There was a lot more stuff in the kitchen than I had thought, and I filled box after box with it all. |
|
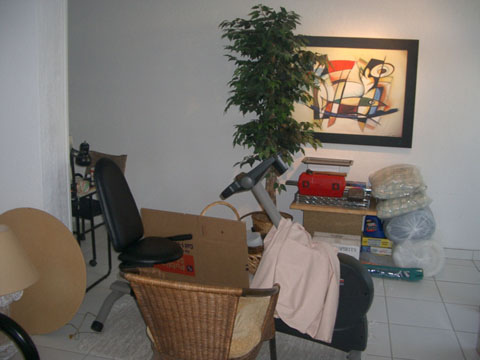
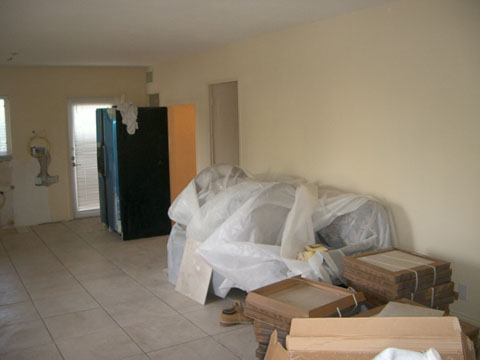
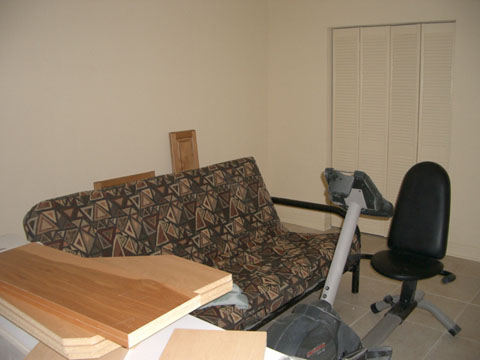
As I filled boxes and found things that I wanted to keep, I piled them in the living room so that I could take them to the storage unit. I am going to be taking the two Glockel pictures to Ron's house; I don't want to run the risk that they might get damaged in the storage unit. The exercise bike and the tubular metal chaise are going to remain in the condo during the renovation; they are too heavy to move. |
|
It is three days later, now, but I didn't think that fact important enough to create a new heading. I've taken the island apart and moved it. One of the last things to move was the big circular dining table. I've taken the chairs over already, but I have to be careful with the glass top. |
|
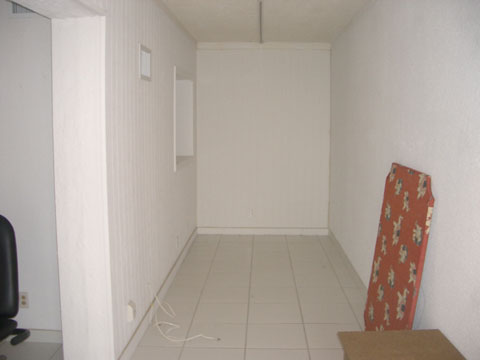
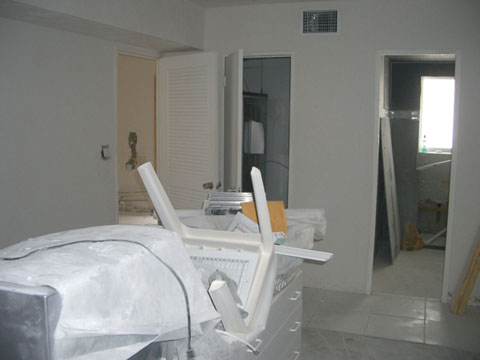
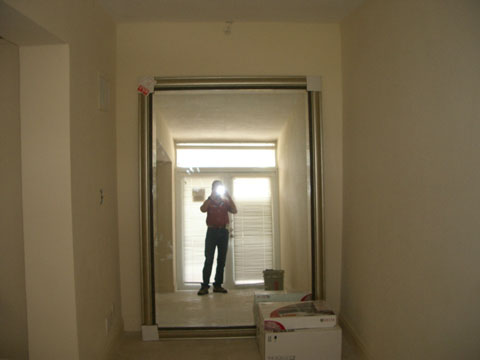
The alcove is all cleaned out now. I have donated the computer desk to the thrift store; I don't think it will fit in with the new decor. We plan to bring that back wall forward to create a new closet for the master bedroom. |
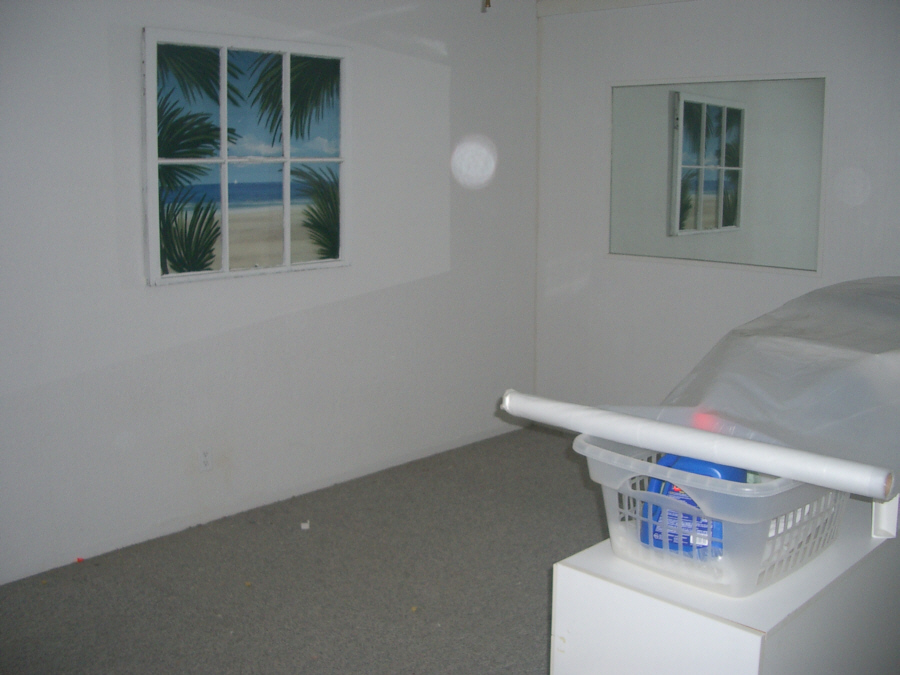
Here is the bedroom. The old bed and everything have been donated, but I plan to keep the old white dresser and nightstands, and use them eventually in the new closet to provide extra storage. I took the nightstands to the storage unit, but the dresser was way too heavy to move. The new closet will be behind the mirror you see on the back wall. I'm sorry that the beach window probably won't fit in to the new decor, but I am going to keep it anyway.
By the time my week was ended, I had completely cleaned out the condo. It was all ready for contruction to begin, but that wouldn't happen for another week.
NOTE:
If you have come to this page from the Index for either 2005 or 2006, you can use the links at the top or bottom of this page to return to the appropriate Index. Otherwise, you can return to the album page from which you came by clicking
here.
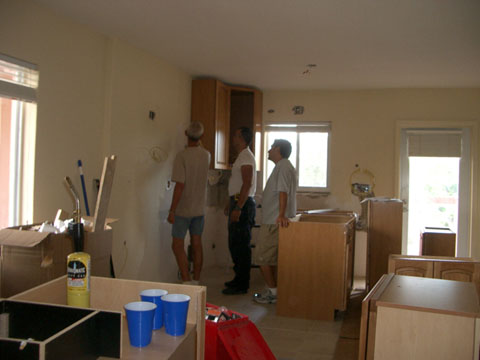
March 16, 2005
The couple of pictures in this section are not mine. I asked Ty to try to record as much of the work as he could for me. He did take some pictures, but I would have taken more, but then it's my own place.
|
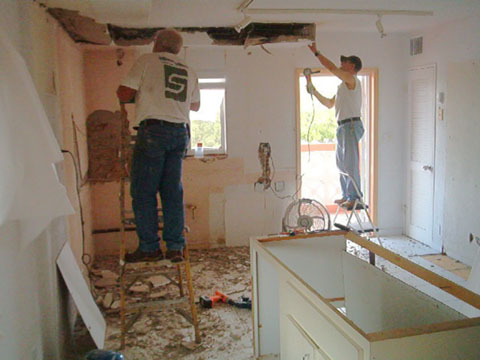
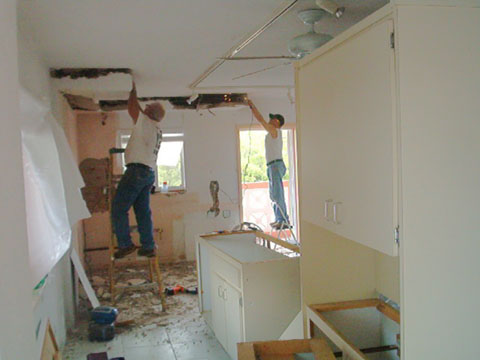
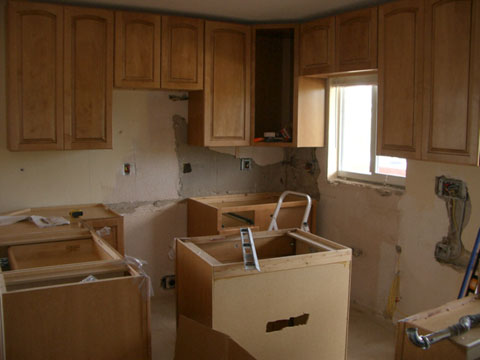
I guess this is the fun part of most renovations, tearing everything down. The work crew has taken out the cabinets, and are at work in tearing down the old soffit. The new cabinets will go all the way to the ceiling. The nice thing for them is that they don't have to worry about damaging the floor since it will be retiled. |
|
In this view you can see some of the old cabinetry. It will eventually be torn apart and taken away. |
April 7, 2005
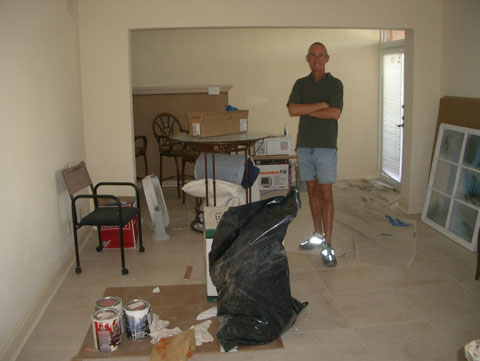
This week, just days before I got here, we ran into a snag in the project. An inspector happened to be here on the property for the inspection of another project, and just happened to walk by my own unit. We had not thought it necessary to get any permits, since it was a homeowner job, but the inspector had other ideas. It seems that permits are always required in any condo building, since renovations in one unit may affect systems shared by others.
So, he left notice with the crew that they had to stop work until the right permits were issued and the work done so far had been inspected. So, as it turned out, the only thing I could do with respect to the project was to (1) take some pictures of the current state of things and (2) do some legwork to try to get the permit process in motion. Below are thumbnails and descriptions for the pictures I took this week.
|
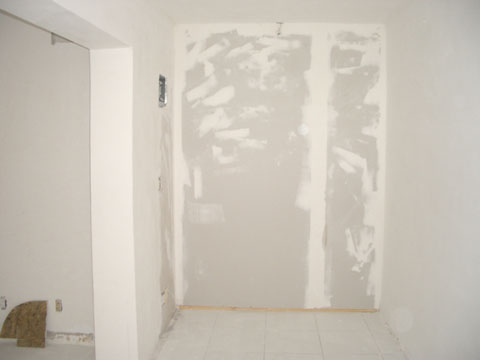
We have brought the back wall of the alcove forward so as to make a closet behind it in the master bedroom. The existing master closet is being given over to the recessed refrigerator and, potentially, a washer and dryer. |
|
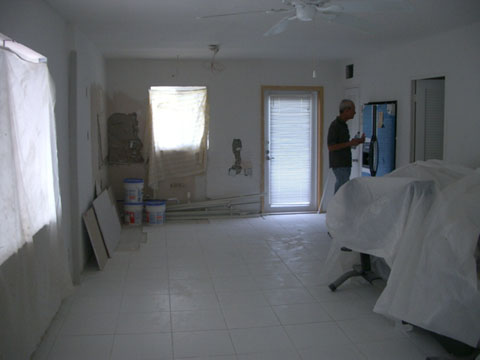
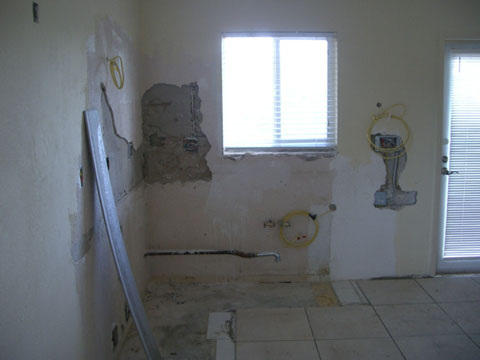
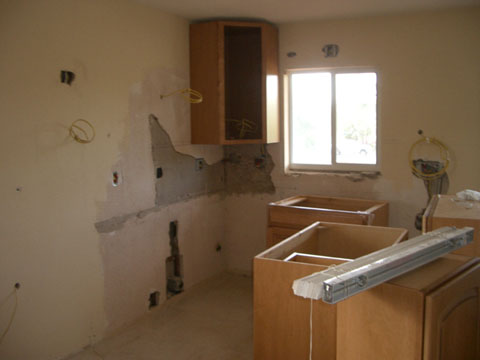
The kitchen end of the living room. All of the kitchen appliances and cabinets are gone, and some of the wall prep has been completed. |
|
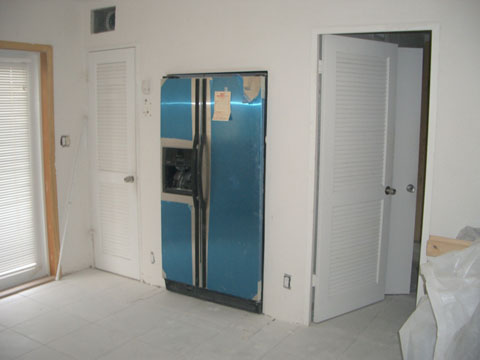
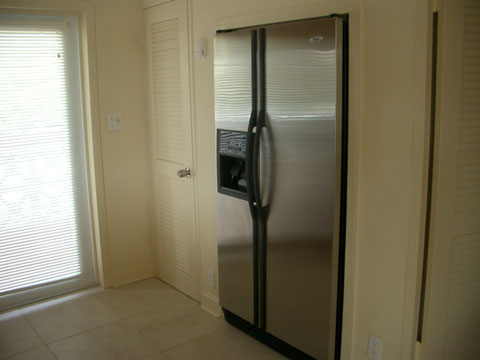
The pantry, new recessed refrigerator and the entry to the bedroom. The refrigerator is already here because just before the project began, my old fridge went bad, and so I had BrandsMart deliver the new one immediately. But the blue plastic protector film has been left on it, of course. |
|
The new closet that has been constructed at the back of the master bedroom. A few items of furniture are still here; just covered up to protect them. But all the small stuff went to a storage unit, which is where the new cabinets are also sitting. |
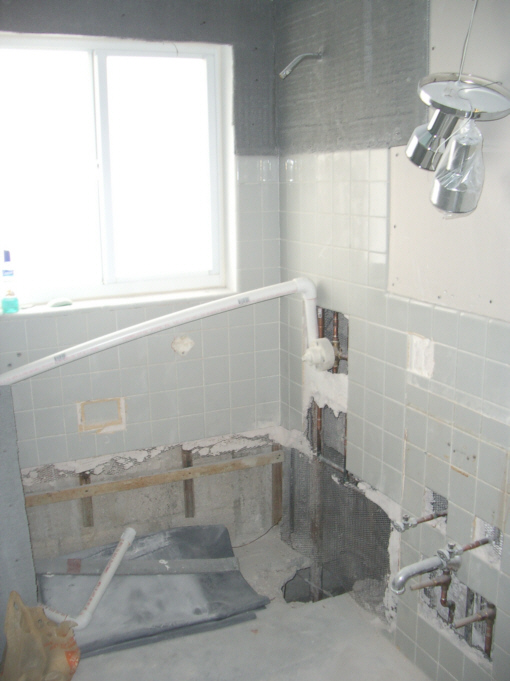
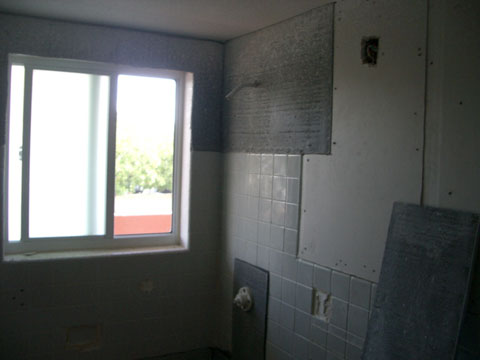
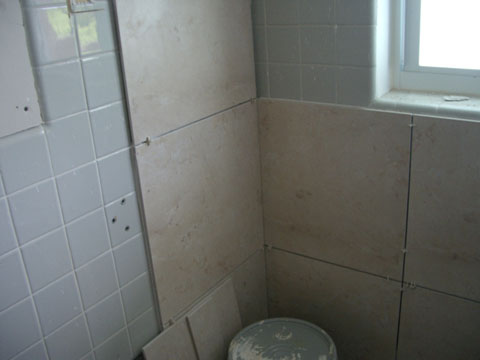
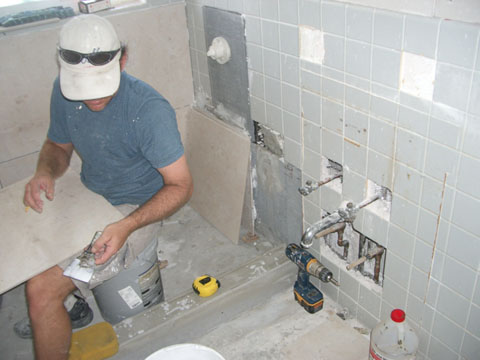
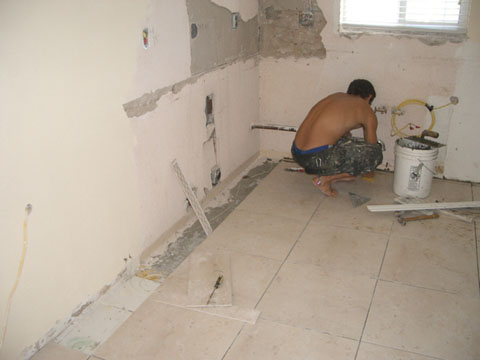
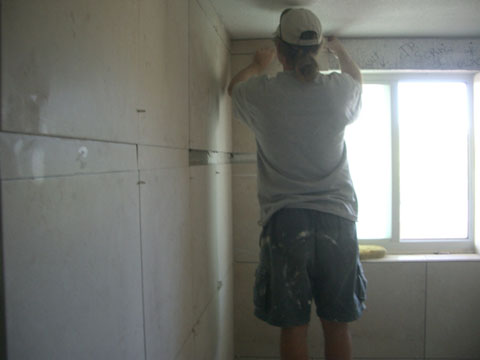
The bathroom has been all torn out. Rather than take the old tile off the walls, which would have been a huge job and which would undoubtedly have damaged some of the walls, we have decided to tile right over it. So you can see that some prep work has been done above the old tile. Some of the plumbing has also been installed, but we can't go any further without the permits.
|
The other end of the bedroom, showing the old closet and the entry to the bathroom. |
|
The front door. We have also decided to simply put the new tile on top of the old. This will provide more soundproofing and also keep the cost down. |
NOTE:
If you have come to this page from the Index for either 2005 or 2006, you can use the links at the top or bottom of this page to return to the appropriate Index. Otherwise, you can return to the album page from which you came by clicking
here.
July 14, 2005
Floor Tile and Shower
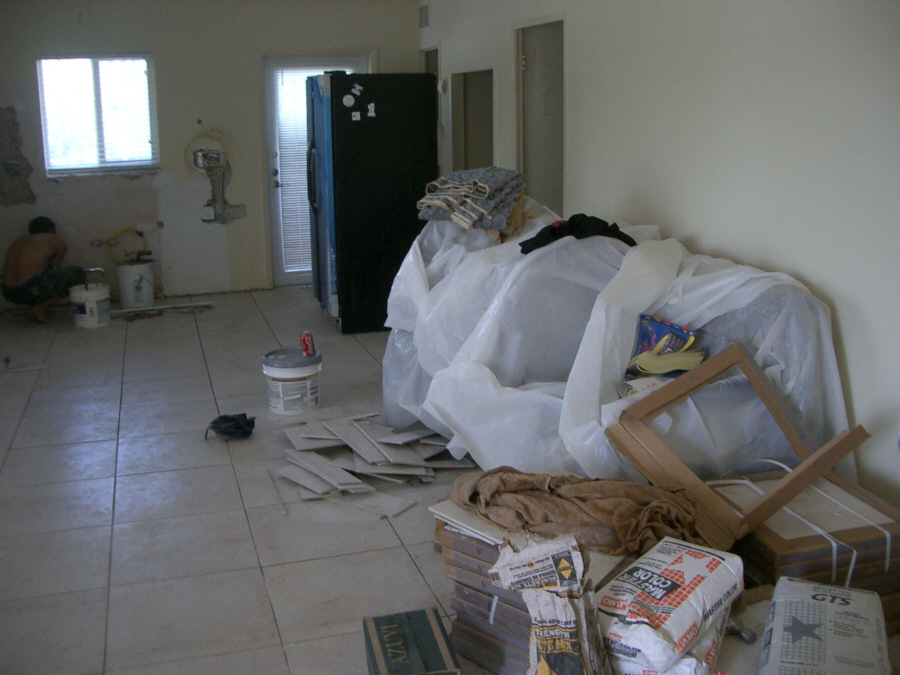
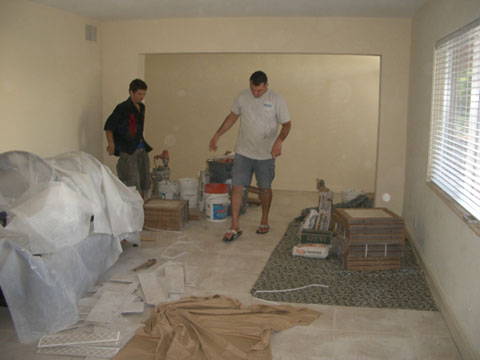
Since I was here last, the floor tile has been pretty much put down. Ty decided to put it right on top of the old tile, and I have just made the decision to put it throughout the condo, rather than leave the bedroom carpeted.
|
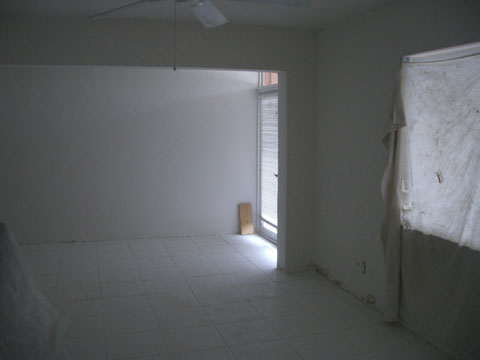
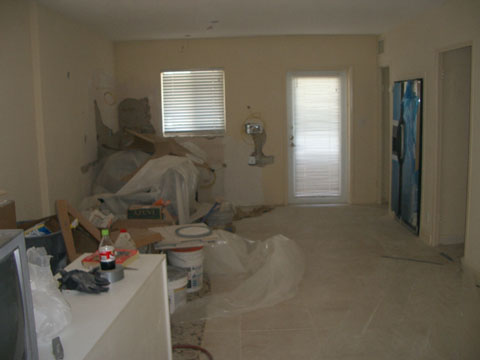
The walls have been prepared, although the final paint is not yet on them. This is the alcove, which has been shortened quite a bit due to the construction of the new bedroom closet. It (the alcove) will still be large enough to keep the exercise bike and bicycles in when I am here, yet have them out of the way. At the moment, the alcove is being used as a preparation area for the tiling of the rest of the condo. |
|
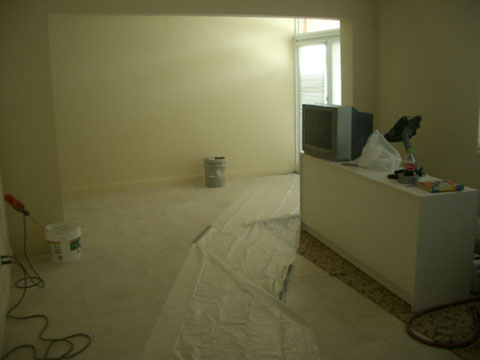
The tile has been laid throughout the living room, although the pieces along the wall have not all been cut and laid. The refrigerator is currently slid out of its new home as the small utility closet is still being tiled. The kitchen walls look bad, but what hasn't been prepared will be behind cabinets anyway. |
|
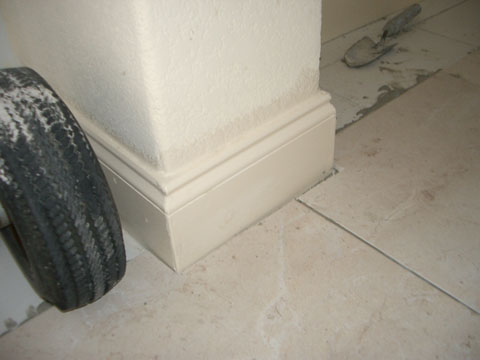
Here is a close-up view of the wall treatment and the new baseboards. We are tiling right up to the walls, of course. The wall corners have been rounded off, giving a much nicer look than had been there previously. We will also be taking up the old tile baseboard and replacing it with wood baseboard throughout. |
|
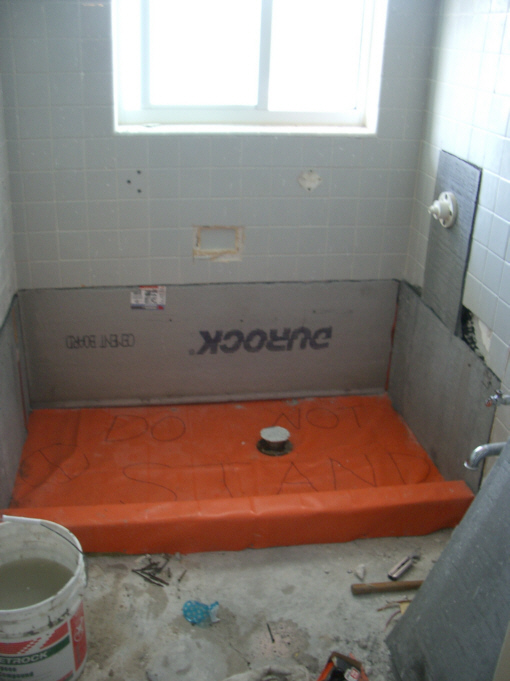
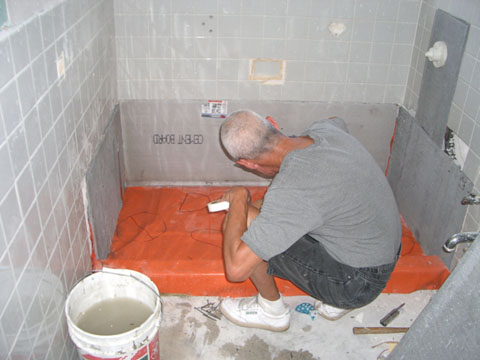
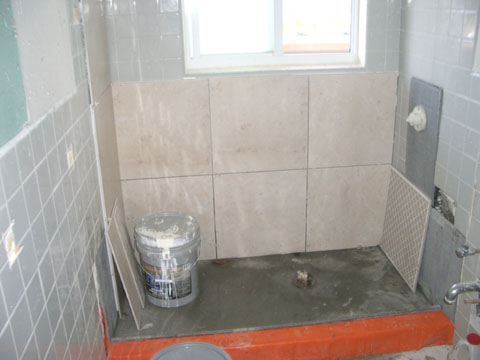
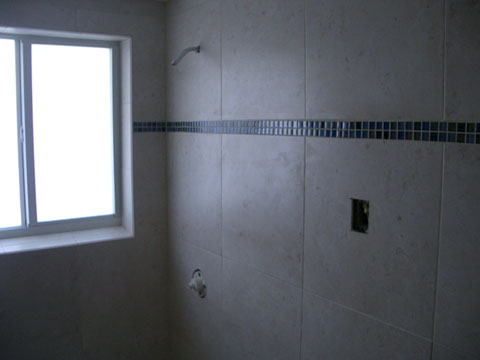
The shower area in the bathroom. There was quite a lot of plumbing work to do, but it has been finished and the new shower pan has been constructed (there was a tub here previously, as you know). The concrete under the shower pan has just recently been poured, so Ty is ensuring that no one stands on it until it is set. We are planning to tile the entire bathroom, right up the walls and over the old tile. |
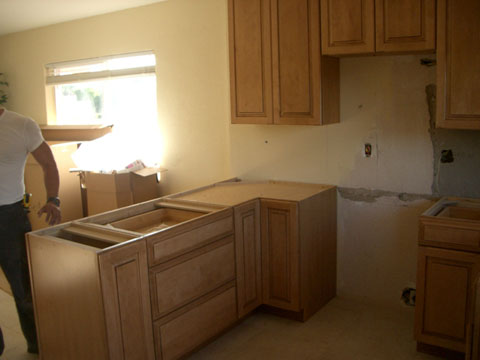
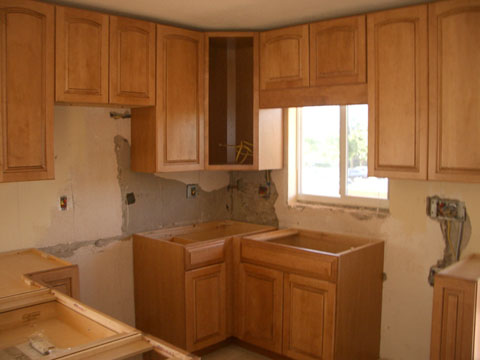
The kitchen area. This area looks terrible, but there is still quite a lot to do here. When Grant put down tile originally, in 1990, he did not tile under the cabinets. Now that the old cabinets have been removed, you can see that the floor is now going to have to be leveled before the new tile can be carried right to the walls. I think Ty is planning to do this with a combination of some old tile squares that we had kept around, and some of the cut pieces of new tile- all supplemented with concrete as needed. As you can see, the wiring for the eventual appliances and outlets has been done but left hanging for the installation of the cabinets and appliances. There will also be a new granite windowsill; that's why the current one looks so bad.
Looking from the living room into the bedroom, you can see that one line of tile squares has been put down for reference; this line carries in the line from the living room. When we tiled in 1990, we carpeted most of the bedroom but tiled the high-traffic path to the bathroom. Some months ago, I thought I would do the same thing again, but two factors have caused me to decide to tile the entire bedroom. First, to put down carpet again, the floor would have to be raised somewhat before padding and carpet could be put down. Secondly, carpeting part of the room but not all of it always looked a bit odd, although it seemed worth it to be able to step on carpet when getting out of bed. After consulting with Ty, we've concluded that it is much more flexible (and a good deal easier) just to tile the entire condo all the same, and then use rugs where desired. Rugs can always be changed as decor changes; it is a lot harder to do that with carpet. In this picture you can also see the difference between the old and new tile. The new tile is warmer and, because it is a beige shade with some veins, it will not show dirt nearly as badly as the old tile did.
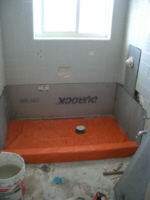 |
The new shower pan and drain. This will have to set up for a day or two before they can begin the process of tiling the walls.
|
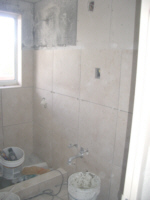
The shower area in the bathroom. I wanted to show how the walls above the original tile have been prepared for the new tile. These walls had just been painted before, but now have to be floated out to the same level as the old tile. |
|
The bedroom area. The bedroom walls and ceiling have been prepared, but the area is still just a storage area for those large items that I did not take to the storage unit. Ty and one of the construction crew are watching another member of the crew checking the level of the shower pan and walls before the tile goes on. |
In this movie, I am walking through the bedroom to get a look at what the crew member is doing in the shower.
(Mouseover Image if Video Controls Not Visible)
| | The current condition of the kitchen area and living room.
(Mouseover Image if Video Controls Not Visible)
|
Cutting some pieces of cement board for installation in the bathroom.
(Mouseover Image if Video Controls Not Visible) |
NOTE:
If you have come to this page from the Index for either 2005 or 2006, you can use the links at the top or bottom of this page to return to the appropriate Index. Otherwise, you can return to the album page from which you came by clicking
here.
July 15, 2005
Tile Work
Today, the tiling of the shower begins.
|
The bottom of the shower has been mudded in, and the crew have begun the process of tiling the walls of the shower. It looks as if three of the tile squares fit exactly, but, actually, one of them had to be cut. This will be a delicate process, but Ty has great faith in the crew he has chosen. |
|
Some detail of how the tile is going on the wall right over the old tile. We are going to leave one of the tiles at the bottom only lightly secured to the wall in case I want to put in a washer/dryer at some point; we would have to use the shower drain. |
|
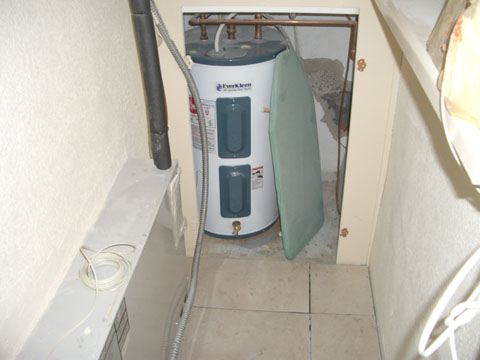
Laying tile in the pantry and where the water heater is. There is a little door in front of the water heater, but it has been taken off temporarily. |
|
The crew is cutting tile to finish off the area next to the walls. They have already done most of the living room. |
The progress of the tiling job in the bathroom.
(Mouseover Image if Video Controls Not Visible) |
NOTE:
If you have come to this page from the Index for either 2005 or 2006, you can use the links at the top or bottom of this page to return to the appropriate Index. Otherwise, you can return to the album page from which you came by clicking
here.
July 16, 2005
Tile Work
Today, the tiling of the shower and floors is continuing.
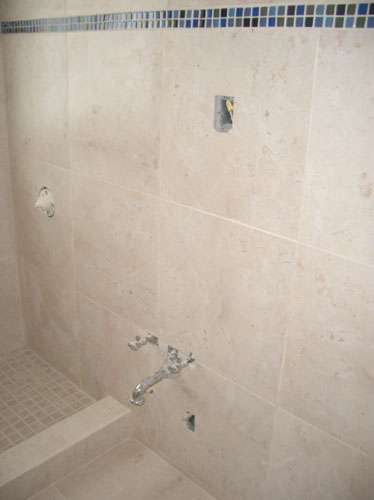
|
The tile guy is taking his time and being as careful as Ty wanted. Because we are tiling over the existing tile, my bathroom will end up about two inches smaller in three dimensions. |
|
Tiling around all the plumbing fixtures is going to be tricky, but the tile guy is being precise and taking his time. |
|
Laying tile in the kitchen is a lot easier, for there is nothing to tile around. So the apprentice tile guy is able to handle this part of the project. |
|
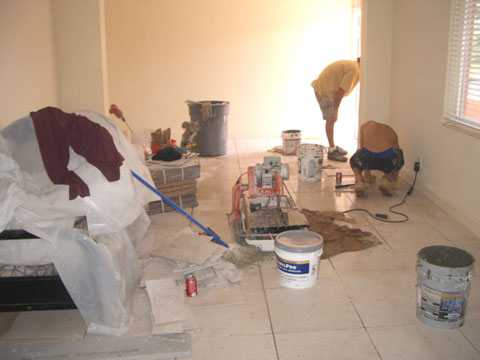
There is just one more strip of cut tile pieces to lay and then the living room will be done. The tile folks are having to float the floor up to be level, of course, since not all of it was tiled in 1990. |
A view of the living room towards the end of the tiling phase of the project.
NOTE:
If you have come to this page from the Index for either 2005 or 2006, you can use the links at the top or bottom of this page to return to the appropriate Index. Otherwise, you can return to the album page from which you came by clicking
here.
July 18, 2005
Tile Work
Today, the tiling of the living areas has been completed.
|
The pantry has been completely tiled, and the closet into which the refrigerator has been placed has also been completed, so it has been moved back into its cubbyhole. |
|
The construction crew leader is checking the tile work in the living room, stepping gingerly due to the fact that the grout has not yet been sealed, and so is susceptible to getting dirty. |
NOTE:
If you have come to this page from the Index for either 2005 or 2006, you can use the links at the top or bottom of this page to return to the appropriate Index. Otherwise, you can return to the album page from which you came by clicking
here.
July 20, 2005
Project Status
I am heading home today, so I wanted to record the status of the condo renovation project up to this point.
|
The living room has been completed, at least as far as the tile is concerned. The crew grouted one half of the floor yesterday, and the other half today. Doing this has meant that everything still in the condo (not much of my own stuff) has to be moved from one side of the room to the other. |
|
The alcove has been completed. This week, Ty showed me a large mirror at an antique store that he thought would look good in the alcove. We purchased it and it has been delivered. It will eventually simply be leaned back against the real alcove wall, and it will make the room look much bigger when you first walk in. I have also taken delivery of a new sink for the kitchen, as well as the fixtures that I want to install when the granite countertop is installed. |
 |
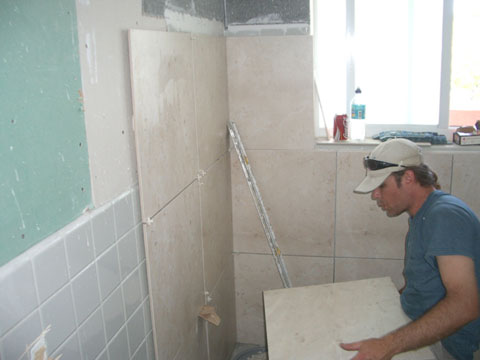
The tiling of the bathroom is proceeding nicely. As you can see, the tile guy has done most of the hard work- tiling around all the plumbing. He has also finished the lip of the shower. Actually, there are only some relatively easy wall tiles on both sides of the room to complete this part of the project. When I return next, it will all be done.
|
The tile guy is working this afternoon on the tiles at the very top of the room. Notice that he seems to have used a strip of thin tiles all around the room. These tiles are in place just as place keepers, because we are going to put in a strip of small blue glass tiles in a stripe all the way around the room. This will add an accent to the room, breaking up the expanse of tile on the walls and floor. We hope it will look great. |
|
The living room tile has been grouted, and the crew has put down plastic to cover the new grout so that it can set completely. I look forward to coming back to a completely prepared condo, and the next major task will be cabinet installation. |
NOTE:
If you have come to this page from the Index for either 2005 or 2006, you can use the links at the top or bottom of this page to return to the appropriate Index. Otherwise, you can return to the album page from which you came by clicking
here.
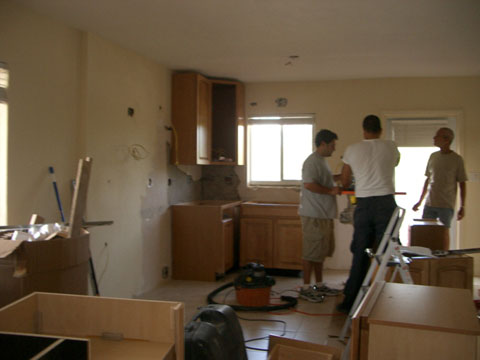
August 10, 2005
Construction Status
There has been some minor preparation work done since I was last here, but, basically, the condo is as I left it last time- except that the first cabinet has been installed.
|
This is the first kitchen cabinet that has been installed; Ty tells me it was installed just this morning before I arrived. It is the upper corner unit and is of necessity the first one that must go up, as all the others will be attached to it. Doing it this way eliminates the possibility of an incorrect measurement causing a problem later. As you can see, the installer has brought over all the cabinet boxes from the storage unit where they have been waiting for about three months and has uncrated the cabinet sections and done some assembly. But the rest of the cabinets will be installed beginning this coming Monday. |
|
Some of the cabinets that have been uncrated and assembled and are awaiting installation. Note that the refrigerator is now inset into the wall where the built-in credenza used to be; this will allow much more space in the kitchen itself. |
|
This is what the bedroom looks like at the moment. I did not take the sofa or the exercise bike to the storage facility; both have remained here covered with plastic while the construction has been going on. The cabinet installer is using the old dresser to organize the shelves and cabinet hardware. The new closet is done and there is some junk in there, too. |
|
The tile in the bathroom is all done, and the blue glass strip around the wall has turned out well. The plumbing fixtures have yet to be installed, the shower enclosure needs to be put in, and of course the vanity, countertop and toilet aren't here yet. |
In the picture at left, you can see the work that's been done for the bathroom plumbing, and you can see the floor tile and shower enclosure as well. Code requires an electrical outlet above the sink, but we will be covering that with a mirror after the inspection is completed.
The movie below will walk you through the bathroom and out through the bedroom into the kitchen area:
|
(Mouseover Image if Video Controls Not Visible) |
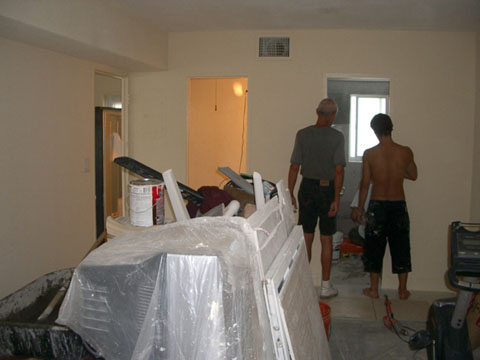
The living room is just a storage area for now. There are more cabinets here, the new dining table (the chairs are at the storage unit), the new mirror that will go on the back wall of the alcove, and some of the kitchen appliances.
August 15, 2005
Kitchen Cabinet Installation
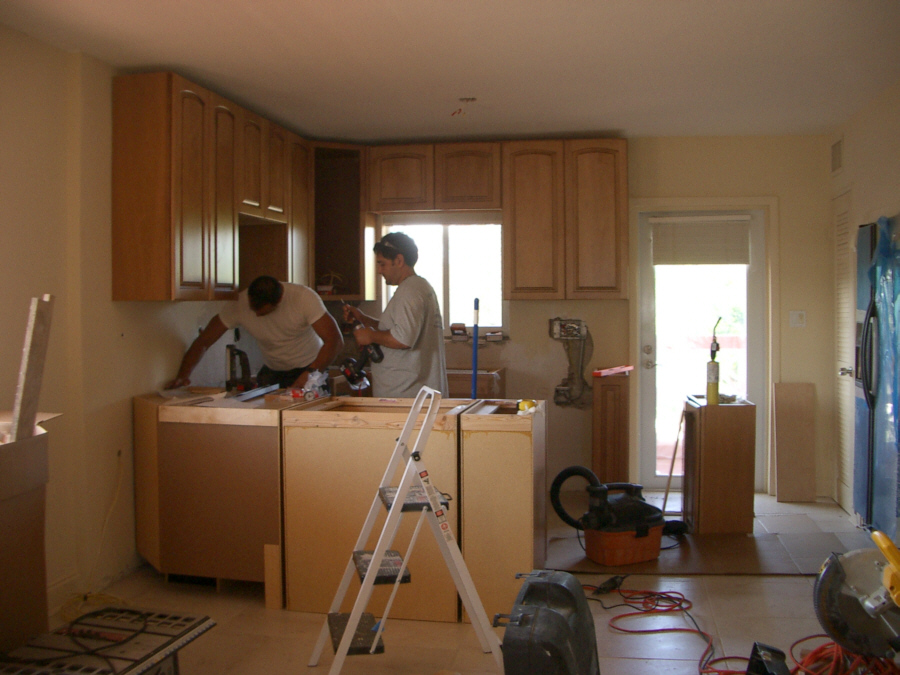
Well, it's Monday morning and the installers are back to put up the rest of the kitchen cabinets. They put up the first corner unit last week, but needed some additional materials before they could finish the job. They have them now, and that's what will be happening today.
|
The installer, someone Ty has relied on before, is preparing the second cabinet to be raised into place and installed. It is like a big jigsaw puzzle, and last week they got all the pieces laid out. |
|
The second cabinet has been put up, and Ty and the installation team are checking the alignment to ensure that the entire row of upper cabinets will be straight. |
|
The first two upper cabinets have been secured in place, and the installation team have arranged the two lower cabinets beneath them to ensure that the starting point for the bottom series is correct. |
|
The value of taking a lot of time with the very first corner cabinet becomes clear, as work on installing the upper cabinets can move quickly. The installation team has measured the wall size and alignment carefully, so they know that if all the cabinets are installed properly, flush with each other, that the entire line will be straight. They have finished the cabinets on the sink side of the kitchen, and are working now on the cabinets over the cooktop/range. |
|
All of the upper cabinets are in place now, and they look perfect. The installation team has measured the space for the range/cooktop and then continued the placement of the lower cabinets on that side of the kitchen. They have also placed the cabinets for the peninsula but have not secured them together yet. These cabinets (as well as the other lower ones) will be attached to each other but simply floated over the tile floor. The weight of the eventual granite countertops will keep them in place. The corner unit will eventually be faced with veneer so that the peninsula is straight. |
|
The bottom corner cabinet is in place, and now the installation team is ready to place the sink enclosure and the final lower cabinet that will go next to it. They have been checking and double-checking the space for the eventual range/cooktop, ensuring that it will fit perfectly when the cabinets are secured. |
The sink cabinet is in place and the installation team is making final adjustments for the space being left for the range/cooktop. Once this is done, then the peninsula cabinets can be attached to each other. This is as far as the team got today; the rest of the installation will occur tomorrow.
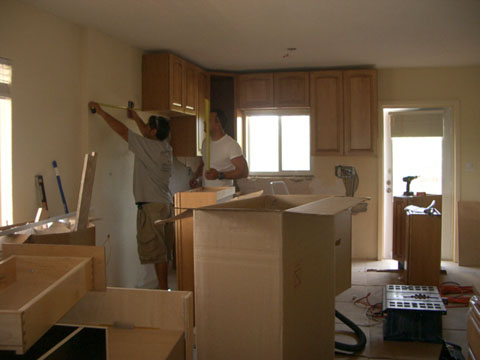
August 16, 2005
Kitchen Cabinet Installation
It's now Wednesday afternoon, and the cabinet installation is almost done. I have to leave today, so I won't see the actual completion, but I hope all the finishing touches will be in place when I return again in September.
|
The installation manager is here to inspect the work that the installers have done. As you can see, the cabinets are all in place, with spaces left for the dishwasher and the range and microwave. There are also some finishing touches that will be put on the wall facing the camera and on the end of each set of cabinets. |
|
The peninsula cabinets. There will be a moulding piece installed on the end of the peninsula, but we first have to put in an electrical outlet (called for by code), have the inspection, then take the outlet out and put up the facing piece. |
|
They did a really nice job on the cabinets. There is a glass door that will go on the corner cabinet, but we've left that off for now so that the electrical can be completed for the under-cabinet lighting. Also, the hardware has yet to be installed; that should be done while I am gone. |
|
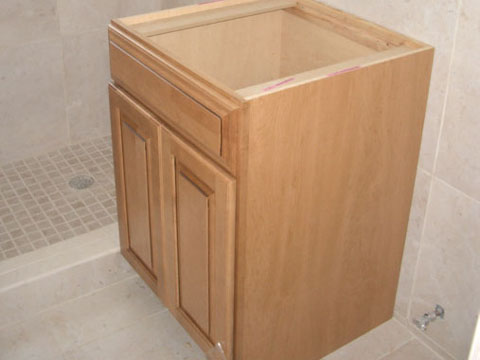
We got a vanity for the bathroom made of the same wood and finish as the kitchen cabinets, and we will be using the same granite in here as well. This cabinet has been just set in here for now; the plumbing has to be finished (and the sink installed) before we can attach the cabinet to the wall. Actually, we are thinking now that the weight of the granite countertop will hold the cabinet securely in place, but we will see. |
NOTE:
If you have come to this page from the Index for either 2005 or 2006, you can use the links at the top or bottom of this page to return to the appropriate Index. Otherwise, you can return to the album page from which you came by clicking
here.
September 9, 2005
Construction
When I arrived this week, I found that not much had been done since last month, but this was not unexpected. After the cabinets were installed last month, we had to get the cutout template for the new kitchen and bathroom sinks over to the granite folks, and they had to come by to do the final measurements for the granite countertops- measurements that could not be done until the cabinets were in. Then we'd been advised that it would be about three weeks until the granite countertop sections would be ready for installation. So that's why I've returned this week- to monitor the progress of granite installation. I hope that it will go smoothly and that we can also get appliances installed and perhaps kitchen and bathroom fixtures as well.
As usual, I've made a thumbnail for each picture and movie, and you can click on the ones that interest you to see the full-sized image or watch the movie.
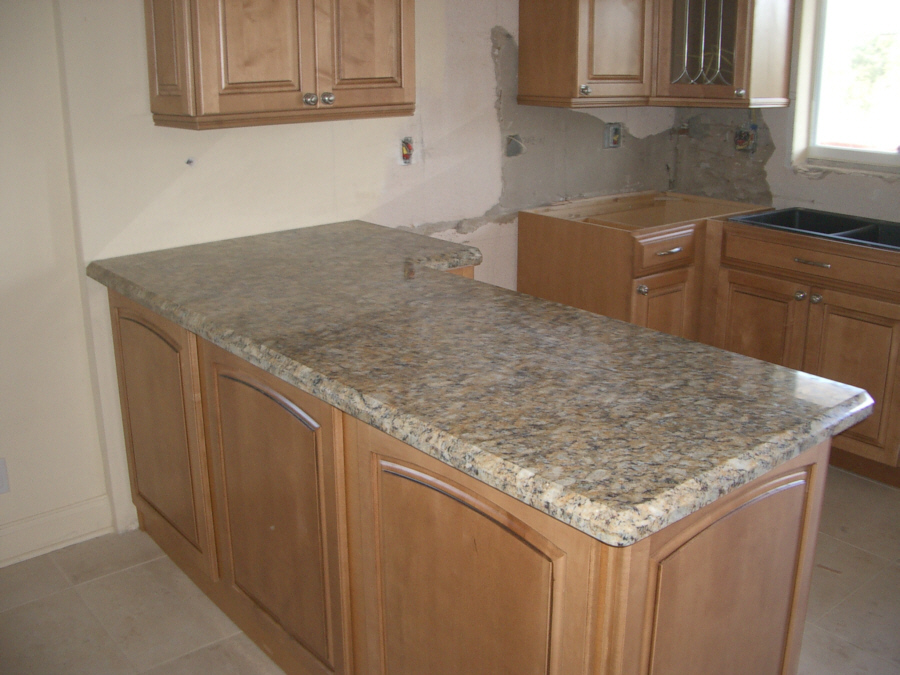
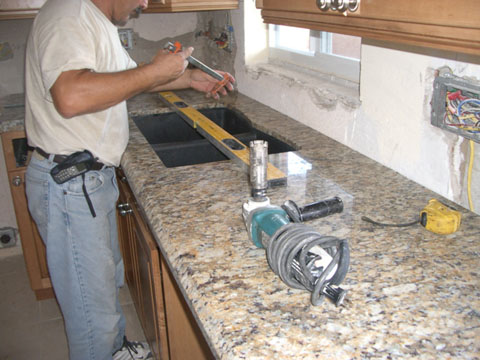
The granite countertop in the kitchen will be in two pieces- one for the island and one for the sink area. Since we were going to use a slide-in range/oven, there would be a break in the countertop where that appliance will go. I wanted to get a picture of the first piece of granite going in, but I had to run an errand early this morning to get some stuff at Home Depot, and when I returned the first slap of granite had been brought in and laid on the island cabinets. Many times, granite counters are actually cemented to cabinets, but in my case, for the island, the fit was perfect and we will simply rely on the weight of the granite and the small "tabs" on the underside of the slab to keep it firmly in place.
This short movie will show you the first slab of granite already installed, and then show you the place where the other slab will go. This will be my last chance to show the bare cabinet surface since the fellows are downstairs at this moment getting ready to bring the second kitchen granite slab upstairs to lay it in place.
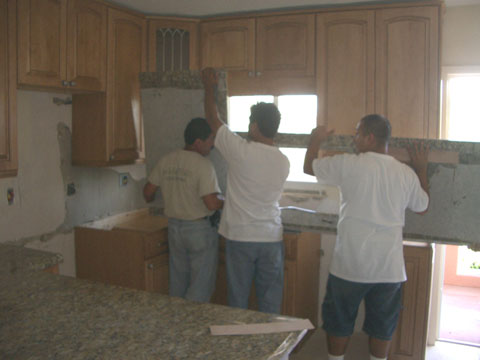
In this movie, you will see the crew carefully carrying the large granite slab into the condo and preparing to set it in place. This operation must be done with great care, since the holes for the sink are already cut and we now have a large piece of granite with two very heavy end pieces connected by two slender and comparatively fragile strips of stone. I'm told that even the slightest twisting or bending motion might be enough to snap those two strips- not because they are so fragile but because the ends are so heavy.
|
The process of turning the granite slab to lay it on the cabinet tops begins. Care must be taken to lower both sides at the same rate, miss the wall cabinets and then slide the granite slab into the corner to fit it into place. I would have taken a movie, but wasn't sure whether this might throw the installers off their game. |
|
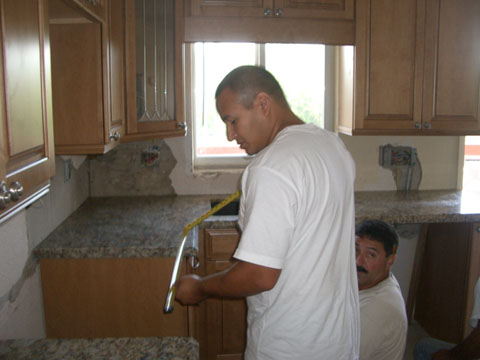
The granite slab was successfully laid in place, and now one of the crew is measuring the exact width of the opening for the slide-in range. Once they know exactly where the range will go, then they can position the two granite slabs either slightly closer together or further apart before they fix them in place. While there may be a slight gap against one or more of the walls as a result, the tile that we will be putting on the walls will hide those gaps. |
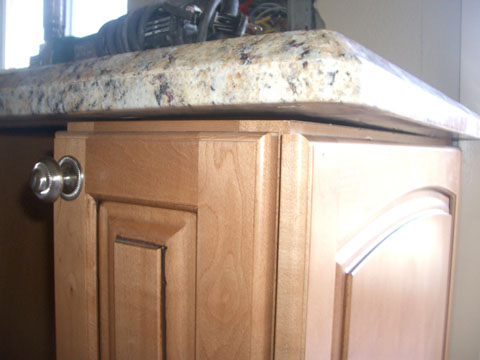
Now that the granite slab is in place, an imperfection in the cabinet installation has become evident. All of the cabinet installers careful measurements were good, but now we can see that either the floor was not exactly level or those measurements were slightly off. Either way, there are two problems here at the corner by the range. We know the granite slab is absolutely level, so the corner of the cabinet is too low. This must be due to a variation in the height of the floor (if we can trust that KraftMaid cut the cabinets properly).
|
So the cabinet corner will have to be raised slightly. But there was an imperfection either in the way the drawer was cut or the way it was installed for it is a bit crooked. This the cabinet people will have to come back and adjust- probably by moving the drawer slides up or down. |
|
Now that the slab of granite where the sink will go is in place, the workmen can actually attach the undermount sink to the granite slab. The sink will literally "hang" on the granite slab, attached at the underside by an extremely strong cement. The workman is leveling the slab and sink, and beginning the process of clamping the sink to the granite. Once this is done, holes can be drilled for the fixtures. |
|
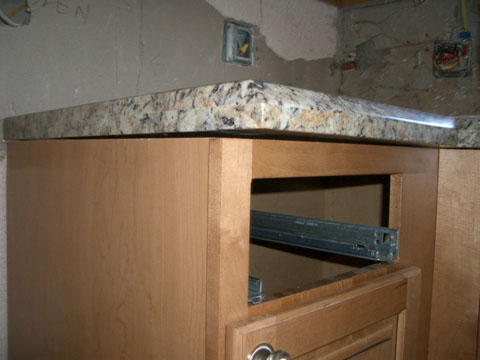
Another imperfection in the way the granite and the cabinets meet has become apparent at the other end of the cabinets near the kitchen door. Once again, it appears as if the floor itself is the culprit, but the cabinet people will come back and shim the cabinets so that they will more closely meet the granite slab. You don't want a space this large (even though it is hard to see from a standing position) because if you were to happen to put much weight on this corner of the granite you would run the risk of cracking it due to the sink opening. |
|
I've taken the drawer at the other end of the cabinets out to see more clearly how it was misaligned. Ty thinks that they will just have to reinstall the drawer slides, but they won't do that until the cabinet has been raised a bit to meet the granite countertop. |
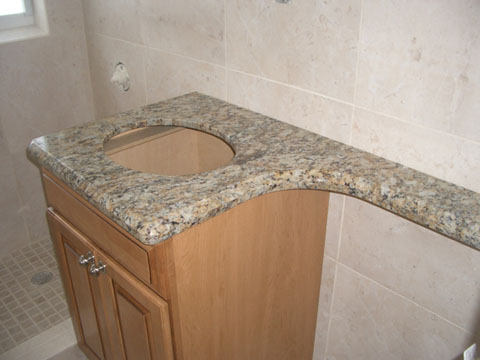
They have just brought up the granite countertop for the bathroom and have laid it in place. The bathroom is so small that there will never be a lot of counterspace; the thin shelf along the back of the area where the toilet will be installed is about the best we could do.
|
Once we got this slab in place, we decided not to adhere it to the wall. There is not much way we could put enough weight on the thin shelf to cause it to break and, because of where the toilet will go, there is almost no chance that someone could lean on the shelf and cause it to fracture. |
|
The granite workmen have installed the small granite window shelf and are making their final adjustments to level the sink and the countertop. Their next step will be to cut the holes for the fixtures, but that will have to wait until the sink is firmly set. |
September 13, 2005
There was a problem last week with the granite installation, although I did not think to take any pictures when it occurred. After the sink was firmly in place, the workmen began to drill the holes for the sink fixtures. I had left the box with the fixtures on the counter, and the box had a picture on the top showing the faucet in the middle of the sink and the control to its left and the soap dispenser to its right. I watched them as they drilled the center hole and began drilling the one to its right. But then I got called down to help Jack with something. When I returned a few minutes later, I found that they had drilled both of the holes for the water control AND the soap dispenser to the RIGHT of the center hole for the faucet! Not only was this going to look terrible because of the asymmetry, but it would mean that for a right-handed person you would have to reach under the faucet to turn it on and off; this would be particularly awkward if you were using the spray. This was simply not acceptable, and Ty and I were on the phone immediately to the granite place to tell them of the problem.
Their first response was that they would make a plug out of the same granite to fill the rightmost hole, but both Ty and I knew that this would never look right; there would always be an obvious circle where the plug had been placed. I was about to demand that they make an entirely new countertop (which would have cost them thousands in lost labor and material) when I had the idea that if something else could be installed in the extra hole then the problem would be solved. And I thought of just the thing- one of those instant hot water dispensers. Even if I never used it, it would look as if it had been planned and not an afterthought; after all, many new kitchens have them.
So I suggested to the granite people that paying me $200 to buy the fixture and a plumber $100 to put it in would be a cheap way for them to avoid a major loss on the countertop itself. They were quick to approve the idea, so I have purchased the dispenser and you can see it and the fixtures waiting for the granite people to come back and drill the final hole so that the plumber can put all the fixtures in.
September 14, 2005
Appliances and Fixtures
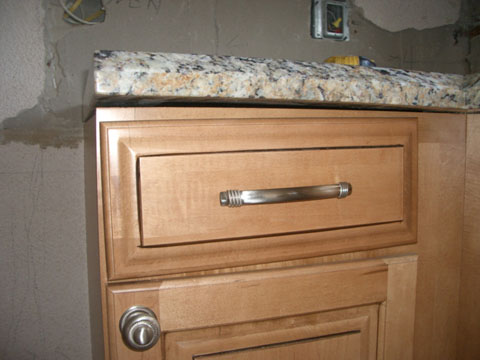
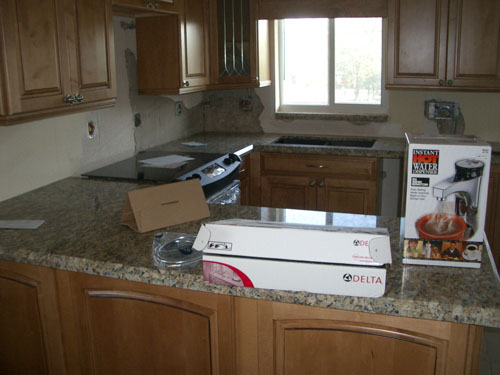
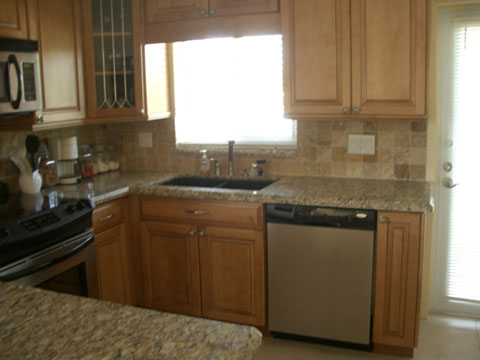
This morning the plumber was here to install the kitchen sink fixtures. You can see that the holes have been properly drilled now and that the hot water dispenser has been installed in the rightmost spot in the hole that was mistakenly drilled last week. The end result is pretty nice, and I got the hot water dispenser for free. The slide-in range (which has been sitting in the living room) has been installed. There is one more strip of granite that is being cut and which will be installed along the wall at the back of the range. They could not measure for this strip until the range was in place. The dishwasher has also been installed, alhough it has not been hooked up yet. The misaligned drawer has not yet been repaired; that is supposed to happen next week.
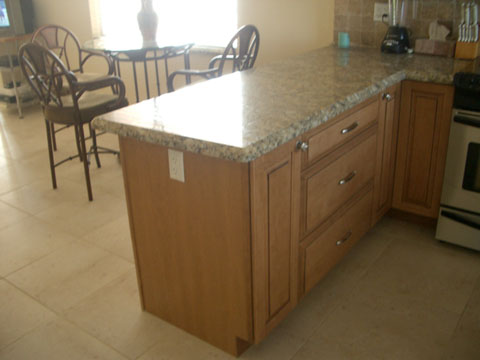
The island
is done and we just have some fixtures sitting there that will be installed in the closet in the bedroom.
I've cleaned off the counters so you can get a good look at how the kitchen looks at the end of my week here. The island is finished. The granite strip behind the range has to be installed and then the range leveled to meet it and the granite on both sides. All the sink fixtures are installed and functioning, and the dishwasher has been installed and hooked up. The next step will be the tumbled marble for the kitchen walls; that may actually be installed before I return again.
NOTE:
If you have come to this page from the Index for either 2005 or 2006, you can use the links at the top or bottom of this page to return to the appropriate Index. Otherwise, you can return to the album page from which you came by clicking
here.
October 13, 2005
Construction
On my arrival this week, I saw that Ty has overseen much of the touch-up that needed to be done. It seems as if the condo is just about ready for a thorough cleaning, but let's run through where things stand now.
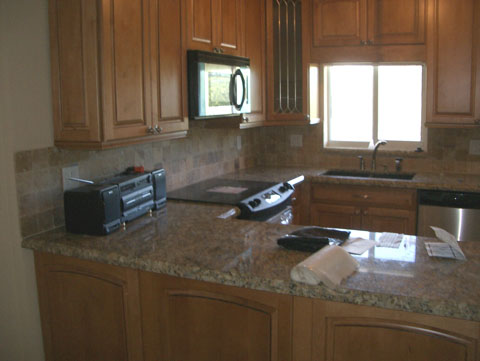
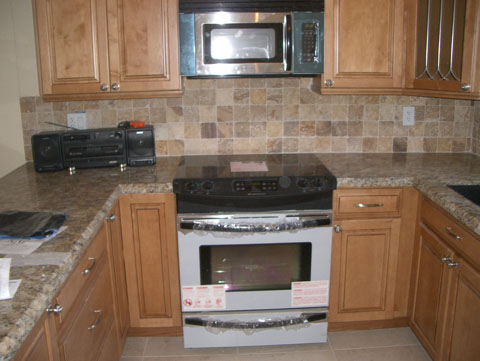
|
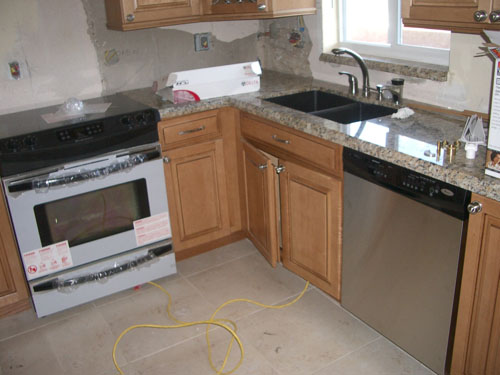
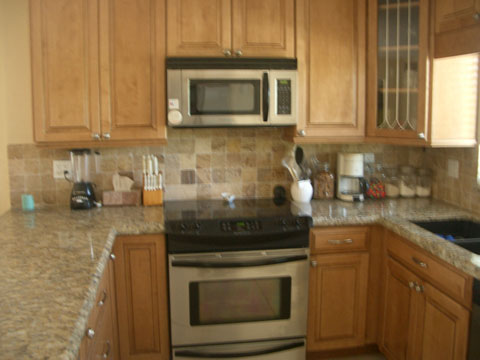
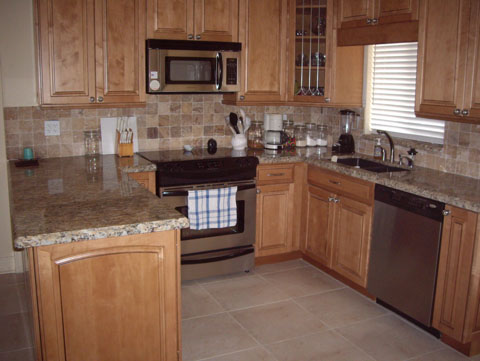
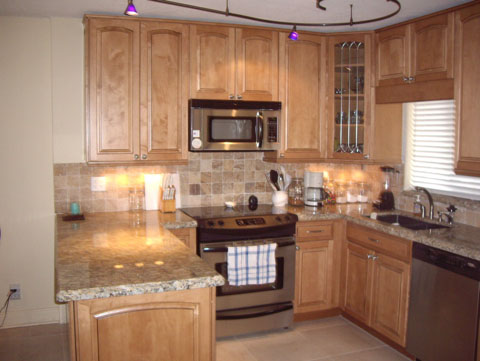
The construction of the kitchen has been completed. The last items to go in were the range and microwave, and they have just been installed. Everything is working, except for the telephone line that we ran under the tile and behind the cabinetry to come out just behind where the boombox is sitting. This is not a problem since I will be using my cell phone down here anyway. |
|
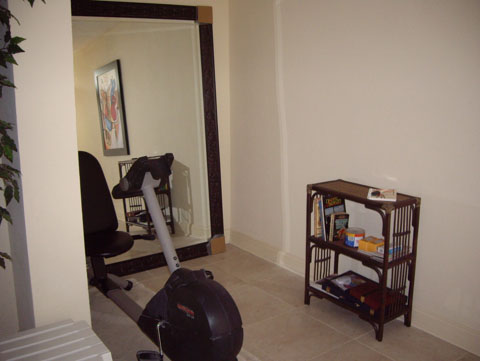
The bedroom has been finished, but there is still a lot of stuff in here that we were keeping out of the way- like the exercise bike and the living room sofabed. I am planning to get a new bedroom suite, at which time all of this will be either disposed of or moved back into the living room. I do not know whether I will keep the sofabed, but I suspect I will get something with some color to it to go with the artwork in the living room. |
I also have to go through the stuff in the closet; much of it is no longer needed. While the kitchen cabinets are done, I still have shelves to install where I want them, and the facing panel for the end of the counter is still not installed.
 |
(Picture at left)
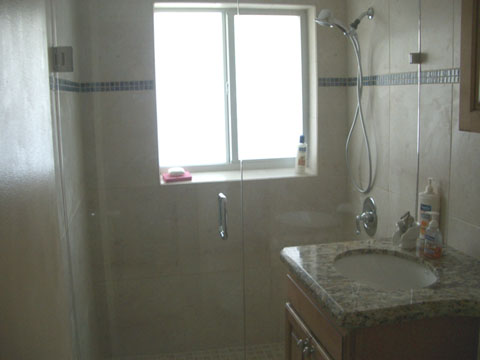
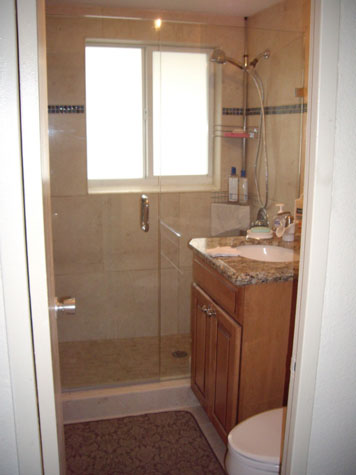
The bathroom is done from the construction point of view. The shower is functional, although I need to solve the problems of where to put shampoo and shower stuff, how to hang towels and stuff like that. The frameless shower door has turned out very nicely, and I plan on doing the same thing in Dallas at some point.
(Picture at right)
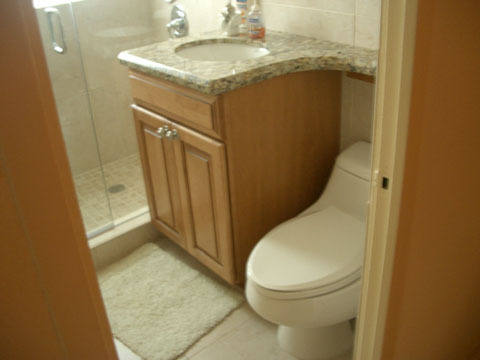
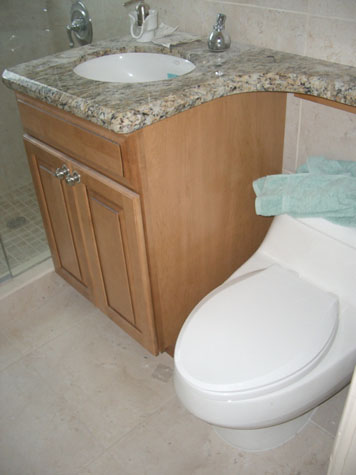
The bathroom vanity has been installed and the countertop put in place. All the fixtures are working now and functional. There is still not much counter space (there was really no way in such a small bathroom to get any more, so there are some storage issues still to deal with. The commode works nicely, and is just the right height. But, due to the closeness of the fit of the commode, attaching a tissue holder either to the side of the vanity or to the inside of the bathroom wall is not feasible.
|
 |
Considering the tightness of the commode area, I may look for a freestanding holder, perhaps like the ones Prudence has found for her bed and breakfast, or I may mount the holder on the inside back of the bathroom door or I may mount it inside the far door of the vanity. This last solution will require a small sign to let people know where it is. If I choose the last option, it will be a bit of a reach, but then the good point would be that the paper would be hidden completely away.
The refrigerator
has been in its new cubbyhole for some time now, but I've taken off the protective wrapping and given it a cleaning.
|
All that remains to do in the living room is to do a bit of touch-up of the painting and then clean the tile. The mirror that the construction people broke is leaning against the wall behind Ty; they did not want to take it even though they paid for it. I think I will ask Ty whether the mirror glass could be taken out of the frame, beveled around its edges and then perhaps affixed to the wall in the bedroom. It would make a great full-length mirror. I won't be arranging the furniture until the painting is all done. |
|
While I have been using the refrigerator for a while, the stove is newly-installed; I have yet to take the protective wrappings off. The same is true for the microwave. But once I do that they will be ready to go. I have not yet unpacked any of the dishes and stuff to put in the cabinets and drawers; I need to think through where I want things to go and what kind of organizers will be needed. |
NOTE:
If you have come to this page from the Index for either 2005 or 2006, you can use the links at the top or bottom of this page to return to the appropriate Index. Otherwise, you can return to the album page from which you came by clicking
here.
October 19, 2005
Furniture and Accessories: Living Room
The living room has been cleaned now, and all the major pieces of furniture that will be used here have been moved from the bedroom. Much of what you will see is eventually going to be replaced, and there are still decisions to be made about how the alcove will be used.
A movie tour of the new living room.
(Mouseover Image if Video Controls Not Visible)
|
|
A movie tour of the alcove and entry and plans for lighting.
(Mouseover Image if Video Controls Not Visible)
|
|
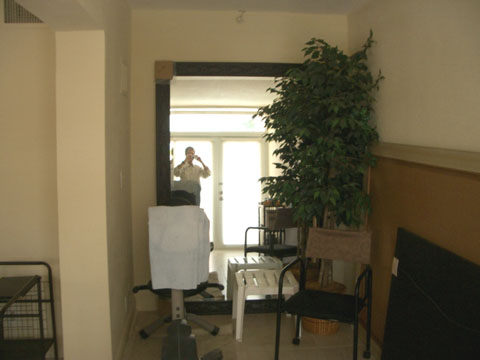
This view, from the kitchen counter, looks down the length of the living room towards the front door. I have placed the dining table and chairs where they will go. Temporarily, I am using the old kitchen island rack as a TV stand. The old bookshelf Ty gave us is against the entry wall, and the mirror that the construction guys broke is leaning against the wall. I will have it cut and mounted in the bedroom. The exercise bike is in the alcove. |
|
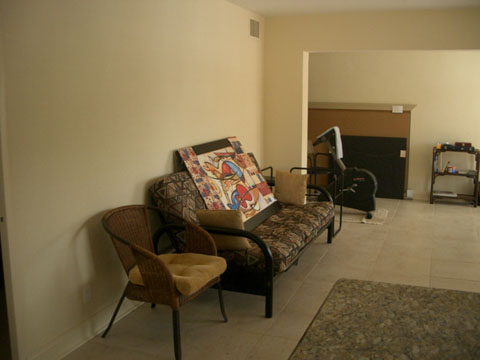
I've moved the tubular sofabed back into the living room to use it as a couch for now, although I intend to get both a new couch and some end tables and get rid of it. I have one of the pieces of artwork with some of Ty and Scott's fabric samples leaning on it. I won't hang the artwork until the lighting is worked out, and Ty and Scott are working on some window treatments and perhaps a bedspread out of those fabrics. I am temporarily using some old chairs and tables here. |
|
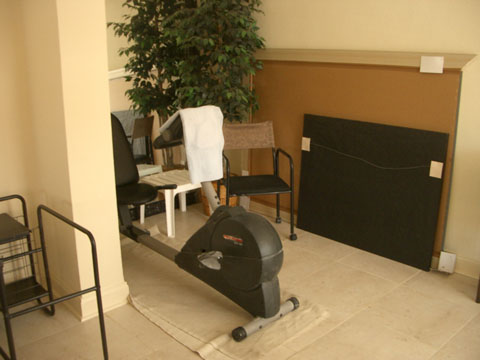
The alcove with the fake plant, the new mirror in the back, the exercise bike, artwork and mirror. Right now, I haven't figured out just what to do with the alcove, aside from that being the location where the exercise bike will reside when not in use. |
|
The alcove mirror. It has not been unwrapped yet; I still have to decide what to do with everything you see here. |
I have talked with Ty and Scott about the color scheme for the condo and, as you'll see in the bedroom, the basic furniture color will be the sand color that is prominent in the artwork. It will be left to window treatments, sofa color, accent pillows and perhaps a bedspread to bring the other bright colors out of the paintings into the rooms. We all liked both of the fabric samples, but we finally agreed that the one with the smaller pattern would look too busy- especially on a bedspread. So we are going with the one on the right (in the left-hand picture below).
|
The artwork and fabric samples. |
|
A view to the kitchen from the living room. |
Let's take a look at the detail of the kitchen next.
Furniture and Accessories: Kitchen
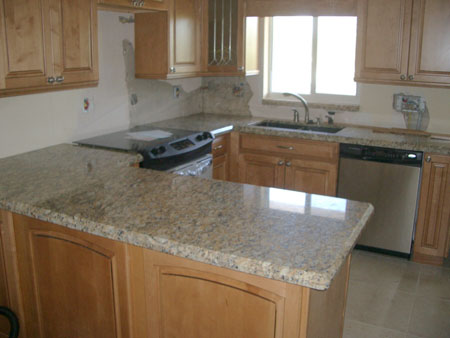
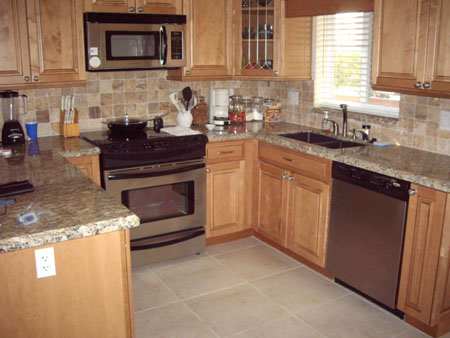
The kitchen is finished. About the only things that need to be done are to replace the decorative panel at the end of the island (we left it off temporarily so that the electrical inspector could see an outlet at the end of the counter, one will will now remove) and to figure out why the phone line doesn't work. Here are some pictures of the mostly completed kitchen that I took today:
|
Probably the biggest structural change in the new kitchen is that we have opened up a lot of space by removing the old cabinet that used to occupy the space between the pantry and the bedroom door and then insetting the fridge back into the closet. This took away a lot of closet space, but we got that back with the new bedroom closet. |
|
The sink is in the same place as the old one, but it is a new double sink with a deep basin and new fixtures. Because the granite guys messed up and drilled too many holes in the counter, the firm bought me one of those instant hot water dispensers to occupy the extra space. I did not have a dishwasher before; it occupies the space where the old A/C unit was before I got central air conditioning in 1997. The cabinets of course are all new. |
|
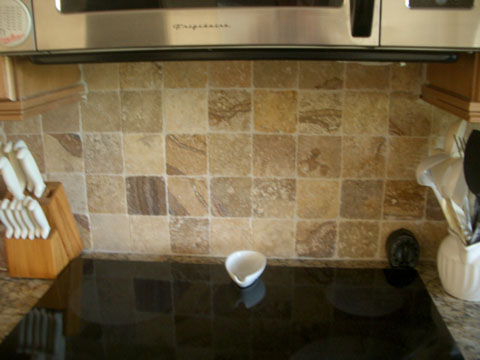
This picture is unfortunately fuzzy, but you can see the new cooktop/oven and microwave. Both work quite well, much better than their predecessors. Without the fridge on this side of the room the kitchen is much more open. And the tumbled marble backsplash going all the way up the wall is a nice touch and I am pleased with it. I was so pleased with the way it turned out that I did the same thing in Dallas. |
|
Here is another view of the counter peninsula. It simply floats over the tile floor (as does everything else in the kitchen) so if anyone ever wants to rearrange things again, they won't have to worry about gaps in the floor tile. |
|
An unfortunately fuzzy view of the new sink and fixtures. |
|
A detail view of the tumbled marble backsplash. |
Finally, here is a picture of
the new drop‑in range.
A movie tour of the new kitchen (1).
(Mouseover Image if Video Controls Not Visible)
|
|
A movie tour of the new kitchen (2).
(Mouseover Image if Video Controls Not Visible)
|
Furniture and Accessories: Bedroom
The bedroom is almost done. All the furniture has been delivered and looks great, but there are a number of accents that need to be acquired. The first thing I need is a rug on the floor. I like tile, but it is nice to put your feet on carpet when getting out of bed. I will look for something that covers a large part of the floor but not all of it. I also need two bedside lamps and a standing lamp for the end of the dresser. The broken mirror in the alcove needs to be cut and mounted. I need new bed linens and a new bedspread, and then I also need some new artwork to hang over the bed. Here are the pictures and movies I took today now that the bedroom is all set up:
Entering the bedroom and a tour of the closet.
(Mouseover Image if Video Controls Not Visible)
|
|
A movie tour of the bedroom.
(Mouseover Image if Video Controls Not Visible)
|
|
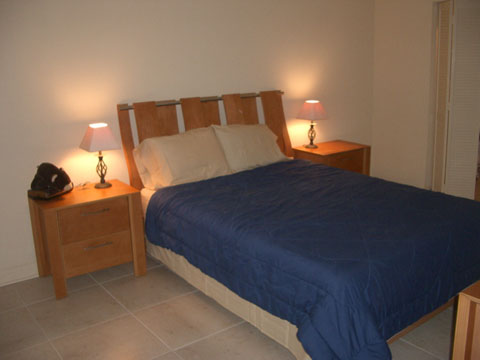
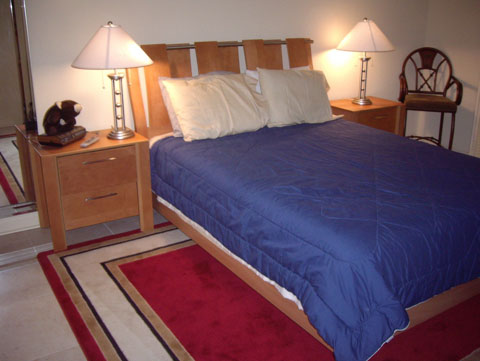
The new bed looks very good, although I am having to get used to the ultra-firm mattress and box spring. I also like the bedside tables that were part of the suite. The two lamps you see are old ones I had from the old bedroom; I will replace them as soon as I can. |
|
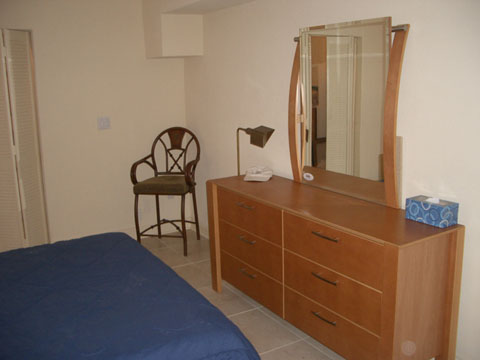
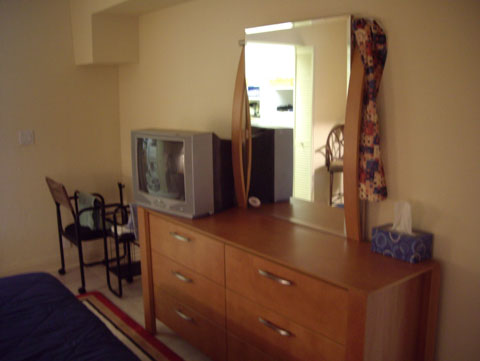
I like the dresser, too, and the only thing it needs is some way to hide the support pieces behind the mirror. Since the mirror support is curved, it doesn't go flat against the wall as most dresser mirrors do, so I need something along the sides. I need a new standing lamp where the old brass one is since I would like to use that corner as a reading nook. I need a new chair, too, as I am using one of the dining chairs at the moment. |
|
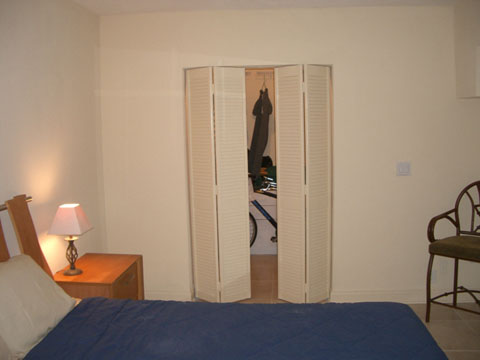
There is the new closet; I took this picture to show how it almost disappears when the bifold doors are closed. I need a chair or something for the far left corner. |
|
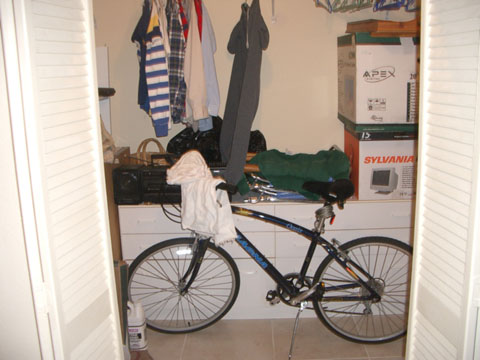
The interior of the new closet is quite ample. I need to go ahead and get rid of some boxes and things I won't need. And then I think I will also get rid of the large dresser that I put in there. I really don't need the space and it gets in the way of the clothes. When I remove it, I'll be able to get both bikes in easily (one of them is along the wall to the right in the closet and you can't see it in this picture. |
Furniture and Accessories: Bathroom
The bathroom is done, structurally and functionally. The only things remaining to do are to figure out what to do about hanging towels, to find a good mirror, to get something for inside the shower to hold soap and shampoo and to decide where the tissue holder should go. I am looking for a solution to the towel issue that does not involve drilling into the wall tiles. And I think the tissue will end up being mounted inside one of the vanity cabinet doors.
I did a movie looking around the renovated bathroom. The movie doesn't take long, as the bathroom is quite small. (This is largely because Riverview Gardens was built long before large bathrooms with their own zipcodes became all the rage.) While the room has everything one needs, there is hardly room to cuss a cat. Ty has done an excellent job of fitting everything in in the most efficient way possible.
You can use the player at left to watch this movie.
|
The new bathroom. The picture is a bit dark, but you can see that the tub and the shower curtain are gone. |
|
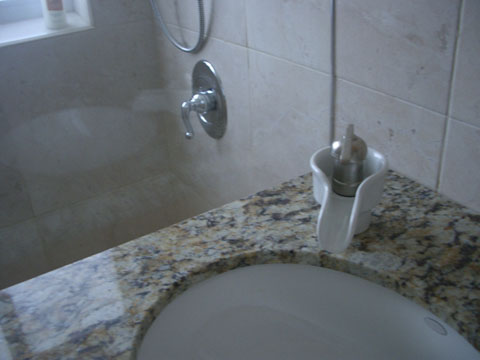
The new sink, vanity and commode. I've used the same granite here as I used in the kitchen and the same cabinets as well. The frameless shower enclosure makes the bathroom look bigger. |
|
I copied the faucet from one I saw at Ty's condo. You raise a little handle- kind of like a pump handle- and water gurgles up from beneath and runs down the spout. Turning the handle regulates the temperature. |
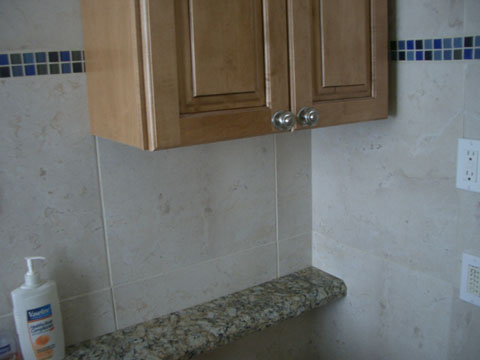
|
The cabinet and narrow shelf over the commode. It would have been nice to have a larger counter, but there was no way to do that without making it impossible to use the commode. What we did do was get a low-rise fixture so that I can get access to the tank without the counter interfering. In the old bathroom, a section of the counter had to be lifted out to get access to the tank. |
NOTE:
If you have come to this page from the Index for either 2005 or 2006, you can use the links at the top or bottom of this page to return to the appropriate Index. Otherwise, you can return to the album page from which you came by clicking
here.
December 6, 2005
Lighting
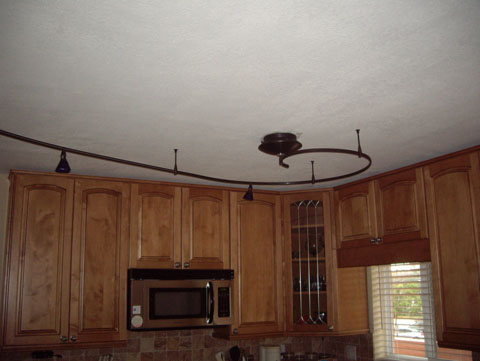
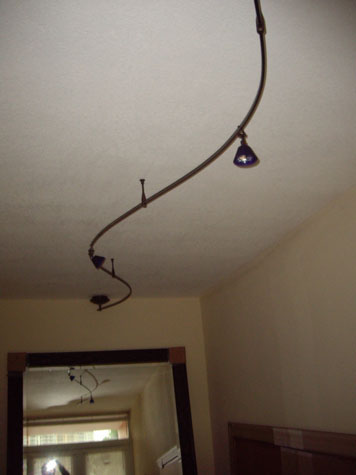
Well, it's the day the new track lighting is being installed. Some time ago, Ty and I picked out a different kind of track lighting. The track is suspended from the ceiling on 4-inch posts, not attached to the ceiling as most track lighting is. This kind of track can also be bent into any desired shape, unlike the straight, square tracks you might be used to seeing. Another difference is that this lighting is actually low-voltage lighting, and so there is a transformer about two inches thick and the size of a small dinner plate that takes the place of the usual square box that brings electricity out of a ceiling fixture for normal track lighting. Finally, there are many, many more options insofar as fixtures are concerned, and you can put as many on the track as you want, so long as their total wattage doesn't exceed the capacity of the transformer.
We found this lighting at Light Bulbs Unlimited up on Oakland Park Boulevard, and ordered it about two months ago. I had gotten a call about a month ago that all the lighting was in, and so I scheduled the installation for today, when I knew I'd be down here in Florida.
The installers began early in the morning, and had the transformer in pretty quickly. Then the installer and I sketched out how I wanted the track to be bent. The artwork I have all has a musical theme, so what I wanted on the kitchen-living room ceiling was something approximating the "staff" symbol on written music. It looks like a stylized capital "S," with an extra circle at the top; the larger part of the symbol is in the living area. The lights will be placed strategically to light the sink, cooktop, island counter, living room artwork, entertainment center and dining table.
As it turned out, I should have used a flash for all the still shots that I took; I was fooled because the room was so light. The installers were constantly in motion as well, and so all of the still shots of the installation turned out badly. But I did take one long movie of the installation process as they were bringing the final section of track around and over the dining table. You can view that movie using the player at left.
NOTE:
If you have come to this page from the Index for either 2005 or 2006, you can use the links at the top or bottom of this page to return to the appropriate Index. Otherwise, you can return to the album page from which you came by clicking
here.
December 9, 2005
Lighting
The installers have come and gone and I have had a few days to get used to the new lights. I already know I need to get a low-voltage switch for the wall so that the transformer does not burn out, but I'm told it will be all right for a while. I also need to figure out a way to get a light switch near the door so I can turn on some lights in the room as I enter. But here are some pictures that will give you an idea of how the new track lighting looks.
|
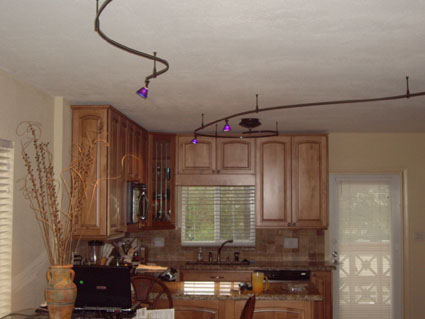
The transformer is mounted in the center of the kitchen. The track leaves the transformer going towards the sink, and then curves completely around to take a straight path towards the island counter that divides the kitchen and living room. |
|
Looking from the living room, the track angles across the island counter to illuminate it, and crosses the ceiling to the east side of the room and then turns straight to parallel the wall and light the artwork on that wall. Then it makes a broad, sweeping curve back across the room, lighting the entertainment center and ending just above the dining table, and throwing a light directly on it. |
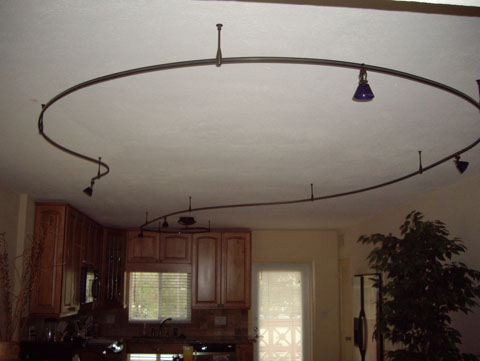
An entirely separate track has been installed in the entry and alcove. It begins from a smaller transformer by the back wall, and then undulates across the ceiling to the front door, lighting the alcove, entry and artwork.
At right you can see the new track lighting turned on. You really don't get the full effect of the new lighting unless it is dark outside. The lights themselves are a cobalt blue, so even though the light that is cast is white, the fixtures look blue.
The movie at left will take you through all the new lighting, beginning in the alcove-entry and ending in the kitchen.
Furniture and Accessories
I've been mostly busy with the lighting this week, but have had an opportunity to put away a lot of stuff in the kitchen and get the counters organized as well as find some solutions to the problem of where to put things in the bathroom and in the bathroom shower. Here are some pictures of these two areas that will give you an idea of what I have done up to now.
As you can see at left, the bathroom has a new rug and a corner shower holder.
As you can see at right, you can see that the kitchen's been cleaned up and everything put away. I am still finding out where the best place for some things is. And I still need a brighter light over the sink.
NOTE:
If you have come to this page from the Index for either 2005 or 2006, you can use the links at the top or bottom of this page to return to the appropriate Index. Otherwise, you can return to the album page from which you came by clicking
here.
February 1, 2006
During my trip down here this past week, I have been arranging for and taking delivery of some of the new furniture and accessories for the condo. Here are some pictures that will give you an idea of what the status of all the furnishings is now.
|
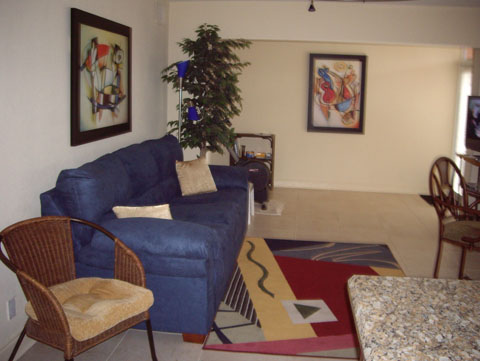
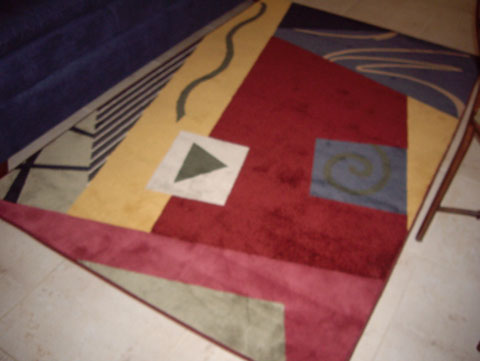
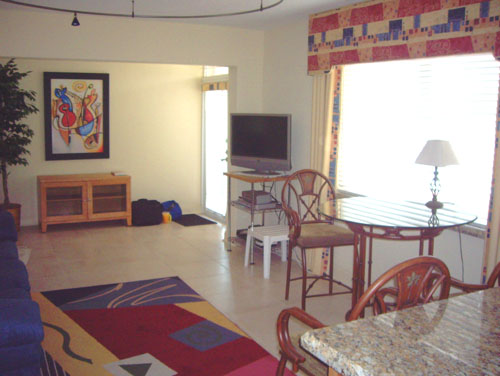
I've had the sofa for a few months, but have just gotten the living room rug from Home Depot. The artwork is hung, I have a new lamp, and I have arranged some of the few pieces of furniture that I kept from the old condo. |
|
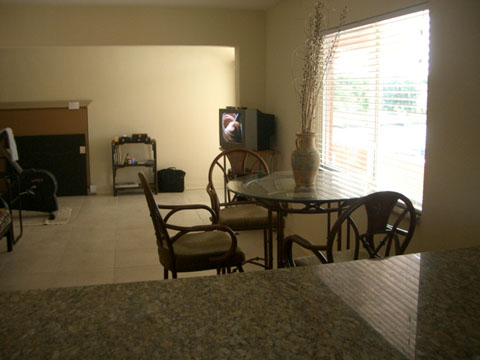
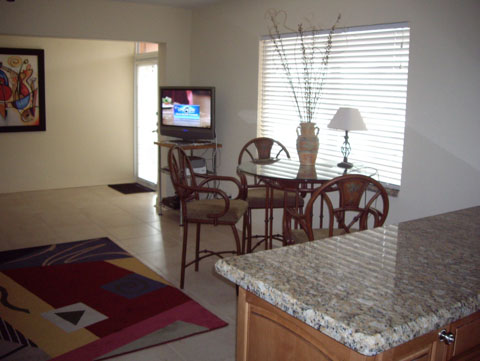
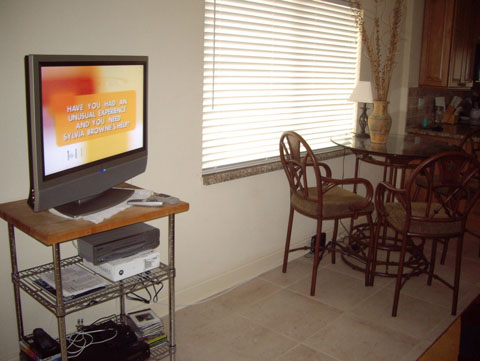
I've bought a new flat-screen TV for the living room, and have brought back the dining table and chairs that I had before the renovation. I've also arranged a vase and lamp that I had before. |
|
The kitchen is done, and I've simply put out or away all the kitchen accessories that I had before the renovation. Very little new stuff, save drawer dividers and such, has been bought. |
|
Lighting was another major addition to the condo. We've installed under-counter lighting in the kitchen, a downlight above the window, and innovative track lighting on the ceiling. It remains to get a low-voltage switch to control the ceiling lighting. |
|
This picture's a little fuzzy, but here is the new rug in the living room. It was also ordered through Home Depot with colors designed to match the artwork and window treatments. |
|
The alcove is still a work in progress. We have a new mirror to replace the one broken by the workmen earlier in the project, and it willl just lean against the back wall as shown here to provide more depth to the space and make it seem larger (since it is actually quite a bit smaller because of the new bedroom closet). I am still using the old bookcase and this is a convenient place to park my exercise bike when not in use. |
|
I am still looking for some sort of TV cabinet where I can hide all the electronics. For now, I am using the small baker's rack that had been the kitchen island before the renovation to hold the new television, DVD player and other electronics. I've placed the dining table near the window; the chairs get moved around as needed. |
|
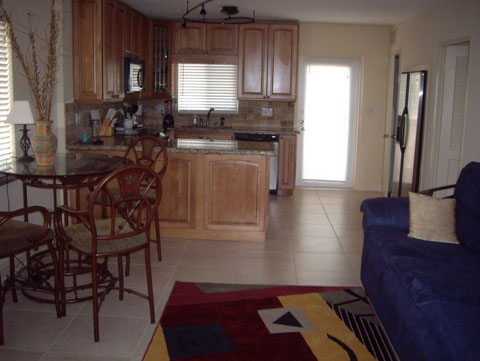
Here's a view of most of the living room. The refrigerator has been recessed into the old closet, and not having that large box out in the room makes everything seem larger. |
|
The new bedroom suite is working well. Currently I am using my old bedcoverings, but Ty and Scott are making a new one to go with the window treatments that they are also making. The lamps go well with the furniture, and I am using one of the dining chairs in the corner. You can also see the new closet; I still have to simplify it some. But I can keep all the bicycles there when I am not using them. |
|
Here you can see the new bedroom rug, also ordered from Home Depot in colors that carry in the artwork colors from the living room, and which will match the new bedcoverings. We had the broken mirror cut down and mounted on the wall to the left of the bed; you walk right towards it when you enter the bedroom, and it makes that end of the room seem bigger and brighter. |
|
I haven't decided what to do with the old computer desk, but I will probably discard it eventually. I am simply sitting at the dining table with my laptop when I use a computer. Since I probably won't get another mainframe, the desk is superfluous. I have moved the old TV into the bedroom to take advantage of the new cable access. The new dresser provides lots of storage, and Ty and Scott are looking into ways to hide the supports behind the mirror. |
|
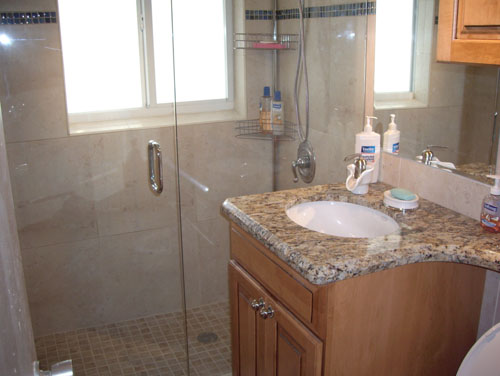
One of the biggest changes has been the new bathroom. It was gutted and completely rebuilt. We've tiled all the walls and installed a shower in place of the tub. The frameless enclosure makes the bath larger, and Target has provided a neat solution to the problem of where to put shower accessories, since the window sill is sloped now. I like the choice of fixtures in the shower and the new lighting fixture in the ceiling. The mirror also adds to the feeling of spaciousness. |
The tile floor in the shower looks great, and matches both the wall tile and the cabinet finish. I've copied the sink fixture that Ty and Scott have in their own condo and aside from an odd problem with the pressure on the hot water side of the fixture, it works great. The counter marble matches that used in the kitchen and extends around over the commode to provide more space. Because of that, we got a low-rise commode and have a installed self-lowering seat. Two problems still exist. One is that the handle on the commode keeps coming off occasionally. The other is that I haven't quite figured out yet where the tissue holder will go.
March 29, 2006
I was down in Florida in late March, 2006 to spend a week or so, and also to be in the condo when some new furniture was delivered and some of the paintings and such arranged. The condo renovation has certainly been a work in progresss, and this represents the last of the major work that was done. From this point forward, the condo is basically finished and is just to be enjoyed.
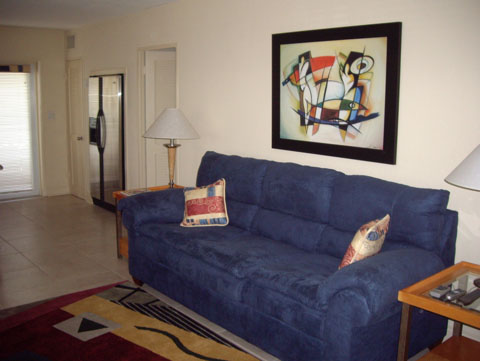
|
In the living room, almost all the furniture is new. The blue sleeper sofa came from City Furniture on Federal, and its color matches the blue color in the two prints by Glockel, one of which is hung over it. The end tables came from Modernage, also on Federal, and the lamps were a gift from Ty and Scot. The rug, which again pulls in colors from the prints, was actually ordered from Home Depot. |
|
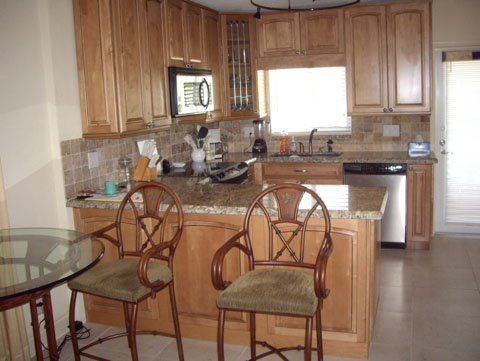
Of course, the kitchen doesn't have furniture, but you can see that a couple of the tall chairs from the dining table that I got before the renovation started are being used as reverse bar stools; they are just the right height. |
|
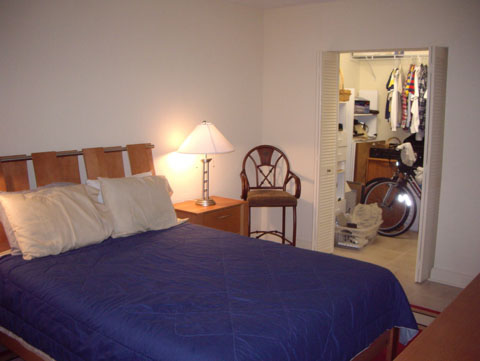
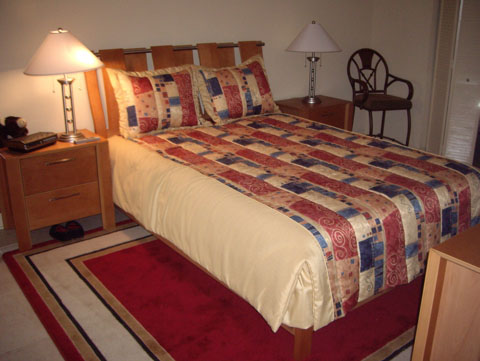
The bedroom has changed dramatically. The bedroom suite came from Eldorado Furniture all the way out on University Avenue and the lamps came from City Furniture. I am using one of the dining table chairs in the corner, and the patterned rug came again from Home Depot. Ty and Scott made the bed coverings using the same fabrick that they used for the window treatments in the living room, and the total effect is very coordinated but also very dramatic. The bedspread is so nice that I always take it off and put it away when I am there so that it doesn't get worn out or something spilled on it. |
|
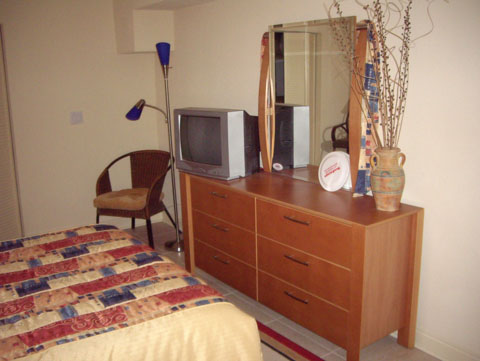
On the other side of the bedroom, I have moved the old television from the living room into the bedroom and placed it on the dresser, since there is now a cable connection here in the bedroom. The lamp actually came from Target, and the chair is one that I had before the renovation. I am looking for more artwork for the bedroom, as I want to turn that corner into a reading nook. |
The living room is still something of a work in progress. I bought a new flat-screen television to take the place of the old one, and I wanted to find a nice credenza on which to put it and in which to put the components. Against the far wall is the one I found at Eldorado Furniture. But when I got it delivered, I thought that it looked good right where it was under the print. So I am debating what other piece of furniture I might get for the electronics.
If you came to this page from somewhere in 2005, you can use the first link below to return to the index for that year. If you have come to this page from somewhere in 2006, however, please use the second link below to return to the index for 2006.
|
Return to Index for 2005 |
|
Return to Index for 2006 |