|
October 15, 2010: Some Hikes in Phoenix, AZ |
|
Return to the Index for our Western Trip |
For a while now, Fred and I have been planning to make another trip out West, this time going as far west as Phoenix, and making stops in New Mexico and Arizona. Fred has done the research on things to do and we've agreed on a flexible schedule that can change depending on weather and other factors. In mid-morning, October 13th, we started out.
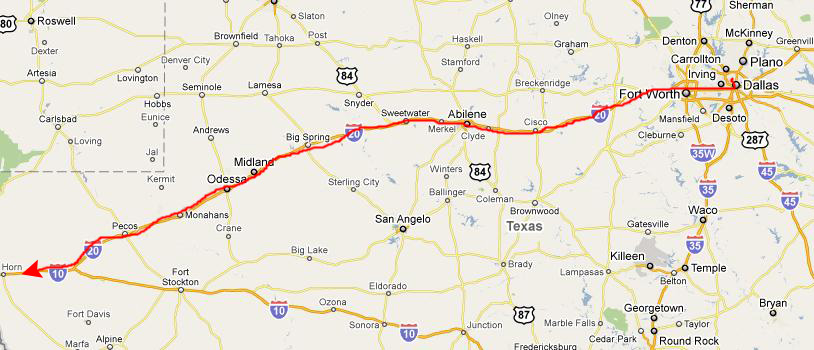
Driving to Willcox, AZ
|
We stopped past Midland/Odessa and had some lunch at a roadside rest area.
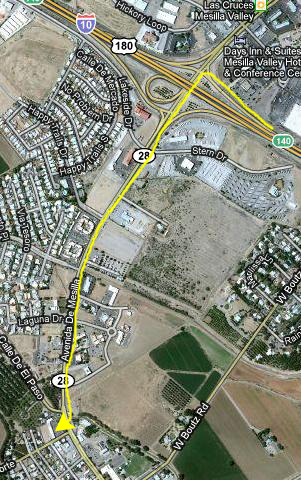
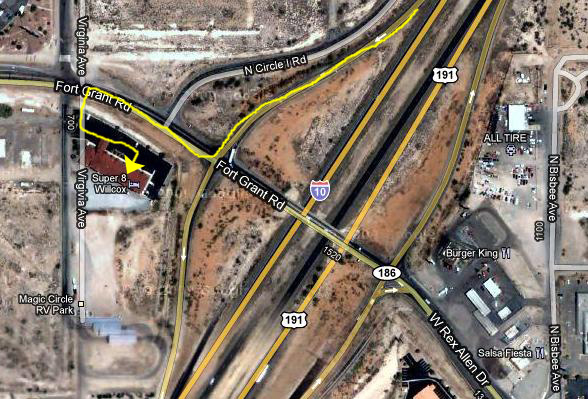
We continued west on I-10 as it got dark past El Paso. We weren't tired, to I called ahead and made a reservation at the Super 8 in Willcox, Arizona. We stopped in Las Cruces for gas and to have dinner at a Mexican restaurant that we had eaten at perhaps ten years ago- the Andele Restaurant.
The Andele Restaurant is a very good one. The food tastes authentic and the prices are definitely reasonable. You also don't have to ask for chips and salsa; there is a self-service table at one end of the dining room that offers three or four different salsas, a variety of condiments and chips. But the meals big enough that it's wise not to fill up on chips and salsa. After we finished, we headed back up to I-10 and then continued west through Lordsburg and into Willcox. We arrived at our motel just before midnight
This brought us to the end of our first day, which as you can see was entirely occupied by driving west.
Visiting Biosphere II North of Tucson
Getting to Biosphere II
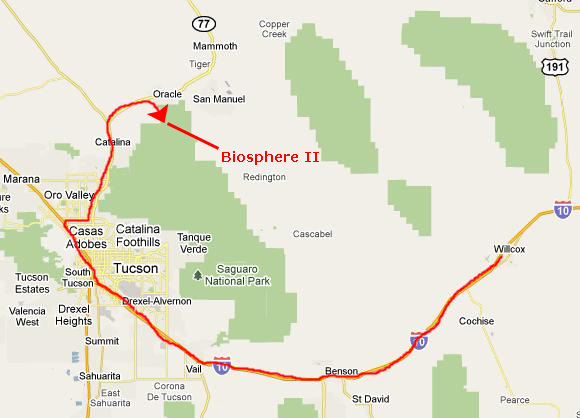
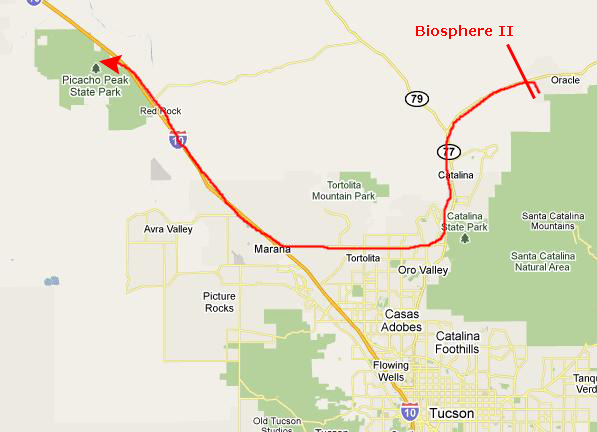
On Thursday morning, we left the Super 8 in Willcox and continued west on I-10 around to the west side of Tucson. It had been dark when we got to Willcox last night, so it was only in the morning light that we could see the mountains north of the interstate. We followed the directions we'd written down for getting to Biosphere II; these involved going around south of Tucson on the Interstate and then getting off at Arizona Highway 77. This highway came back east a mile or so and then turned north around the city of Tucson around towards Oracle, Arizona. It was slow going; we were on a major city street with lots of traffic, lots of businesses and lots of traffic lights. But after a while the road opened up and we could make better time. Along the way, Fred took an interesting, "artistic" picture out his window and you can have a look at it here.
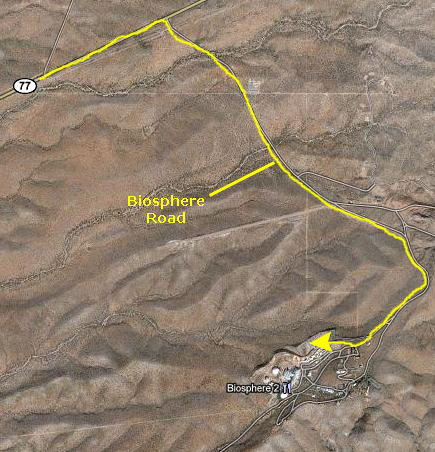
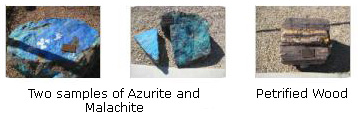
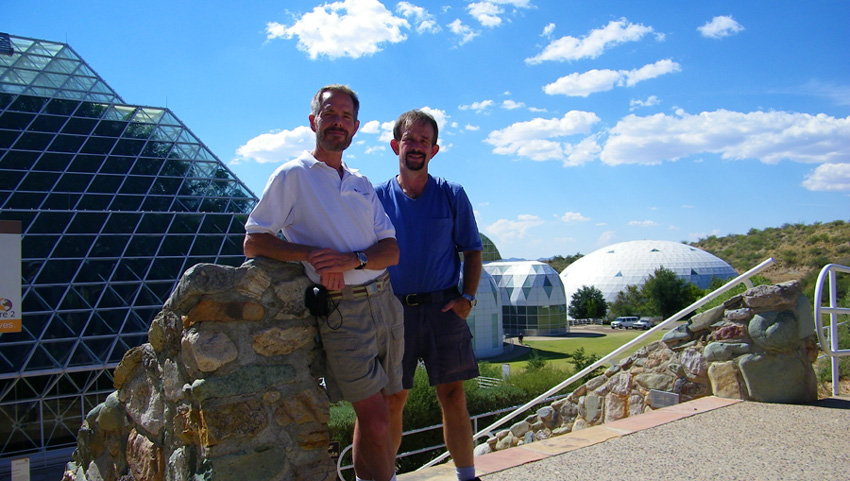
After Highway 77 curved around to the northeast towards Oracle, we found the marked turnoff we were looking for- Biosphere Road. We turned right, headed south, drove about five miles through pretty desolate countryside and presently arrived at the Biosphere complex, where we were directed to the visitor parking area. Biosphere began as a private venture (funded by the Bass Brothers out of Fort Worth) but complications and controversy arose and eventually the complex was taken over by the University of Arizona, which now operates it. I'll talk more about that in a while. Before heading in, I snapped a picture of Fred at the Biosphere entrance. Also of interest near the parking area were some rock samples that were on display from this general area. This part of Arizona is known for the many minerals and gemstones that are found in the mountains nearby. If you'd like to see some of these interesting samples, just click on the thumbnails below:
Entrance and Assembling for the Guided Tour
To get there, we crossed through the Visitor Center and out into an area of buildings, offices and living quarters collectively known as The B2 Institute (click on the previous link to read a sign describing the buildings and the Institute). The Institute and the adjacent living quarters are composed of a number of small, detached buildings- "casitas." Some of them are offices and meeting rooms, and many are residential. In some of our pictures, including the one I took of the central pathway through the Institute, you can see some of the Institute personnel and people visiting Biosphere II as part of its operations. Today, there was a major conference going on in the Institute. If you click on the thumbnails below, you can see a couple of the pictures that Fred took here in the complex of Institute buildings as we worked our way along towards the Biosphere itself:
We continued walking along the walkway from the Visitor Center generally southwest through the area of casitas and eventually came out in an area where we could see Biosphere II ahead of us.
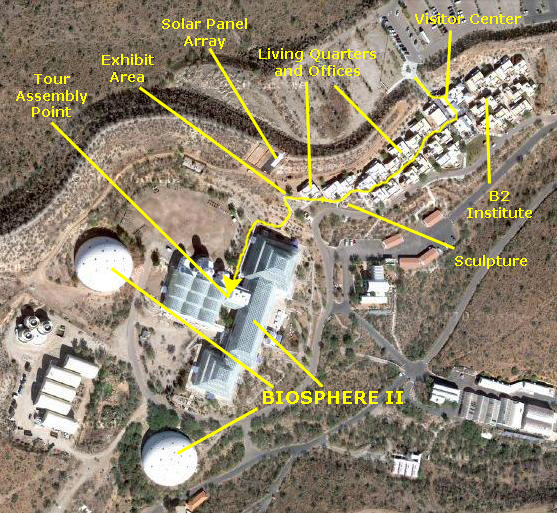
In the B2 Institute This movie pans around the area of casitas and other buildings between the Biosphere II Visitor Center and the Biosphere itself. As you can see on the aerial view above, we eventually came out into an open area up above the level of the actual Biosphere and from which we had an excellent view of the Biosphere II complex of buildings. Here there was a small sculpture garden and we stopped to take some pictures and movies.
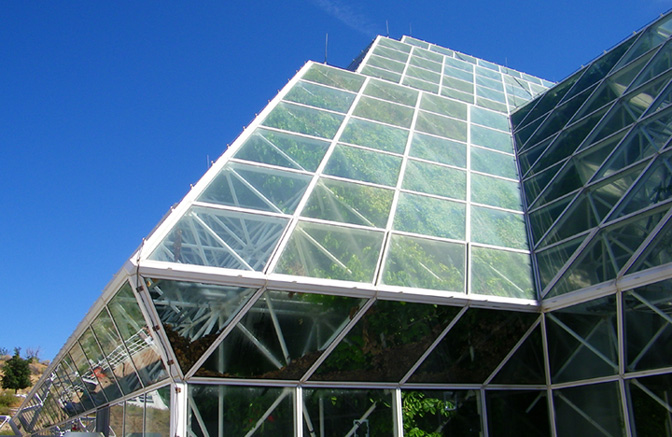
On the Terrace Above the Biosphere This movie shows you the open area at the southwest end of the chain of casita buildings. There is a small sculpture garden, great views of the Biosphere, and an exhibit area having to do with the solar panel array on the hillside nearby. From this vantage point, there were great views out across the Biosphere II buildings. The main Biosphere II building is a pyramidal glass affair- like a huge greenhouse. Supporting the glass ceilings and walls were geodesic structures made up of thousands of sections of white tubular metal, put together in triangular shapes for strength. To the west of the main Biosphere are support buildings, some of which generate the electricity that Biosphere II uses. These support buildings had a vaguely Moorish look to them; they were reminiscent of the whimsical structures on top of Casa Mila La Padrera in Barcelona that we saw in 2008 prior to our Transatlantic Cruise. We took a number of good pictures of the Biosphere II Complex from this vantage point. If you want to see some of them, click on the thumbnails below:
Also at the top of the stairs leading down to the Biosphere was an exhibit area all about the use of solar energy. Solar generates most of the energy that the Biosphere Complex uses; some is generated in other, more high-tech ways. I found the exhibits interesting, and so I photographed them for you to read. Just click on the thumbnails below if you want to learn more about solar energy generation and the other green techniques used here at Biosphere II:
We descended the stairs towards the Biosphere, and then turned right and around to the west side of it- following the signs pointing the way. On the west side of the Biosphere there was a broad walkway leading back to the entry for the guided tours. I stopped to read the exhibit description for the Eddy Covariance stations that are situated on the ground below the walkway. I also got some good pictures of the habitat buildings at Biosphere II; these were the buildings in which the Biospherians actually lived while they were cut off from the outside world for over two years as an experiment in closed-system living. You can have a look at those pictures here and here. At the end of the walkway, we went through the marked door to an assembly area where we waited for our tour guide to arrive and the tour to begin.
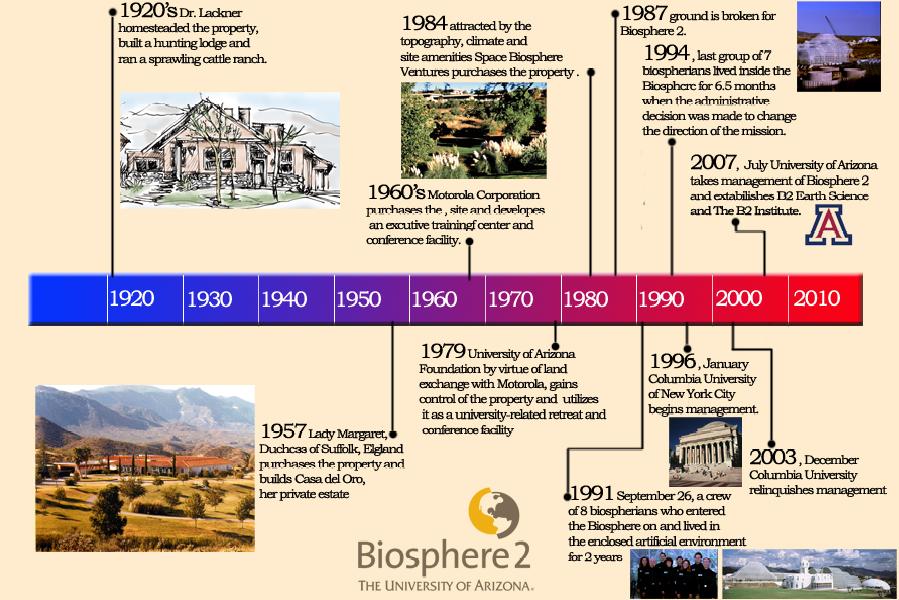
A Short History of Biosphere II
In the 1800s, the Biosphere 2 property was part of the Samaniego's CDO Ranch. After several changes of ownership, it became a conference center in the 1960s and 1970s, first for Motorola, then for The University of Arizona. Space Biospheres Ventures, bankrolled by Edward P. Bass of Fort Worth, bought the property in 1984 and began construction of the current facility in 1986 to research and develop self-sustaining space-colonization technology. Two missions, between 1991 and 1994, sealed Biospherians inside the glass enclosure to measure survivability. Behind this highly public exercise was useful research that helped further ecological understanding. There was some controversy over procedures and protocols and at least one of the experiments ended abruptly. Bass wanted to distance himself from the project, so he set up a $30 million fund from his Philecology Foundation to fund Bisophere 2 operations and some research projects. Other grants and awards, primarily from the National Science Foundation, also supported research activities. When this fund was close to ending, the property was sold June 4, 2007, to CDO Ranching and its development partners. The University of Arizona assumed management of Biosphere 2 in June 2007, with a 3-year lease of the 3.14 acre facility. The agreement to pay a $100 annual fee to owners CDO Ranching and Development may extend to 10 years. The enclosure now serves as a tool to support research already underway by UA scientists. As a laboratory for big-scale projects, the university�s stewardship of Biosphere 2 will allow the UA to perform key experiments aimed at quantifying some of the consequences of global climate change. Much of this history was recounted by our tour guide shortly before the tour began.
Our Guided Tour of Biosphere II
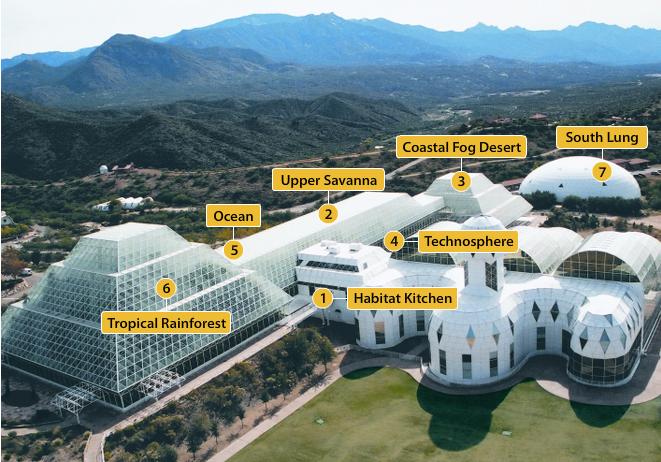
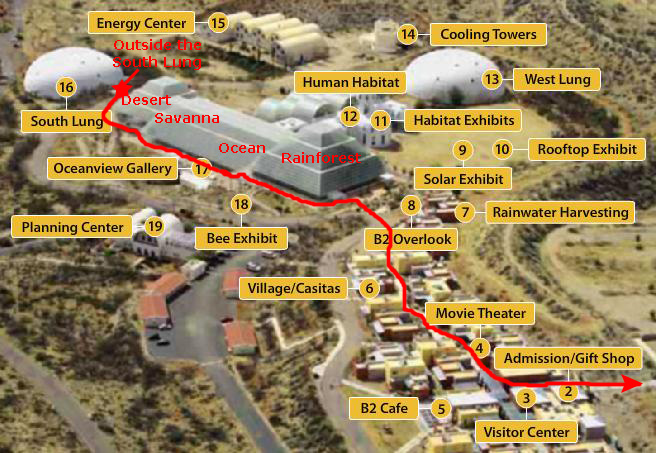
I thought I would make a short movie of part of the introductory remarks that our tour guide delivered; not so much so that you can hear those remarks, but more so that you can see what the guide was like. Now let's go on the tour. Below is a diagram of Biosphere II, and I'll key the pictures we took to the sections we visited.
1 - The Habitat Kitchen
5 - Ocean
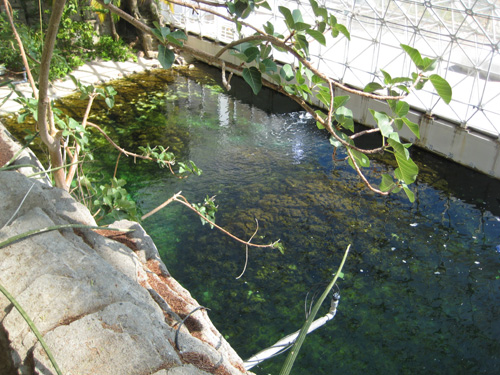
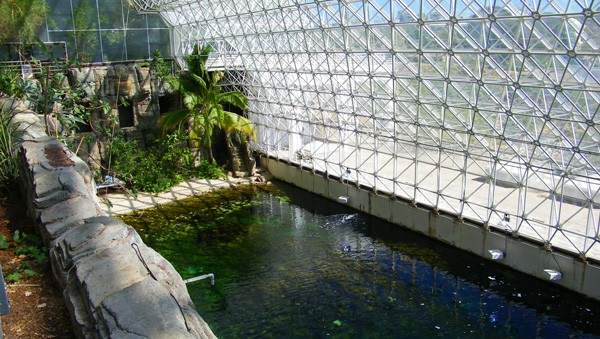
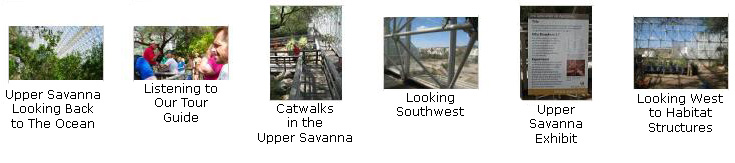
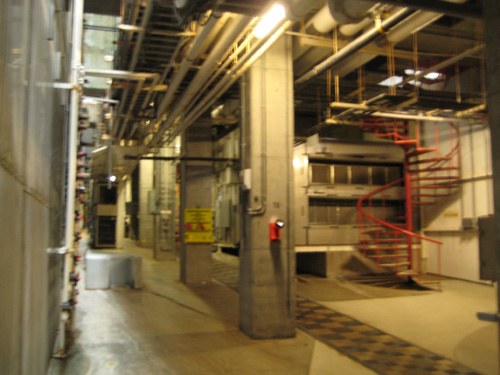
The first stop inside the Biosphere was on an elevated walkway above the Ocean. We would actually see the Ocean area of the Biosphere twice; the second time being just before we entered the Tropical Rainforest area. For now, though, we went through the airlock and then gathered on the walkway and platform above the Ocean to listed to the guide for a time. While he was talking, Fred and I took some pictures of the Ocean down below us.
The Ocean contains over a million gallons of water and consumes much of B2's energy resources to maintain a tropical temperature. The water is actually salt water, and there are fish and coral reefs under the surface of the water. If you will look at the beach area of the Ocean in the picture at right, you will see a rock wall behind the beach that appears to have stone windows. These windows are off the hallway that leads from the underground areas of the Biosphere up and into the Tropical Rainforest, and in a while you will see a view of the Ocean taken from those windows. From where we were standing, we could also look ahead to the next area we would visit- the Upper Savanna. I also got a neat picture of the latticework ceiling above us.
At The Ocean/Upper Savanna While we were here on the walkway above The Ocean, I thought I would make a movie of our surroundings- the walkway, The Ocean and our guide.
2 - The Upper Savanna
Here in the Upper Savanna there are beautiful views of the expansive glass structure, and from the Upper Savanna you can look east through the glass to the mountains and west through the glass to the Habitat structures. To see some of the other pictures that we took here in the Upper Savanna area of the Biosphere, just click on the thumbnail images at right:
3 - The Coastal Fog Desert
From the Upper Savanna to the Coastal Fog Desert I filmed a movie as the group passed through a divider between the Upper Savanna and the Coastal Fog Desert. It was a wall of plastic with a simple door- just enough to keep most of the humidity on one side. As we moved through the barrier, the air, the temperature and the vegetation changed abruptly.
After passing through the barrier, we walked down a long wooden path to a platform in the middle of the Coastal Fog Desert where our guide gave us some information about the area. This area is not reflective of the Sonoran desert. Instead, it is modeled after the coastal deserts along the Pacific and Baja California. As I walked down to join the group, I could look back up at the Upper Savanna and the moisture barrier between this area and the Upper Savanna. We spent a few minutes on the platform while our guide talked to us about this area of the Biosphere. While he was talking, both Fred and I took some pictures looking around the area, and you can have a look at them by clicking on the thumbnails below:
When our guide was done, he led us past the platform and down the stairs to the underground portion of Biosphere II.
The Underground
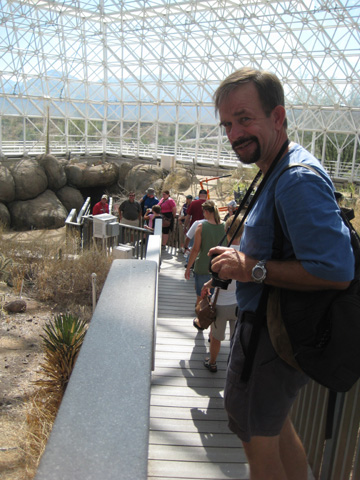
Of course Biosphere II was interesting above ground. But above ground it is not much different from any large greenhouse-type building we have been in. Examples of similar structures that we have toured would be the greenhouses at the Missouri Botanical Garden, the Oklahoma City Botanical Garden and botanical gardens in Austin and San Antonio. What I found really interesting is how much equipment has to be in place to control and supply the environments that are the visible part of any operation such as this, and I was pleasantly surprised that we got to see this subterranean world. This area is called the "technosphere," and it is where the mechanical systems make control of the B2 environments possible. You can see a bit fuzzy example (I liked the lighting better without the flash, but it was hard to hold the camera still) of this underground world at left. We came down the stairs from the Coastal Fog Desert and through an airlock. I didn't take a picture of that airlock, but I did take a picture of a similar one- the Upper Savanna airlock. We gathered together around our guide so he could do a bit of explaining about what we were seeing. You can see what it looked like when we were grouped together here. What our guide had to say was very interesting, and he positioned each of us so we could look up the Coastal Fog Desert airshaft and see some of the monitoring equipment that keeps each section of the Biosphere at the desired temperature and humidity levels. Then it was off to the Tropical Rainforest.
Through the Underground To get to the Tropical Rainforest, our guide led us through the underground maze, up some stairs and then down the hallway at the north end of The Ocean that I pointed out in an earlier picture. In this movie, you can follow along on this section of our tour.
3 - The Ocean
The previous movie ended in the hallway outside the entrance to the Tropical Rainforest. Along this hallway there were viewing windows where you could look out on the Ocean portion of the Biosphere. The view from here was very good, and Fred took the particularly good picture of The Ocean that you can see at left. Then it was through another airlock and up some stairs and into the Tropical Rainforest.
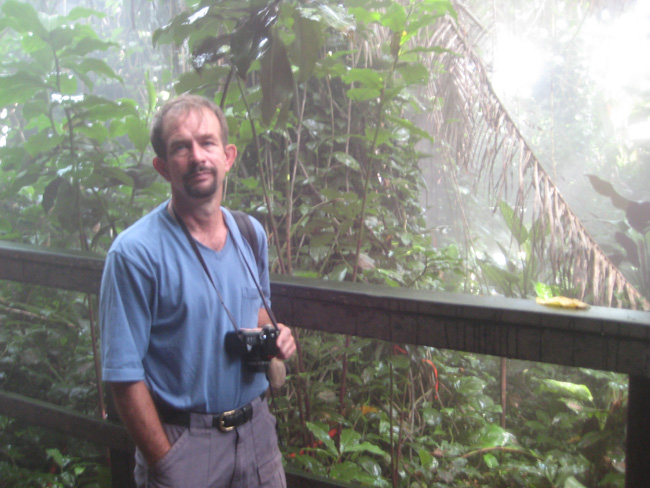
6 - The Tropical Rainforest
The Tropical Rainforest was really well-done. It was certainly the mistiest, steamiest artificial rainforest that we'd ever been in. Everything was damp or wet, and there was an incredible amount of moisture in the air. This made it hard to get good pictures as the water droplets kept getting on our lenses. But wiping them off frequently helped. There is not much more I can add to the pictures we took here in the rainforest, so if you want to see some of them just click on the thumbnails below:
7 - The South Lung
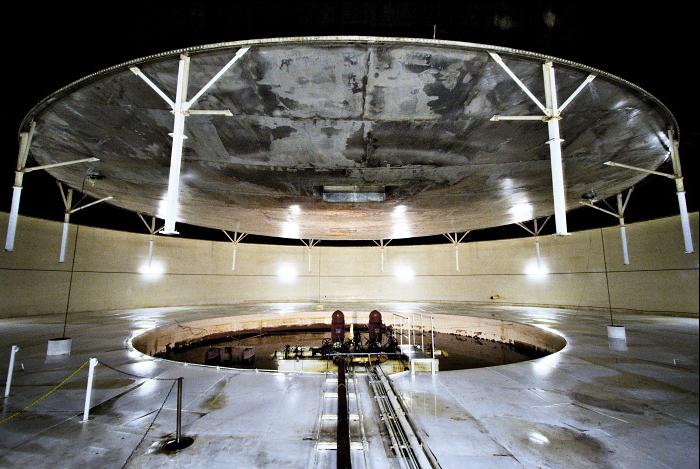
We went back downstairs from the rainforest and back into the underground "technosphere." We walked back through the passages and then beyond the point where we'd entered the technosphere from the Coastal Fog Desert. Just beyond that entrance was the South Lung access tunnel. We went through that airlock and found ourselves in a long, downward‑sloping narrow tunnel. We followed this tunnel for perhaps 150 feet until we came to another airlock. This was the entrance to the South Lung. When we'd all got inside the South Lung, Fred took a picture looking back into the tunnel. The lighting inside the lung was very dim, and the room was so cavernous that the flash didn't help much. So I have taken the liberty of including here a photograph from the Biosphere II Web site of the inside of the South Lung.
The South Lung (one of two at Biosphere II) is a mechanical version of what its name implies. These lungs ensure that Biosphere II would not explode or implode due to pressure forces. The lungs allow air to be displaced to and from Biosphere II when temperature changes from night to day, or at any time that the inside pressure and outside pressure become radically different. For example, during or just before a storm, when the barometric pressure outside decreases, air would tend to rush out of the Biosphere to equalize the pressure. If the lung were not in place, then this equalization force would have to be absorbed by the glass windows- something they were not designed to do. The lung is actually a huge round room covered by a geodesic dome that is not airtight. Suspended in the middle of the dome is a huge diaphram- part metal and part flexible plastic. If the air pressure inside the Biosphere rises, air is forced through the underground tunnels into the lung, and the pressure pushes the diaphram up until the additional volume is sufficient to equalize the pressure. The reverse happens when the outside air pressure rises. Both these thing occur at least twice a day even without storms, for the difference in temperature is enough to require movement of the diaphram. Our guide demonstrated the lung to us. It usually moves much too slowly to be very obvious. But he first closed the tunnel doors leading to the rest of the Biosphere. At this time of day, the air pressure inside the Biosphere was a bit more than it was outside. So the guide opened a vent in the side of the geodesic dome (actually the doorway through which we would exit). This allowed the pressurized air to flow out, equalizing with the pressure outside the dome. As this happened, we could watch the diaphram sink slowly toward the pool in the middle of the lung. When he closed the door again and opened the tunnels up, the diaphram slowly rose again. It was extremely interesting to watch.
The Official Tour Ends
Then our guide led us up the stairs to the south end of that enclosure. I've put a different diagram below so you can see our route back to the Visitor Center:
At the top of the stairs, we paused to take a few pictures. Fred took a couple of me looking along the west side of the main Biosphere greenhouses and towards the Habitat. You can have a look at those pictures here and here. I took a picture of Fred and the South Lung. We turned east and walked along the outside walkway around the Coastal Fog Desert enclosure, and I snapped a picture looking in at another tour group. Then we rounded the southeast corner of the desert enclosure and started along the east side of it. From here I got another excellent view of Fred at the corner of the greenhouse with the South Lung in the background. Fred took a picture looking east towards the Planning Center. We walked along the desert enclosure and eventually came to the larger Upper Savanna enclosure. We walked around the corner of the Savanna greenhouse and could see the walkway continue down towards the Tropical Rainforest greenhouse. Out guide stopped us just outside the main greenhouse, about where the Ocean is and right by an elevator kiosk. Here, he closed out the tour, explaining that we could take the elevator down to the Oceanview Gallery if we wished, or continue walking around the Tropical Rainforest greenhouse to our starting point. We all thanked him and he went on to get with his next tour group. We did go downstairs for a while to walk through the Oceanview aquarium exhibit and look into The Ocean through the underwater viewing ports. Then we came back upstairs and continued walking towards the Tropical Rainforest greenhouse. When we got to it, we found a winding sidewalk that led up and around to it. Along this path there were more excellent views of the mountains to the east and of Rainforest greenhouse itself. The path brought us up to the walkway along the side of the Rainforest greenhouse, where I got a final picture looking back along the Biosphere. We rounded the corner of the greenhouse and were back at the open area in front of it.
Our tour of Biosphere II was very, very interesting. There was a lot to see and learn about, and we had an excellent tour guide. The scenery all around was extremely beautiful, and of course the greenhouses were amazing. Before we left for our next stop at Picacho Peak, Fred set up his tripod and took a number of pictures of the two of us at the top of the stairs leading from the casitas down to the Biosphere. The best of these pictures is the one at left. We returned to the car and retraced our route back into Tucson, stopping along the way for some lunch at a local barbecue joint.
Climbing Picacho Peak
Getting to Picacho Peak
Getting to Picacho Peak was easy. All we had to do was retrace our route back towards Tucson but, instead of going all the way down into town, we turned west on Tangerine Road. This highway led us all the way out to Interstate 10. Then it was just a short distance up the Interstate towards Phoenix before we saw the turnoff to the park.
History of Picacho Peak
Due to years of neglect by the federal government, Confederate sympathies were high in Tucson, which had been proclaimed capital of the western district of the Confederate Arizona Territory. Ultimately, Confederate dreams included influencing sympathizers in southern California to join them and give the Confederacy an outlet on the Pacific Ocean. The Federal government was anxious to prevent this, and Union volunteers from California, known as the California Column and led by Colonel James Henry Carleton, moved east to occupy Arizona. Most of the Civil War era engagements in Arizona, including Picacho Peak, occurred near remount stations along the Butterfield Overland Stagecoach route, which dated to the 1850s and which the Confederates tried to keep open with limited success. Twelve Union cavalry troopers and one scout, commanded by Lieutenant James Barrett of the 1st California Cavalry, were conducting a sweep of the Picacho Peak area, looking for Confederates reported to be nearby. The rebels were commanded by Sergeant Henry Holmes. Barrett was under orders not to engage them, but to wait for the main column to come up. However, their patrol surprised and captured three Confederate pickets. It failed to see seven other Confederate soldiers before they opened fire. During the bloody skirmish that followed, Barrett and two of his men were killed and three others wounded. Aside from the mistake of not waiting for the main force under Captain William P. Calloway to arrive, Barrett erred in ordering a cavalry charge on the Confederates, who had taken cover in a thicket. The Union cavalrymen thus made easy targets. After a brisk engagement that lasted about ninety minutes, the Confederates watched the California cavalry retreat, then the rebels fell back to Tucson themselves, to finish their picket mission by warning Tucson's garrison of the approaching Union army. Rebel reinforcements failed to be sent to Tucson so the commanding Confederate officer, Sherod Hunter and his garrison retreated without fighting, leaving the Union army to capture the desert town. The remains of the two Union privates buried at Picacho were later removed to the presidio in San Francisco, California, but Lieutenant Barrett's grave, near the present railroad tracks, remains unmarked and undisturbed. Union reports indicate two Confederates may have been wounded, but there is no confirmation of this. The Confederate participants reported the engagement to Capt. Sherod Hunter, commander at Tucson and for whom one of the main trails in the park is named, who in his official report made no mention of any Confederate casualties aside from the three men captured. Due in part to the skirmish at Picacho Peak, the Confederate goal of expanding their influence into southern California and to the Pacific Ocean was never realized. Eventually, both Arizona and New Mexico territories came under the control of the Union. Although the skirmish at Picacho Pass itself may have been only a small factor in these events, it can be considered the high-water mark of the Confederate West. Every March, Picacho Peak State Park hosts a re-enactment of the Civil War battles of Arizona and New Mexico, including the battle of Picacho Pass. The re-enactments now have grown so large that many more participants tend to be involved than took part in the actual engagements, and include infantry units and artillery as well as cavalry.
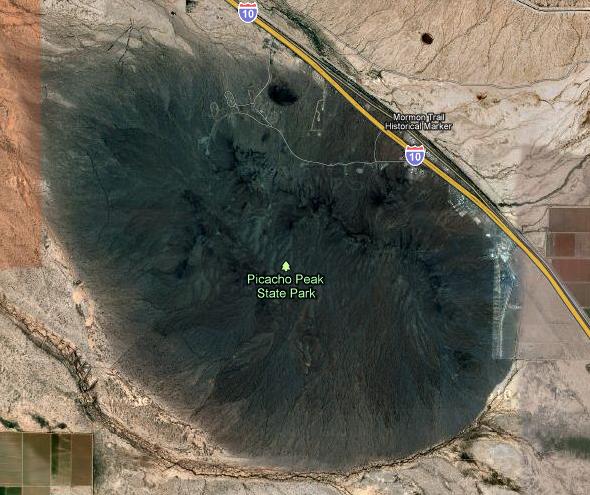
Picacho Peak State Park
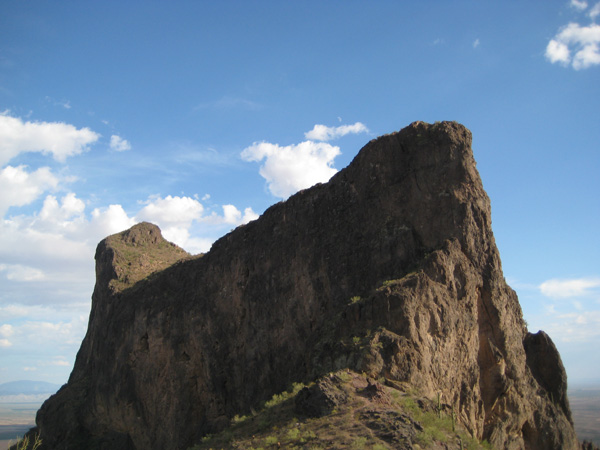
Visitors traveling along I-10 in southern Arizona can�t miss the prominent 1,500-foot peak of Picacho Peak State Park; the peak can actually be seen from downtown Tucson. There are hiking trails that wind up the peak and which, in the spring, overlook a sea of wildflowers. The park and surrounding area are known for its unique geological significance, outstanding and varied desert growth, and historical importance. The unique shape has been used as a landmark by travelers since prehistoric times. One of the first recordings was in the 1700s by the Anza Expedition as it passed through the area. The park facilities include a visitor center with exhibits and a gift store, hiking trails, playground, historical markers, campground (with or without electric), picnic areas, ramadas, grills, dump station, restrooms, and showers. The group use areas, for day & overnight use, are available by reservation. We weren't going to camp here; we had planned to camp west of Phoenix in the White Mountains State Park, a place we've been before. The park is celebrated for wildflowers that appear mid-March to early April following good winter rain. Though set next to an interstate highway, the park's west face possesses an unspoiled Sonoran Desert setting. A small flat space on top of the spire can be reached via two trails. It was unfortunate that we got to the park later than we might have wished, because we didn't think we'd have enough good light to make it all the way to the top and back before park closing. This may have been all to the good, because portions of the trails are precarious, and hikers are aided by cables and catwalks- much like we'd find the next day on Camelback Mountain in Phoenix, or that we found when we were hiking in Acadia National Park two years ago.
Our Hike Up Picacho Peak
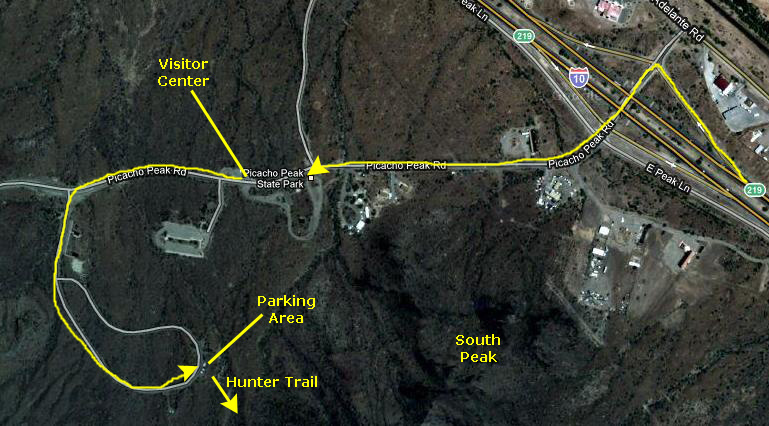
At the Trailhead
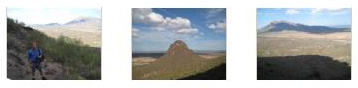
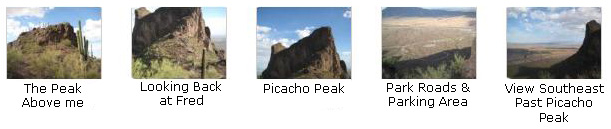
At the Visitor Center, we picked up some directions to the trailhead for the Hunter Trail, the best one to take to the top of the peak. We also found out that the park closed to hiking at 6:30pm, a factor that meant we might not have time to get all the way to the top of the peak. We followed the directions of the park ranger to the parking area at the trailhead and a few minutes later we were parked and starting out on the Hunter Trail. While we were here at the trailhead, I snapped a picture of Fred and also took a picture of the north face of Picacho Peak, up the side of which the trail would wind. Fred took his own picture of the smaller South Peak here at Picacho Peak SP. I knew we'd be taking lots of pictures on the way up, but, for reference, I took one from the trailhead looking north towards Phoenix and also one looking northeast across the valley towards other mountains in the distance. In that last picture, you can see a freight train moving along the dual tracks on the other side of the highway. During the entire hike, it seemed as if there was always a train passing in one direction or another along what must be one of the busiest railroad routes in the Southwest.
Up the North Slope of Picacho Peak
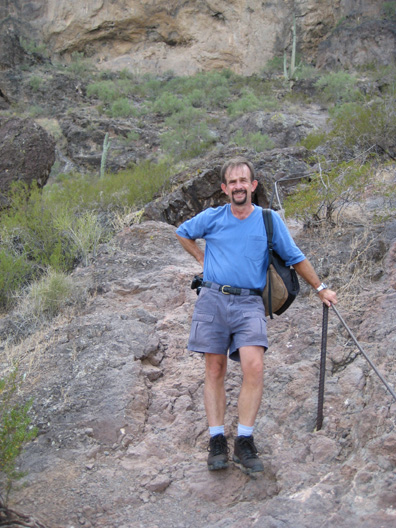
Generally, the trail up to the steep cliffside of the peak was easy enough, although there were two or three places where the going was steep enough that metal rails had been provided, such as the ones you can see in the picture of Fred at left. As we got higher and higher, we got hotter and hotter, eventually taking our shirts off. On the other hand, the views simply got better and better. Knowing that the best views would of course be at the highest point we reach, we didn't take all that many pictures in this first section of the hike, but we did take some. I've selected a few of them to include here, and you can click on the thumbnails below to have a look at them:
Lateral Trail to the Saddle
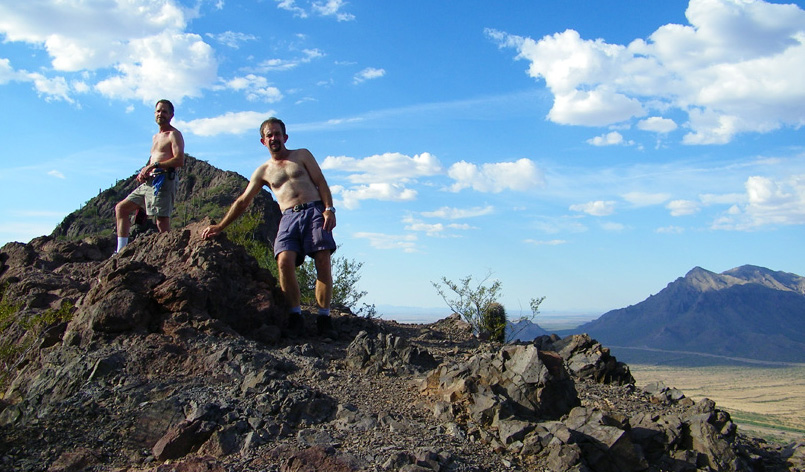
Fred and I at the Saddle
It was amazing being so far up here and having such wonderful views in all directions. The ridgeline runs northwest to southeast. On the southeastern end is Picacho Peak itself. We didn't figure out right away how the trail continued to the top of it. To the northwest, the ridgeline descended ten or twenty feet and then began ascending again to another peak (not as high as Picacho Peak) that is northwest of it. In front of us the view was to the southwest, but there wasn't much out there to see. The scrubland and desert stretched as far as we could see. Behind us, the way we'd come up, the view of course was back to the northeast, and you could see the park headquarters, the parking area, the Interstate and the railroad beyond it. On the far side of the valley were more mountains. It was a tiring walk up here, as evidenced by the fact that we'd taken our shirts off, so we just hung out and took pictures. One of the best of these was the tripod shot that Fred took of he and I; that's the picture I've placed at the left of this narrative. I did take some other pictures in various directions, and you can have a look at them if you click on the thumbnails below:
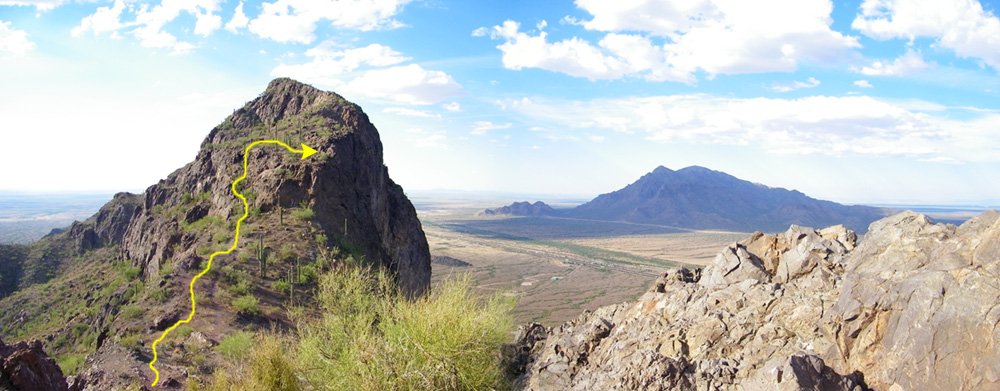
My Climb on the North Peak
Given that decision, we had some time to spend up here, so I thought I would cross the ridgeline over to the peak to the north of us and see if I could climb up partway or all the way to the top. Since I would not be out of sight of Fred, or at least the plateau he would be standing on, I thought it would be a safe alternative to the Picacho Peak hike. So I left Fred temporarily and walked down the ridgeline below the plateau we were on and started up again on the far side. Fred took an interesting picture of me as I was beginning my ascent on the other side of the saddle, and you can have a look at that picture here. To give you an idea of where I was headed, you should look at the panoramic picture below that Fred took while I was climbing up the peak. I have marked the approximate route that I took on that photograph:
As I started my climb on the opposite side of the saddle, I took a picture of the way ahead. It wasn't a particularly difficult ascent, although there was one crevice that I had to pull myself up through so I could reach the relatively flat area about halfway up to the top of the peak. When I got up there, I found the views to be really great. Of course, I had good views looking back towards Fred, who appears as a tiny pink dot right at the peak of the plateau that is at the base of the more sheer rock cliffs of the peak itself. I also took a number of other pictures. You can have a look at some of them by clicking on the thumbnails below:
Fred also used his zoom lens to get a picture of me over on the North Peak. It was a great picture, taken just after I'd completed my movie, and you can have a look at it here.
Returning from Picacho Peak
After a little while of just enjoying the view, we started back down the trail. There wasn't much new to take pictures of, so the hike down went quickly. Just as we were reaching the bottom of the trail, I looked back and got a picture of Fred coming down the trail. We reached the RAV4 and stopped to have a cold drink and a snack before heading off to our campground for the night.
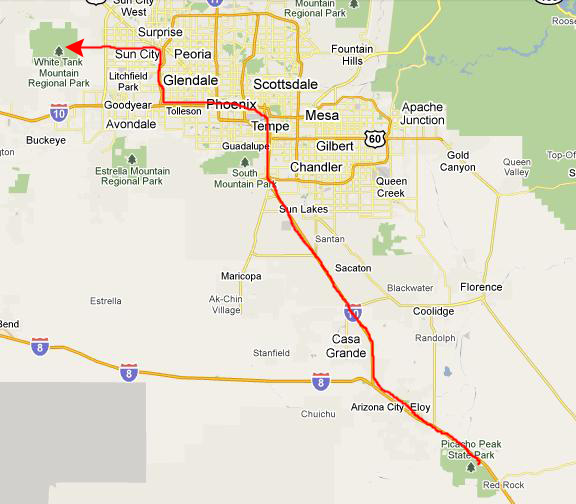
To White Tank Mountain Regional Park
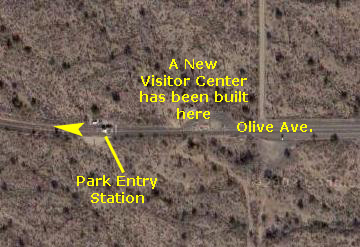
We headed up I-10 to the split with I-8, and continued on I-10 to Phoenix. We hit rush hour there as we turned west on I-10, and so it was slow going. It also got dark while we were going through Phoenix, which made it a bit more difficult for us to find our turn off onto the Agua Fria Freeway (Arizona 101) heading north. From the freeway, we exited on Olive Avenue and then headed west. Olive Avenue is mostly a two-lane street, but it's one of those two-lane suburban streets that is just waiting to be expanded into four; there are lots of new housing developments out in west Phoenix and so there is more traffic than the road was designed to handle. There were lots of lights, so it was not a quick trip heading west until we got way, way out into the suburbs. After we ran out of development, we crossed the last north-south road out west and then came to the entry for the Regional Park.
This park is a bit odd in that the entry closes at 9PM, and you can't get in or out after that time, so we had to make sure we didn't need anything for the night. We didn't, so we stopped at the entry gate and paid our park fee. We could see off to our right, north of the road, a new Visitor Center had been built, but we couldn't see it very well in the dark.
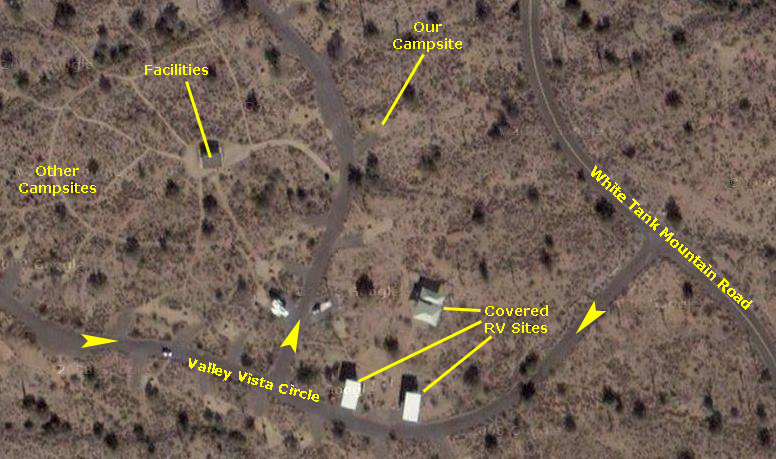
We followed White Tank Mountain Road as it entered the park and turned north. It climbed to the top of the plateau and then we could see the lights of the city of Phoenix off to our right. When we got to the camping area, which is on Valley Vista Drive, we turned in and found it very, very sparsely occupied. We had our choice of sites, so we chose the same one we'd used years previously. It was on the outer part of the loop and so had an unobstructed view of the Valley of the Sun and Phoenix. We set up the tent in the dark and while I was getting the mattress blown up, Fred cooked supper, which we ate while gazing off into the distance at the twinkling lights of Phoenix. It was already quite dark, so we just cleaned up everything and went into the tent for the night. The campground was ideal, with nice facilities including showers, but the only minor problem was that it was very warm. We are used to camping in the early spring and fall in mountainous, wooded areas, which White Tank is not. (Although it is on a mountain, it isn't very high and so not appreciably cooler than in the valley.) So it was warm for sleeping but we made do just fine.
You can use the links below to continue to the album page for different day.
|