|
November 10, 2005: Hawaii Trip Day 6 |
|
November 8, 2005: Hawaii Trip Day 4 |
|
Return to Main Index for Hawaii Pictures |
Introduction
Today was a day apart from Ron and Jay. Although we both wanted to see Volcanoes National Park, neither Ron nor Jay wanted to do much walking at all. They preferred to just do a driving tour of the park. Fred and I knew that we would want to do a lot of walking, and so we decided the night before that we'd go separately. We left fairly early while Ron and Jay slept in, had some breakfast and then headed off down the Hawaii Belt Highway towards the park.
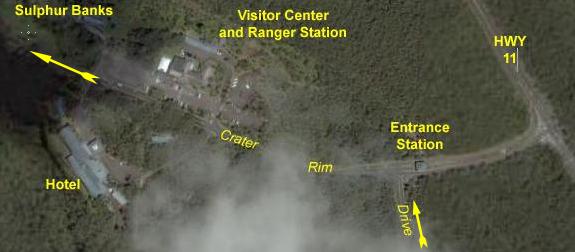 |
We turned into the park entrance and paid our fee and at that point it started to rain lightly. By the time we got to the Visitor Center and Ranger Station (the big complex at the top of the picture), it was blowing and raining steadily if lightly. We asked the ranger whether she thought the rain would continue, and she said that at this time of year there are typically showers until early afternoon, and she advised that we go across the Rim Drive to the hotel and find a rain slicker in the shop there. That's what we did, but everyone else had the same idea and they were out. Rather than be trapped in our car all morning, we drove back towards Hilo and stopped at Wal-Mart and found exactly what we needed. We also got a couple of granola bars for snacks and headed back to the park. All in all, the delay was less than an hour. As it turned out, the wind made the plastic slickers only moderately effective, but good enough to shield head and camera. Fortunately, we were able to jettison them by the time of our Kilauea Iki Crater hike early in the afternoon.
Volcanoes NP Crater Rim Drive
The Haakulamanu Sulphur Banks
The ranger had suggested that we make our first stop the Haakulamanu Sulphur Banks which were only a quarter mile across the parking lot just northwest of the Visitor Center. So we left the car where it was and headed over there. At the beginning of the short trail there were the usual disclaimers, but when have I ever heeded a warning sign? Coughing and choking on the rotten egg smell (just kidding), we took the short trail to the Sulphur Banks, a formation at the base of a twenty-foot cliff where there are a number of steam vents that leave thick deposits of sulphur on the broken rocks at the cliff's base. Here is a closeup of one of the vents, and you can see the sulphur deposits surrounding it. Getting even closer, you can see here the deposits of sulphur on the piled-up rocks.
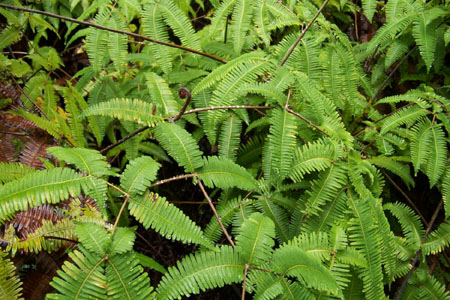
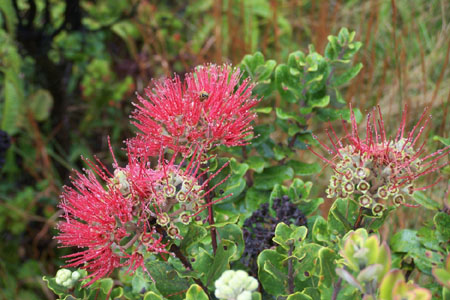
The Sulphur Banks were an interesting place, but just a small taste of what the park had to offer. With all the rain this area gets, you'd expect a lot of vegetation, and there was, including some plants and foliage that seem to like the steam or the sulphur or both:
|
|
An Orientation to Our Visit to Hawaii Volcanoes National Park
Before we go further along the Crater Rim Drive, I think it would be a good idea to get an overall orientation as regards Hawaii Volcanoes National Park, so that you will have some idea of what the park as a whole looks like.
One possibility would be to use an aerial view, as I've done elsewhere in this photo album. But this turned out to be a poor solution. The aerial views available on the Internet at the moment can only seem to orient you to the major features of the park- basically the Kilauea Caldera and one or two of the major craters. But you can't make out roads or trails very well, and that's a major part of what I want to show you.
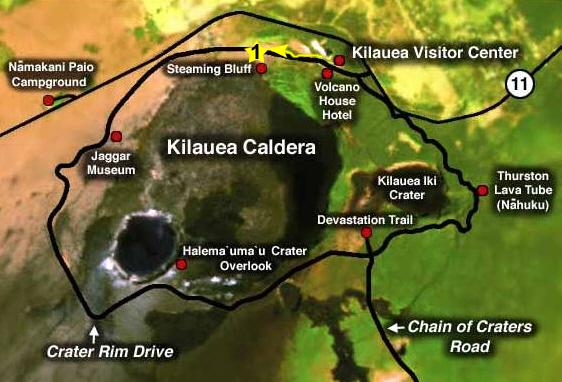
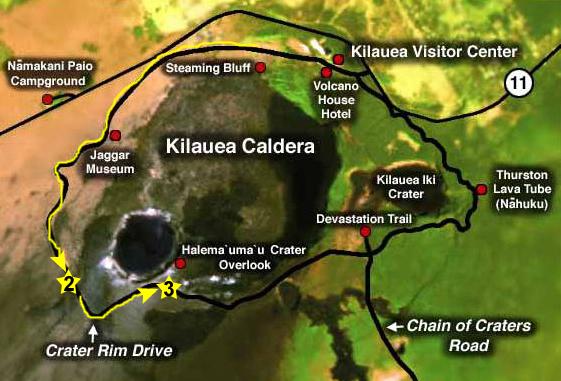
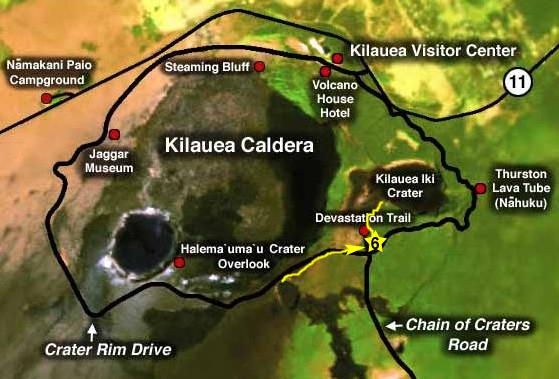
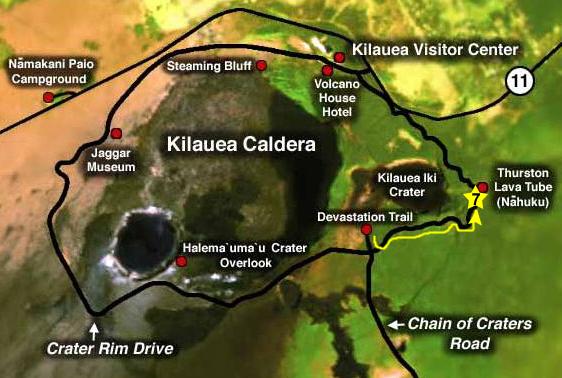
So I decided to use the clearest available park map that I could find, and I did find a very good one on the National Geographic website. That map is reproduced below. I am going to use it to illustrate our progress around the Crater Rim Drive, and especially to note where we stopped to view the park's major features. I'll repeat the map at the head of every section where I think it might add clarity and, as I've done elsewhere in this album, I'll mark it with symbols and/or routes. Here, then, is the park map with our first stop marked:
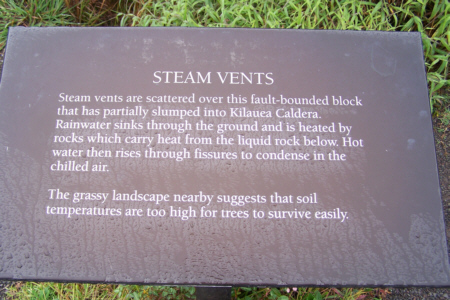
Roadside Steam Vents
 |
I'm not sure why anyone would want to do it, but you'll notice that a fairly large number of coins have been thrown into the vent. I mean, three coins in a fountain I can understand, but what do people think they are doing when they throw coins about four feet down into a steam vent in Volcanoes National Park- appeasing Pele? Who knows what idiocy lurks in the minds of men. If you missed the coins in the previous two pictures, you might be able to see them more clearly in this picture of the steam vent without the steam.
You won't see any coins in this last picture- me in rain gear at the steam vent.
The Southwest Rift Zone
We continued our drive around the Crater Rim Road until we came to the Jaggar Museum and the Volcano observatory (see map below). Since it was still drizzling, we decided to stop in to the museum. There were all kinds of interesting exhibits of volcano fact and fiction. You could take a tour of the observatory, but we didn't.
A bit further on and we came to the Southwest Rift (stop #2 on the map below). In 1974, there was a significant eruption from Halema'uma'u Crater; the lava flowed across the road here, and it was closed until the eruption stopped and the road could be rebuilt. When Tony and I were here in 1976, the road was still closed. During this flow, a classic lava tube was formed, but when the flow stopped and the tube drained, it collapsed along its entire length, creating the rift.
The Halema'uma'u Crater Overlook
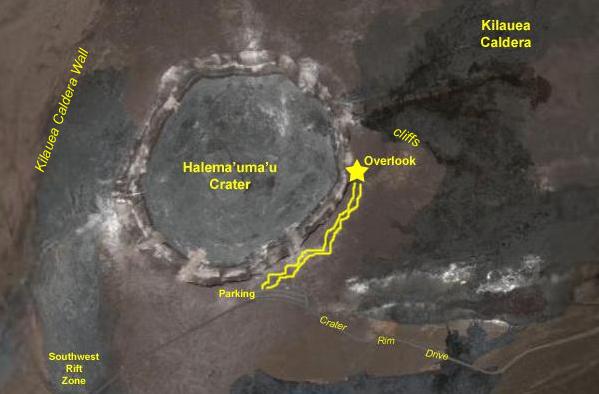 |
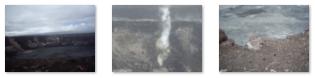
The Kilauea Caldera (shown here in closeup) is what remains of a group of separate volcanoes; it is a roughly circular depression four or five miles across, surrounded by cliff walls that are currently more than a hundred feet high. Over the last centuries, small eruptions have occurred throughout the caldera, the most recent of which occurred in the Halema'uma'u Crater, (the source of the 1974 flows). It's not easy to see from either the aerial view or from our pictures, but the Halema'uma'u Crater is actually a further depression in the caldera, currently another eighty feet deep. The depth of the crater and of the caldera change over time as magma pushes near the surface or then drains away.
There are trails that lead across the Kilauea Caldera; apparently it is inactive enough that the risk is minimal. Indeed, other than at Halema'uma'u, there has not been an eruption in the rest of the caldera since the 1920s. From our vantage point on top of the cliffs at the yellow star in the aerial view, we can see both the caldera and the crater. Here's a picture of me photographing the Kilauea Caldera. Up here where the trail to the overlook is, there seemed to be quite a number of vents that must lead either to a fissure underneath Kilauea or Halema'uma'u.
Shortly after we left the parking area on our hike out to the overlook, Fred took the first of a couple of movies of the Halema'uma'u Crater. You can watch the first one with the left-hand movie player below. He took a second one so I could do some narration, but I flubbed it. I referred to it as "Ha-lee-ahh-kah-lah" instead of "Ha-lee-ma-oom-a-ooh," the former being a major surfing center on Oahu. Oh well. You can watch the second one using the right-hand movie player below:
|
|
 |
During the 1924 steam blasts, Halema'uma'u collapsed, forming a gaping pit about a mile wide and about 1200 feet deep. Since then, 17 eruptions and 4 collapses have occurred in the crater. The net effect has been a slight increase in the crater's diameter and a decrease in its depth from 1200 feet to a present-day 250 feet, somewhat deeper than the rest of the caldera.
From our vantage point at the lookout we could see across the crater to the steam vents on the other side. You can also see leis that have been left here by tourists or locals; I suppose that old traditions die hard, but what harm can it do? Actually, many Native Hawaiians still revere the goddess Pele, and frequently throughout the year they hold celebrations and give offerings here at Kilauea.
I took two good movies to try to show the sweep of the Halema'uma'u Crater; I think that both turned out well, except for a some wind noise. You can watch these movies using the two movie players below:
|
|
We also took some other pictures of the Halema'uma'u Crater, and you can look at the full-sized images by clicking on the thumbnails below:
|
Fissure Eruptions
We continued around the Crater Rim Drive eastward until we arrived at the parking area for the 1974 fissure eruptions (stop #4 on the map below). As the sign indicates, eruptions of the Kilauea Volcano typically begin when long fissures open in the ground, allowing lava to fountain out as "curtains of fire." Fissures have opened frequently on this side of Kilauea Caldera and along the rift zones. Eruptions are usually not violent, relative to most volcanoes, and can easily be observed.
This fissure opened during an eruption on July 19-23, 1974. You may be able to see the red coloration on the walls of the fissure in the previous picture, or in this view of the fissure; this coloration results from the oxidation of the rock by escaping gases.
|
|
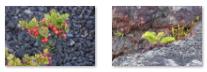
Fred also found some interesting foliage here; all the more unusual for the barrenness of the landscape. To look at the full-size images, just click on the thumbnails below:
|
It was here at the fissure eruptions that we noticed that the weather had changed. While it had been raining at the Visitor Center, it was still just as cloudy and gray but since we passed the museum the rain had pretty much stopped. This side of the caldera seemed dry in comparison to the area near the Visitor Center. As it turns out, this side of the Kilauea Caldera is called the Kau Desert, and it is in the rain shadow of the summit. The Kau Desert receives about half as much rain as Kilauea Visitor Center. It also bears the brunt of hot winds blowing volcanic fumes and natural acid rain�which stunt plants�down from above. Now, going past the fissure eruptions, the vegetation seems to be returning, and as we approached the next crater, trees had returned.
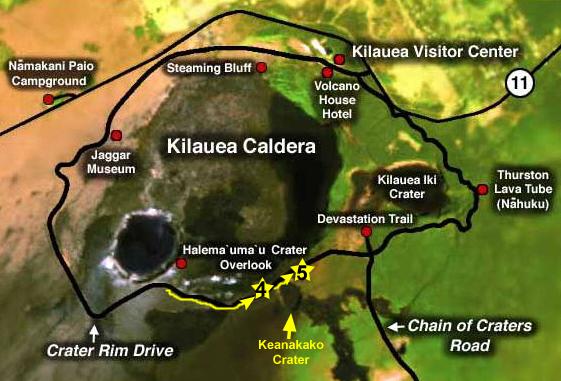
Keanakako'i Crater
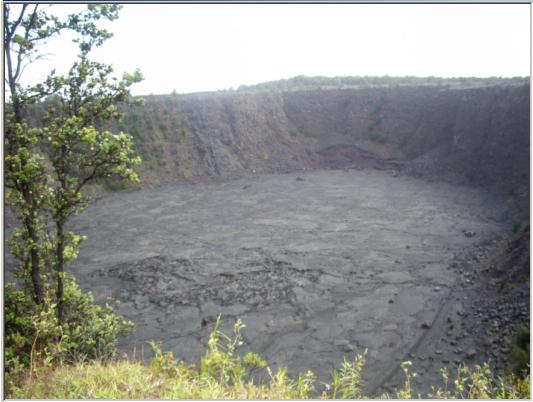 |
Also, in this view of Keanakako'i Crater, you can see what I mentioned earlier- trees have begun to return to the landscape as we leave the Kau Desert on our trip around the Kilauea Caldera.
The Nene
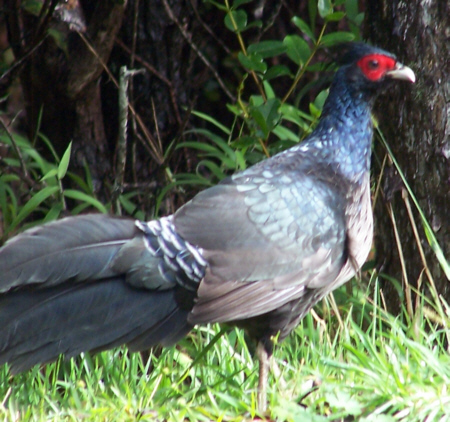 |
But Nene aren't chickens; they are the descendants of Canadian geese who arrived in Hawaii (presumably by mistake though they may have heard about the great surfing) long ago. They have evolved (if you believe that sort of thing) into their own sub-species, and now this specific bird is found nowhere else but here. You can usually find them in family groups like this pair near the parking area for the Devastation Trail. As with most birds (and other animals as well), it is the male of the species who carries all the bright colors and interesting features.
Devastation Trail
We continued around the Crater Rim Drive from Keanakako'i Crater and, as we did, we found ourselves seemingly entering an entirely different realm. Disappearing were the barren craters and rockscapes; we were back in full-fledged rain forest, as you can see from the coloring in the map below.
What has happened is that we have left the Kau Desert, created by the eruptions in Kilauea, and we have moved back into virgin forest.
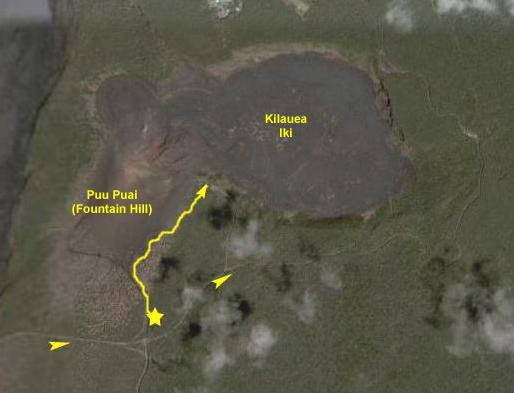 |
The Devastation Trail takes you from the parking area here, through a short stretch of rain forest, and then out onto a barren landscape along the side of Puu Puai (fountain hill) and finally to an overlook where you can look down into Kilauea Iki crater and, at the end of the path, up to the peak of Puu Puai. From the time you leave the short stretch of forest near the parking area, there is no more vegetation until the overlook.
Kilauea Iki experienced 17 phases of eruption between November 14 and December 20, 1959. In addition to the lava lake formed, pumice, cinders and spatter were deposited to the southwest from Kilauea Iki (which you can see clearly still in the aerial view), destroying all life on over 1,250 acres- wherever the ash layer exceeded one inch. Puu Puai was formed immediately downwind of the lava fountains in Kilauea Iki itself, where a rain of volcanic debris piled 150 feet high. If you look down into Kilauea Iki even now, you can still see the steaming fissures at the bottom of the crater. The former Crater Rim Road used to run just south of Kilauea Iki; we crossed it on the Devastation Trail. The road had to be rebuilt to go south of Puu Puai, as you see it now in the aerial view.
Incidentally, we could see that there were people down in the Kilauea Iki Crater, but it was pretty obvious that they didn't get down there from here. We checked the park map, and found that at the parking area for the Thurston Lava Tube we would also find the trailhead for the trail down into the crater, and we put that on our list of things to do.
Obscured from view at the base of the cinder and spatter cone of Puu Puai is the main vent of the 1959 eruption. Fountains reached great heights (1,900 feet at their highest), built Puu Puai and created the Devastated Area out of a rain forest. Once, a great fountain showered the opposite wall, veneering it with a mantle of black lava.
Vast amounts of lava were liberated, filling Kilauea Iki with a lake 414 feet deep. Intermittent backflow down the vent lowered the lake's level, and left a high lava mark around the crater walls. Lava also flooded part of Byron's Ledge (left of Puu Puai) in 1832 and covered the floor of Kilauea Iki in 1868.
Although the Crater Rim Drive does not end here, we were now out of sight of the barren craters and steaming vents for which the Park is noted. We had two more major sites to visit this afternoon, and so I'll give each its own section, although they, too, are along Crater Rim Drive.
Volcanoes NP Thurston Lava Tube
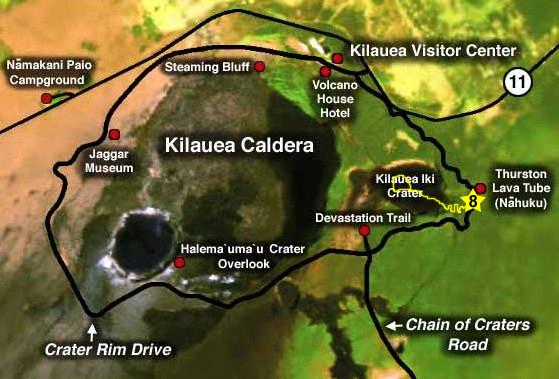
Once again, we've gotten back in the car and continued around Crater Rim Drive, traveling east through a thick rain forest environment. After about a mile, we've reached the parking area for the Thurston Lava Tube (stop #7 on the map above). I only vaguely remember the lava tube from my last time here; I do recall that since the road was blocked, I had to go back around the other way and come in from the park entrance to visit it.
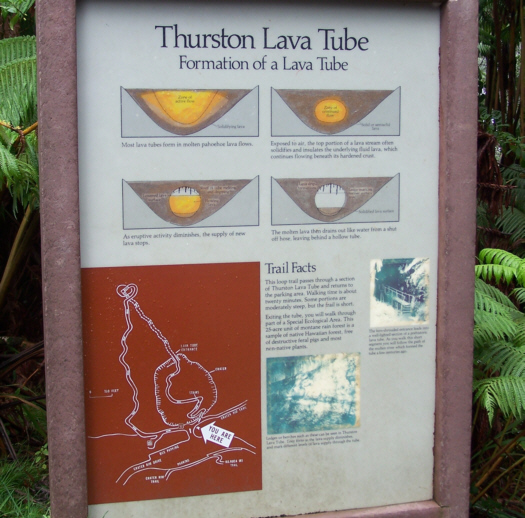 |
This loop trail begins with a short walk down the paved pathway to the lava tube.
By the time we arrived at the entrance to lava tube, we were deep in a damp, rainy forest. Here is Fred at the lava tube entrance. As I remembered, there was a crevasse just outside the lava tube, and taken from inside the lava tube looking out, is Fred on the bridge into the lava tube. Just after I took his picture, Fred returned the favor, so here I am just outside the Thurston Lava Tube.
The trail now passes through a section of the Thurston Lava Tube. We did try to take some pictures inside the tube, but the tube is big enough that the flash doesn't do a good job of illuminating the walls and, as a result, we tended to look like deer in headlights. Some people had flashlights, and about the only thing to see is the water on the floor of the tube and the ferns and vegetation hanging from the walls and ceiling. There was a lot of water dripping in the tube, and at one point we hauled out our rain gear again.
At the other end of the tube, there is a small cave-like room, formed when some of the tube collapsed. Fred and I took turns standing down in that cave room and taking pictures of each other going up the exit stairs. You can see those pictures here (Fred on the stairs) and here (me on the stairs).
The trail then returns to the parking area through what is called a "Special Ecological Area." This 25-acre unit of mountain rain forest is a sample of native Hawaiian forest, free of destructive feral pigs and most non-native plants.
Volcanoes NP Kilauea Iki Crater Hike
To get to our next hike, down into the Kilauea Iki Crater, we didn't have to do anything but cross the road and find the trailhead for the pathway down into the crater.
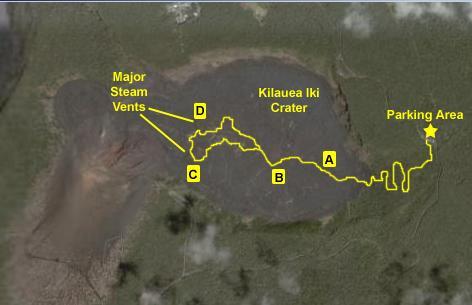 |
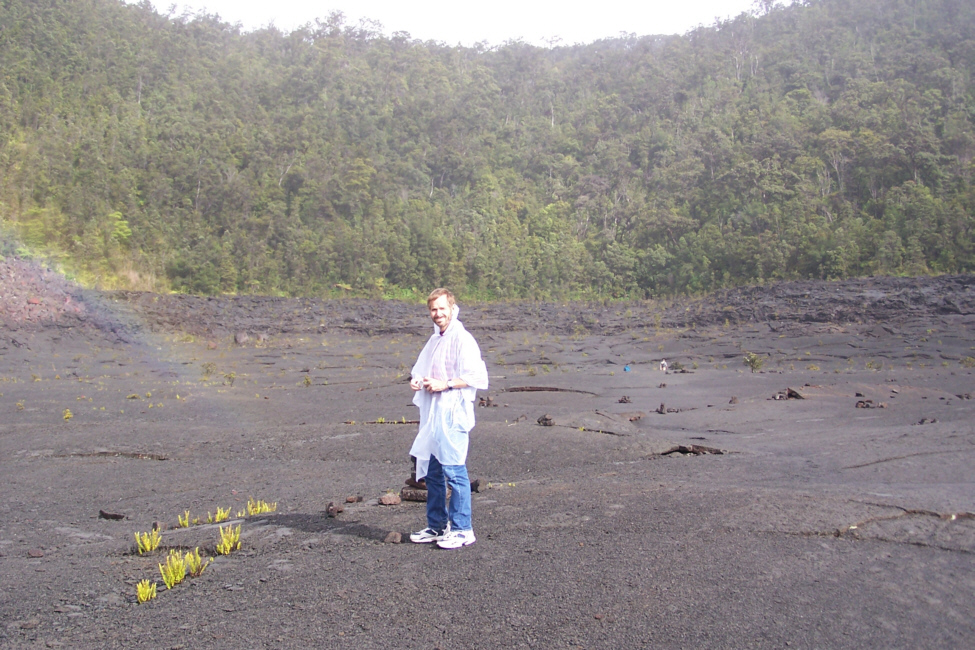
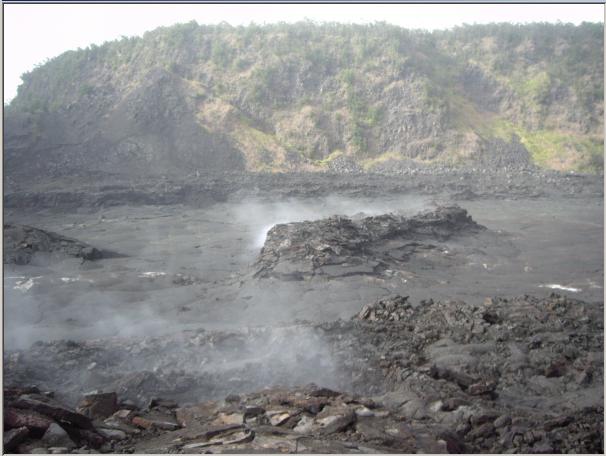
It took us a little while to hike down to the crater floor from the parking area. The trail leads through the woods to the upper edge of the crater, and then down a series of switchback paths until you come out just at the edge of the frozen lava lake. It has been raining lightly on the way down, so here I am in my rain gear at the edge of the lava in Kilauea Iki and a view looking out into Kilauea Iki crater.
We started out across the lava lake in the crater, and ahead of us we could see some other hikers coming in our direction across the lava. We continued walking out onto the lava until we got to the area around Box A in the aerial view. Here we stopped to take a number of photos. If you take a look at the full-size images by clicking on the thumbnails below you'll get a good idea of what the crater looked like about a hundred yards out:
Me in Kilauea Iki looking back towards the pathway down into the crater. |
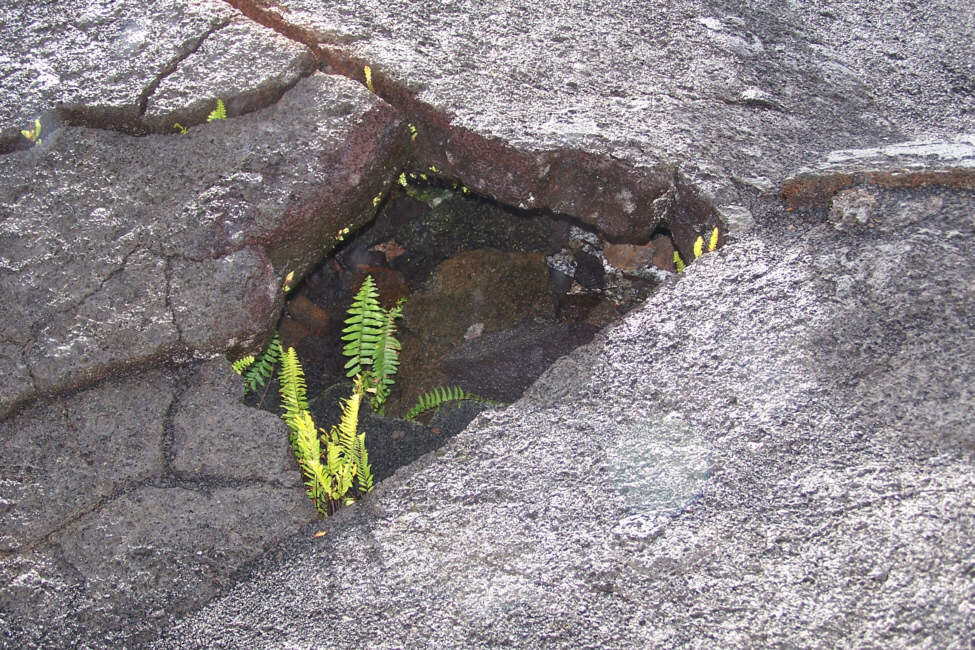
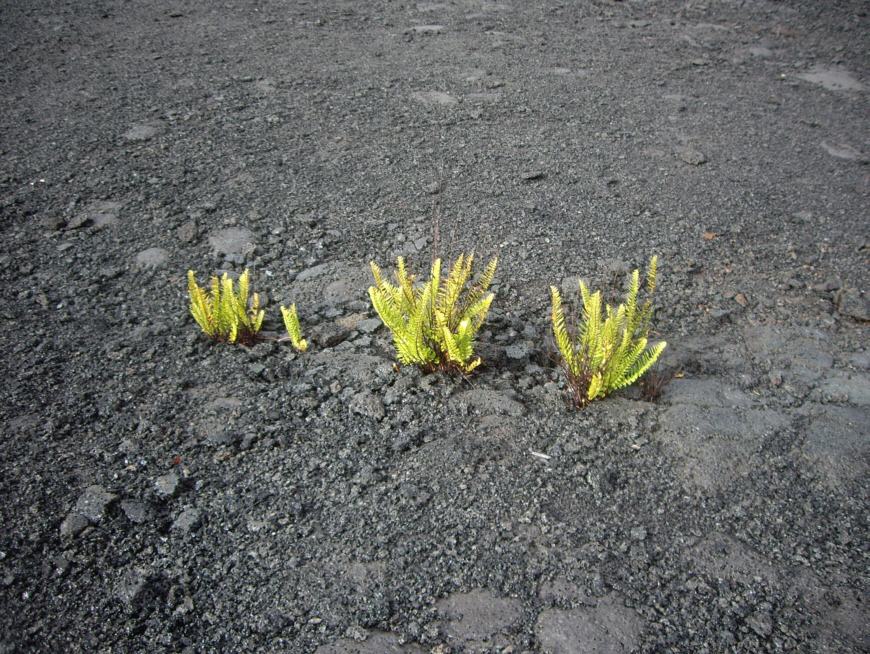
A plant taking hold near a small steam vent. | ||
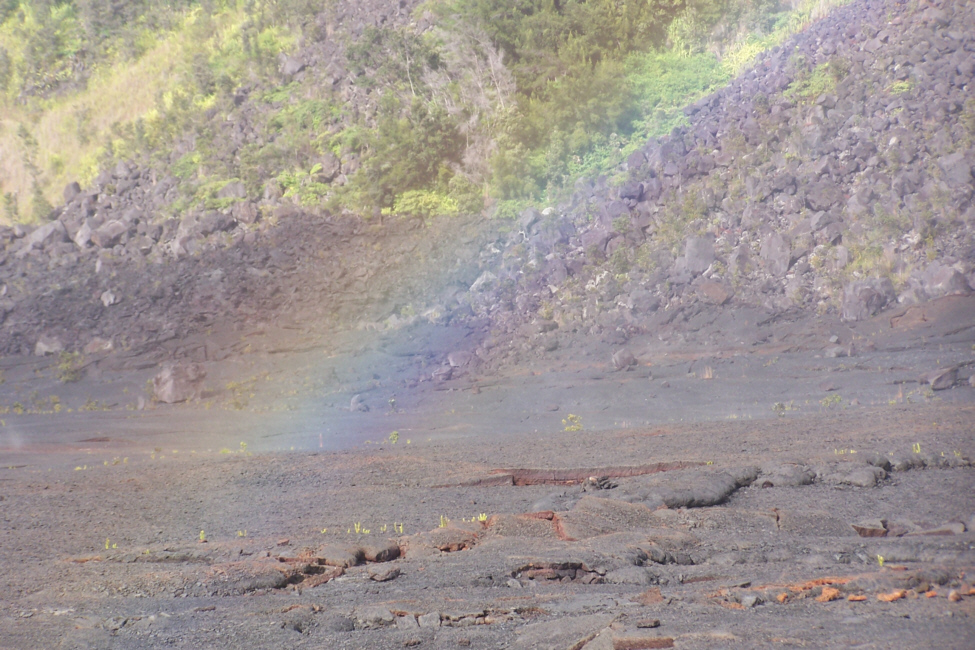
A rainbow in Kilauea Iki. |
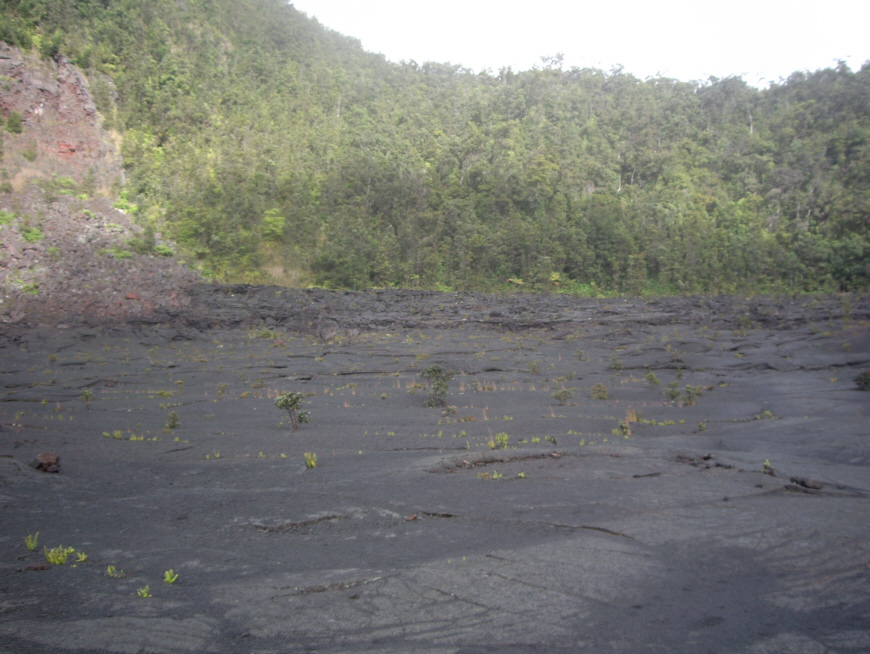
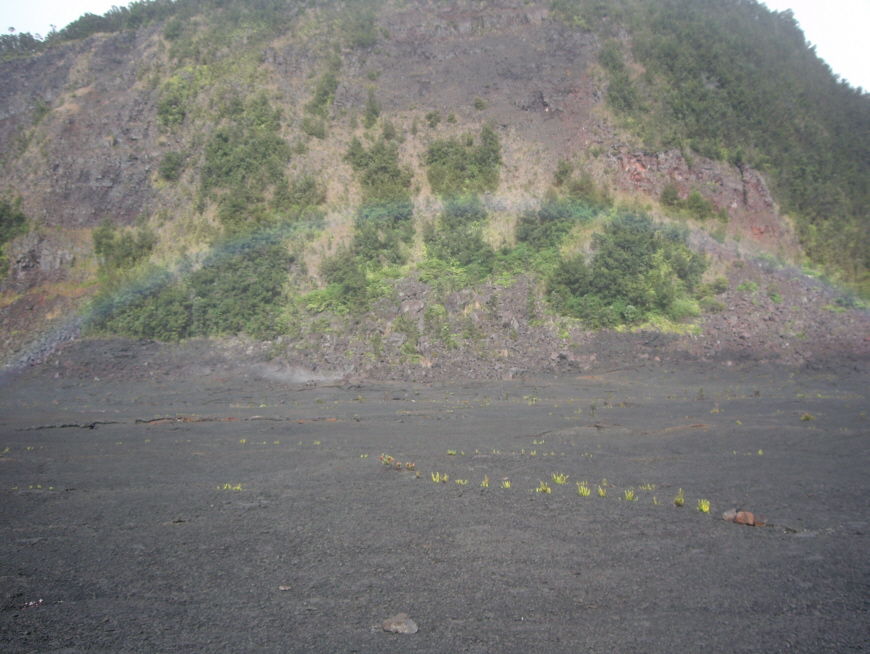
Looking back across the lava in Kilauea Iki crater to the vegetation line. This clearly illustrates the high-lava-mark from the last eruption. | ||
The plants are taking hold again, usually where the rock has cracked and soil can accumulate. There were many lines of plants like this across the crater floor. |
A rainbow in Kilauea Iki crater. |
We continued walking slowly out across the lava, not because we were nervous or anything but just because there was so much to see. The beautiful rainbow was a constant companion as we continued walking towards some of the large steam vents further out into the crater. There were more and more steam vents as we walked across the crater, and occasionally I would stop and examine one. Fred was going a little slower than I was; he was intrigued more by the rainbow at the moment, so I could usually look back and spot Fred under the rainbow.
We continued to walk further out into the crater. While we were walking, it seemed that the weather had started to clear out, and for the first time today we could see some real sunshine. As the drizzle had stopped, we were able to take off our rain gear, and this allowed us to move around a lot more freely. As it turned out, that was the last rain we were to see while we were on the Big Island. But the rainbow was still with us, so I guess there were still some fine moisture droplets in the air. Here is one of the interesting places where the lava floor of the crater has buckled, and here I am beside a steam vent with some mineral deposits. And here is Fred at one of the many steam vents we encountered.
|
|
 |
|
|
Meanwhile, Fred was getting a picture of an interesting lava formation on the crater floor below me. Next, we were going to check out the other large vent that you can see in the middle of the picture at right, so I climbed down to film Fred walking to the other vent. You can watch this film with the player below:
|
|
This next steam vent was much more interesting than the one I'd been standing on- for a couple of reasons. First, the steam wasn't really coming out of the top of the vent, but rather out the side, because the vent was actually a cliff with a ledge you could climb up on on one side and just a sloping lava floor on the other. From the other side, you couldn't see that this side was so interesting. What made it interesting were the mineral deposits and vegetation that were present on the cliff face. There was also more a variety of rock colors here, and all these things made this particular vent interesting. Below you will find some thumbnails for the other pictures we took here; click on any of them to view the full-size image:
|
|
|
On the way back along the path to the edge of the crater, we came on a large steam vent that was really a small crevasse with just some warm air coming out. I couldn't resist climbing down where Fred got a picture of me in a Kilauea Iki crevasse.
Pretty soon, we were back to the trail up to the parking area. Although the day had started cold and rainy, it had turned warmer while we were hiking in the crater, and so it was significantly hotter just when we were having to hike up the trail out of Kilauea Iki. Along the way, Fred found an interesting plant or two as we continued up the trail. About halfway up, we could look back and see most of Kilauea Iki Crater, as well as some of the people behind us on the trail.
|
|
We had done about all we could do here in the park, and seen all the main craters and exhibits, but we did want to see some lava flowing. We checked at the ranger station when we returned to it after completing the Crater Rim Drive, and found that the only possibility was to go to the night lava viewing and perhaps catch a glimpse from a distance. We decided that we would try that, but first we went back to Hilo to hook up with the guys for some dinner.
Volcanoes NP Night Lava Viewing
 |
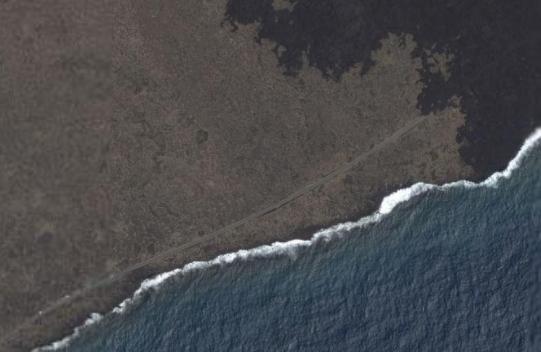 |
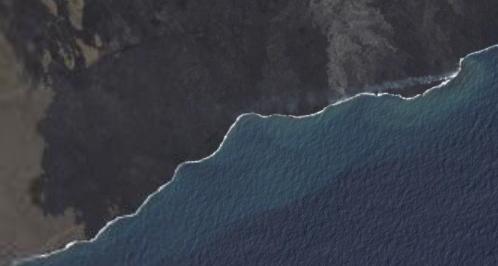
If you will look at the lower left in the aerial view, you'll be able to make out some cars parked along the road. This is where we parked, also. Then you have to walk past the barricades and along the highway until you reach the point where the lava flowed over the road- which you can see clearly in the aerial view. Right at the point where the dark lava flows across the road, we took the pictures you can see here and here.
Now there is a marked trail that leads out over the lava flow between where the road was and the shore. It was pretty dark, and if there hadn't been some people with flashlights, and if we hadn't had one with us, it would have been difficult to follow the trail out to the end. Even at the end of the trail you couldn't see much. At the end of the trail, I took a picture of Fred and he took a picture of me, but you can't see much in either one.
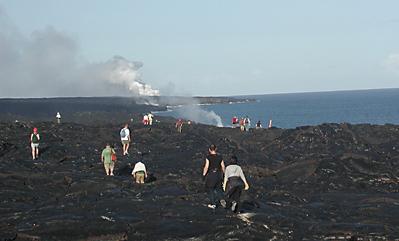 |
But it was fun nevertheless, and we could see the bright orange glow off in the distance (in the daytime all you can see is the steam), so it wasn't a total loss. It was also fun to get close to the shore on the lava cliffs and just sit for a while and watch the waves break over the lava crags.
We got back to Hilo kind of late, and we had to organize our stuff for tomorrow, since that will be our last day here on the Big Island.
You can use the links below to continue to another photo album page.
|
November 10, 2005: Hawaii Trip Day 6 |
|
November 8, 2005: Hawaii Trip Day 4 |
|
Return to Main Index for Hawaii Pictures |