


|
July 18, 2007: New Mexico/Colorado Trip Day 5 |
|
July 16, 2007: New Mexico/Colorado Trip Day 3 |
|
Return to Main Index for New Mexico/Colorado Trip |
 |
After we had a snack and something to drink, we struck the tent and our equipment and loaded it back in the car. Then we took advantage of the bright sunlit morning to take some more pictures of the canyon and of the Rio Grande and Red Rivers.
|
|
Here, there were excellent views of the river and canyon, made all the better for being sunlit in the morning. I got Fred to follow me out to the vista so that I could get this picture of him with the canyon backdrop.
Then, along the trail back to the campground, I found a good place to get a picture of Fred and the canyon. This view looks "downriver" as the Rio Grande, now combined with the Red River, flows southward. The next time we see the river will be when we cross it at Rio Grande Gorge- about an hour from now.
So, we got back in the car and headed off back along the five-mile dirt road back to the highway and south again towards Taos.
Rio Grande Gorge and Bridge
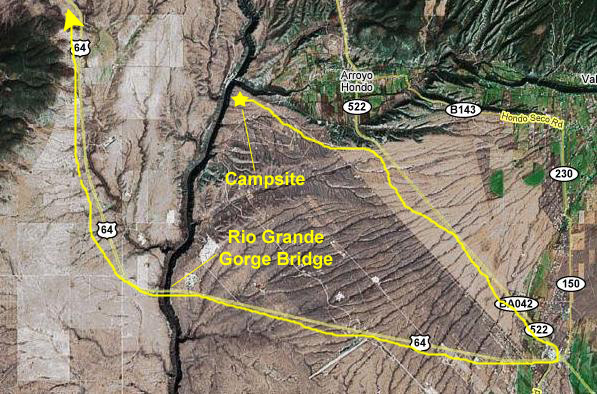 |
We are about fifteen miles from where we hiked this morning and here the gorge is much narrower and the sides much steeper. I would think that hiking down to the river here would be almost impossible without equipment. Even without going down to the river (and I think it would be amazing to be in the bottom of the gorge looking UP at the bridge), the views from the bridge are pretty amazing.
Being out on the bridge itself was quite an experience. While I have never thought of myself as having any kind of a fear of heights (witness all the rock-climbing I've done on our many trips), there was just something about being suspended over such a sheer drop that was unnerving. And when you are out on the bridge and a vehicle comes across and the bridge vibrates, your mind can just imagine the whole thing collapsing, with nothing between you and the river hundreds of feet below. As you can see from the picture of the bridge earlier, there are some viewpoints that have been constructed that come out from the sides of the bridge. These are intended for sightseers, but being out in them even removes the bridge itself from your peripheral vision, enhancing the feeling of being suspended above the canyon. All in all, I, like Fred, felt more comfortable walking as near the roadway as possible when out on the bridge.
|
|
While we were on the bridge, we took a number of excellent photographs of the gorge. I have put thumbnails for six of the best of these below. The first three look north; the second three look south. To view the impressive full-size images, just click on the thumbnails:
|
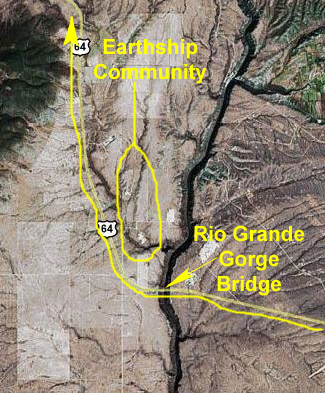
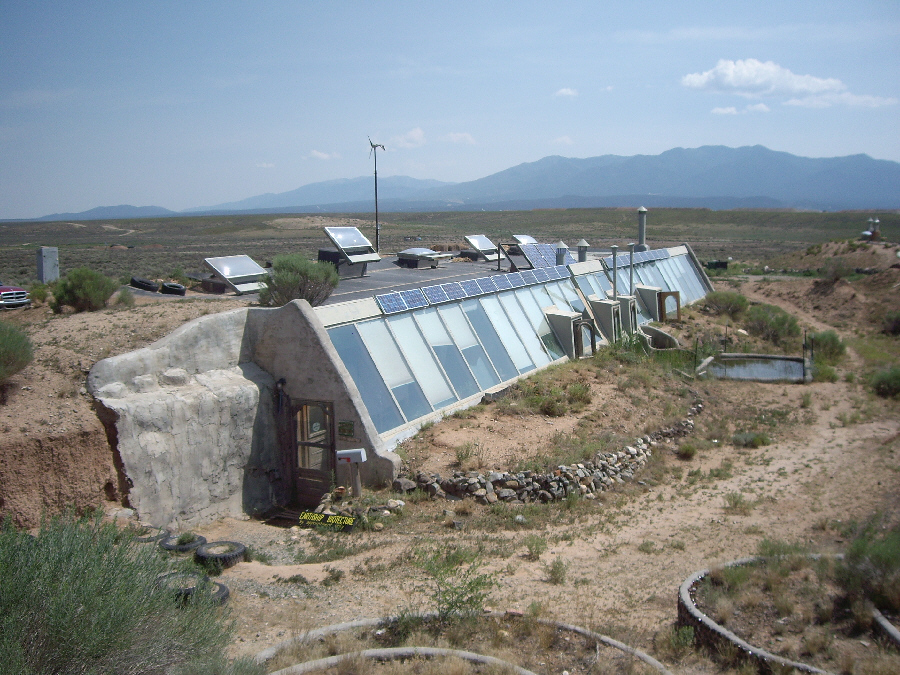
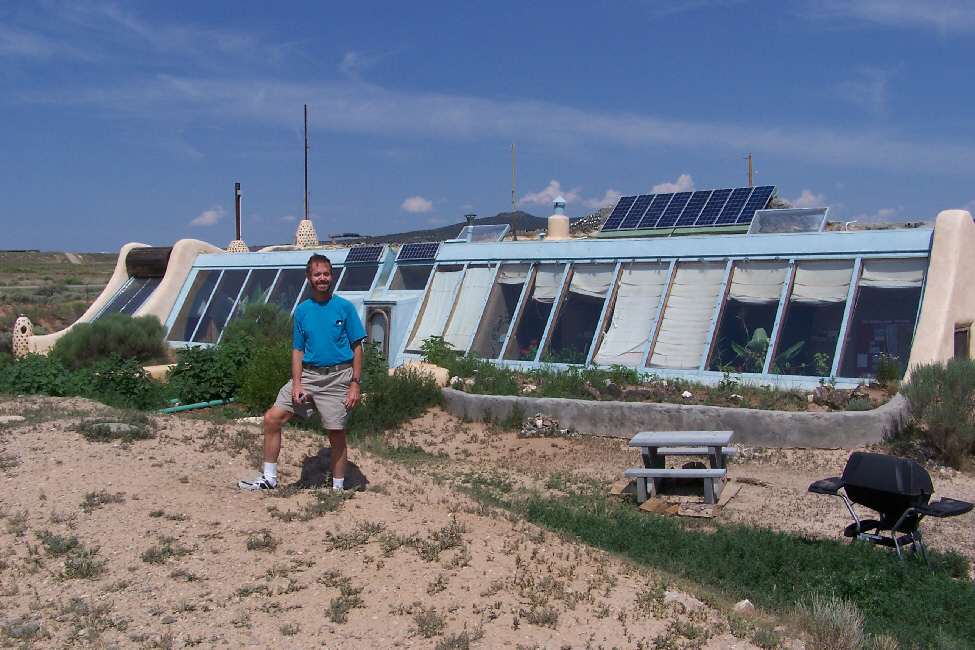
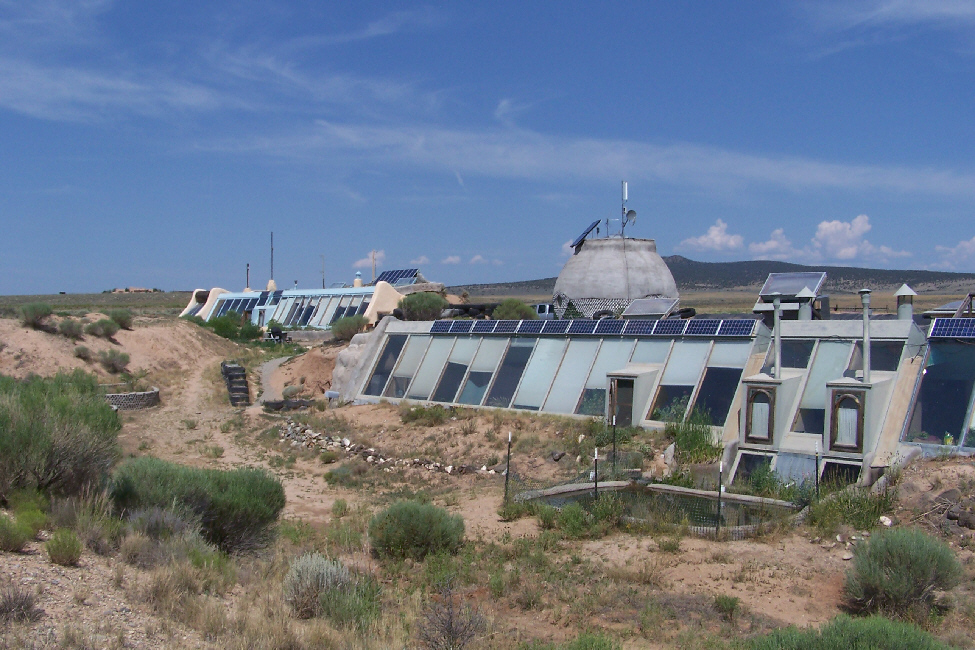
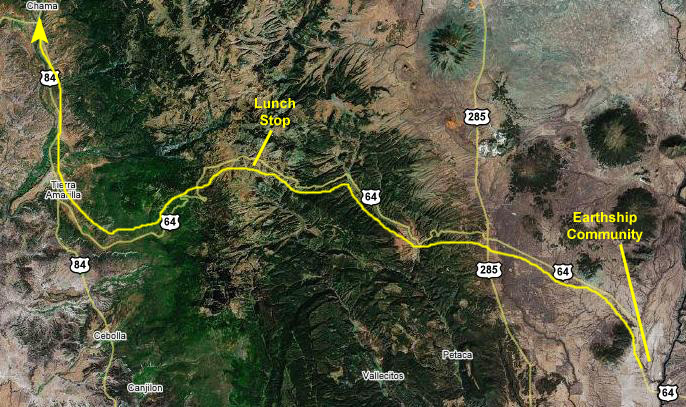
The "EarthShip" Housing Community
 |
We stopped at the demonstration building, and Fred was so intrigued that we ended up spending the better part of a couple of hours there. You can learn what we did about these unique homes and buildings by Googling "Earthship" on the Internet, for that is what the concept is called.
I don't want to include a lot of information here that you might not be interested in. If you ARE interested in the concepts involved, you can learn a lot more on the Internet than I can tell you here. But I CAN summarize what we learned.
An "Earthship" is a dwelling or commercial building that exists entirely "off the grid." This means that, at least for utilities (power and water), an Earthship has no connections to municipal sources. There are no power lines running into the community, nor are there municipal water or sewer lines. Telephone service is cellular where available, although some Earthship communities around the world do have access to telephone systems. But, since these consume no power, I suppose they don't count.
In addition to being "off the grid," Earthship buildings are made from recycled or natural materials- materials available locally or within a short distance. For example, where a lot of wood is not available, earthen walls or adobe might be used. Insulation is provided by natural materials; no commercial insulation is used. Power is supplied by solar panels or, in some locations, by wind turbines. All the water used comes from rainwater or, in some locations, streams, springs or wells. So, Earthships are designed to have as close to zero impact on non-renewable resources as possible.
What I'd like to do is kind of take you on the same self-guided tour that we took. I'm going to group the pictures that we took (most of them credited to Fred) around specific characteristics of the Earthship homes that have been built here. As you can find out on the Internet, other Earthship communities around the world may be built differently to take advantage of the particular materials available at those other sites.
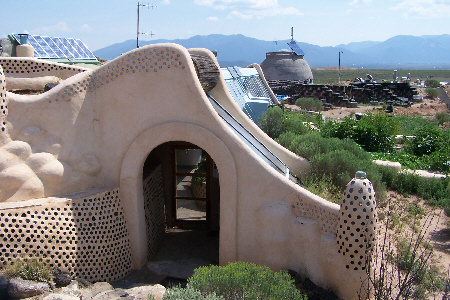
Entry Area (Wall Construction)
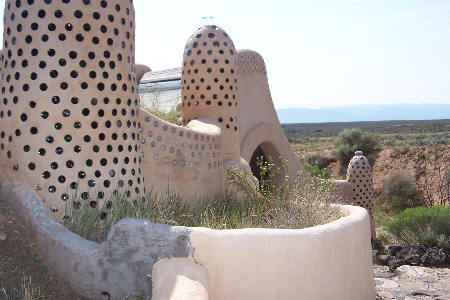 |
But as you can see in this view along the front of the building, this method can be simply decorative as well; there are no interior rooms beyond some of the low walls that you see here. Some of the spires, though, are actually skylights, allowing light to filter into interior rooms (many of which don't have windows to the outside- so as to minimize heat transferring in in summer or out in winter). Also, this method of building walls cannot be used if the walls need to be very thick, as some of the load-bearing walls in the interior of the structure need to be (particularly those that form the back of the structure that is built into the earth). This picture shows a second method of wall-building, which is simply a thin wall of cement or adobe. These walls, usually only six or eight inches thick, can be decorative outside retaining walls or interior, non-load-bearing walls.
Here is another method for building walls- using discarded aluminum cans instead of bottles. Walls built this way are a bit thinner, and they do not admit light, so they might be used for some interior walls that need to be relatively lightproof and soundproof. This picture was taken of one of the walls in the equipment room (more later about that); no plaster has been spread over the wall to hide the ends of the cans. In the equipment room, that isn't necessary, since it's not a room that the residents would spend much time in, but we learned that the general practice is to plaster over them anyway simply to provide a more "finished" look. In the demonstration home, however, visitors want to see just how the walls are built.
Earthship homes are built to take advantage of the light from the sun for heat in the winter, which in this area means glass windows on the south or southeast side of the house. This allows maximum use of winter sunlight for heating. In the summer, shades made of natural materials are lowered to cover the window surface as necessary to prevent excessive heating in the interior. The windows are sloped at an appropriate angle for the latitude where the house is built to maximize heat gain in the winter and minimize it in the summer. As you can also see here, Earthship homes take advantage of interior plantings to absorb carbon dioxide, provide a restful environment and even to supply edible herbs and such.
The last wall-building method is used when walls need to be well-insulated, thick and/or load-bearing. (Earthships tend to be single-story affairs, which are much more energy-efficient an easier to build- particularly when they need to be built partially into a hillside or covered with earth.) About the only load these walls have to bear are the ceiling beams (and in turn the solar panels and equipment that are mounted on the roof). One of the common methods for building these walls is to use old tires. With the hundreds of millions of cars on the road, each of them throwing off two or three old tires a year, there is no shortage of materials. (In many places, disposing of them is a real problem, so it's good that at least some of them can serve a useful purpose in an Earthship.) The tires are simply laid in rows where the walls need to be, and then filled with compacted dirt or sand. Actually, just about any dense material can be used for this purpose. Once one layer is filled, then a thin layer of cement is used to keep the tires from moving and the next layer of tires can be added. Any leveling problems can be corrected with the cement. Finally, when the walls are of the required height, visible surfaces can be plastered. We learned that walls built in this way are surprisingly sturdy- much sturdier than the wood frame walls that most houses are built out of.
So much for wall-building technology (pretty low-tech, if you ask me). We found ourselves in the entry vestibule for the demonstration home. There was a little bench and a decorative wood ceiling. We opened the screen door and went on in.
Information Area (Room Construction)
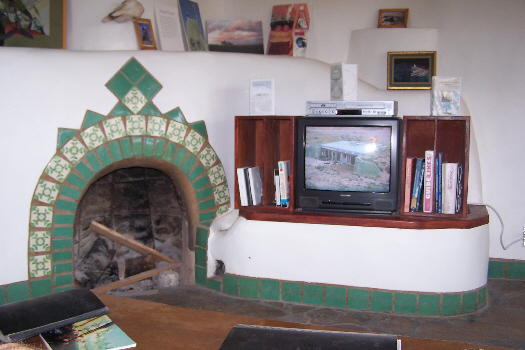 |
The main information room was typical of the rooms in the demonstration home. One end of the room (here, the end of the room with the fireplace), is situated at the side of the building that is built into the hillside (here, kind of an "artificial" hill- basically just mounded earth). The back wall of this room was constructed using the "tire" method. To bring light back into this part of the room, one of the skylights had been constructed above this portion of the room. The interior walls were all plastered, of course, to hide whatever method had been used to construct them. For demonstration purposes, a number of shelves and ledges had been built for the informational materials and to hold the television.
The first thing we did was to sit down and watch a 30-minute video in which we learned much of what I've included in this narrative. (We also learned that there are a number of Earthship communities around the world- in the US, Canada, Scandinavia, Africa and South America. We watched how the various methods of wall construction were performed, and we learned much about the interior systems that are installed (more about the equipment in a minute). Around the walls we found a great deal of interesting information, and spent some time reading about the Earthship concept.
The Earthship Equipment Package
 |
But, like subdivisions, there are standard things that every home will have, and the Earthship organization sells a complete equipment package for the Earthship home. The two major elements of this equipment package are the water filtration and usage equipment and the power package, which includes the solar panels. These equipment packages come in standard sizes to match to the size of the home being built and the number of occupants it will have.
Water Systems
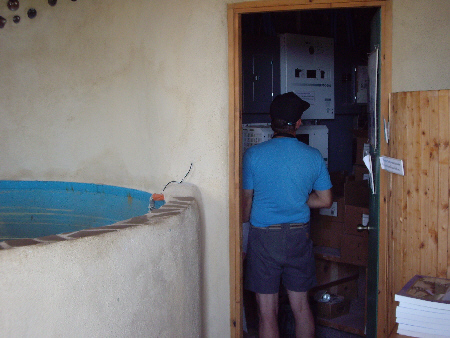
The water system package is designed around the concept that water resources should be conserved. Earthship homes don't have swimming pools, indoor jacuzzis, fountains, sprinkler systems or other "luxuries" that use lots of water; the whole point of an Earthship home is to avoid stressing the environment. The actual source of water for an Earthship home depends on where it is being built. At this particular location, the main source is rainwater (although we understood that there was a single well in the middle of the community for use in case of prolonged drought). The roof of the home is designed to catch as much of this rainwater as possible through a clever system of catchments. All the water so caught is brought inside the home to the main cistern where it is stored. The cistern is inside the house to minimize water loss through evaporation. Usually, the cistern has a cover on it, but in this demonstration home it was left open so you could look inside.
In Earthship homes there is a good deal of decoration, but it is done in such as way so as to be part of the operation of the home wherever possible. In this particular home, the water that is caught on the roof enters the home and then drops into the cistern over a small waterfall built at the back of the systems alcove. As you can see, this offered the opportunity for more plantings; keep in mind that the cistern in a normal home might not even be visible. Every home has one area where the water and power equipment is located; the rest of the rooms have standard plumbing and electrical systems.
The water that is caught cannot be used directly; it must first be filtered and treated. One of the highly technological aspects of Earthship homes is their reverse osmosis water filtration systems. This method removes almost all impurities from whatever water comes into the home; in some areas, the water source may be particularly "dirty," in which case the filtration system has a lot to do. The water filtration equipment occupies an area about the size of a large refrigerator freezer, and is usually located near the cistern under a counter or in a separate room. Here, we were able to see all the equipment and follow the water as it is being cleaned and treated.
Earthship homes are all about reusing water when possible, and in this particular home every cup of water was used at least three times. The first use is for drinking, for the icemaker in the small fridge in the kitchen area and for cooking. Any water not totally consumed here is cleaned and filtered again and then used for washing- dishes in the sink and people in the bathroom tub. Water used in this stage is only minimally filtered (it looks and smells clean but is not drinkable) and then some of it is used finally in the commode (after which it goes into a normal septic system) and the rest is used to water indoor and outdoor plants- including the usual garden. Both of these uses are shown here.
There are some alternate water systems that are available. In one of them, solid wastes are separated out from final water uses and the remaining water is held in an outdoor catchment to be used for outdoor watering.
Electrical Systems
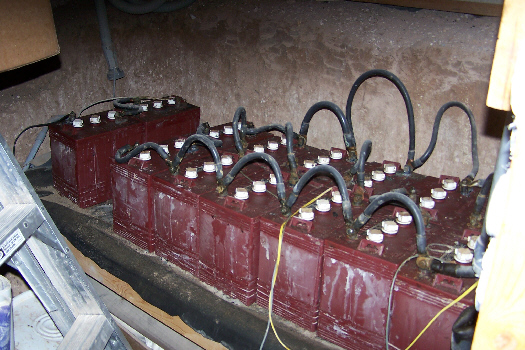 |
The power system begins with the solar panels that are installed on the south-facing sloping sides of most of the plans. The electricity that is generated is processed through the power system package for storage in the battery package. The batteries are simply improved and more capacious versions of your typical automobile battery, and the number of batteries used depends solely on the electricity requirement of the particular Earthship plan chosen. For the one-bedroom plan we toured, there are about ten batteries. These are sufficient for the electrical needs of the entire home. We did find out that low-voltage equipment is used where possible, energy-efficient appliances are required, and so on, but basically there is enough power to last through the night and through cloudy days.
Earthship homes do not have central air-conditioning; for one thing, it consumes way too much power for the usual number of solar cells. I did learn that there is enough power for small window units, and that some Earthship owners in desert areas find them necessary on the hottest days. But mostly, they aren't needed, since the insulation provided by building the homes into the earth and using the tire-earth-bottle-can wall-building methods are usually enough to keep the inside comfortable in summer and hold in heat in winter.
One of the things you get when you purchase an Earthship construction package is the technology- both for water filtration and for electricity. The electrical equipment is usually housed in a small room the size of a large closet. In this demonstration home, you could not only see the electrical system in that room, but they had left the outer wall unplastered, so you could also see how the tire/earth method worked.
In desert areas like New Mexico, then, the Earthship designs depend on solar, and this means that there need to be sloping building sides that face south or southeast. This makes all of the homes look somewhat similar, as the three images below will show. To view the full-size images, just click on the thumbnails:
 |
 |
 |
Amenities and Decoration
 |
The concept is a good one, but it wouldn't be worth doing unless one could have many of the conveniences that we are already used to, and Earthships were surprisingly comfortable. They have full kitchens, although the appliances tend to be smaller. As it turns out, Earthships can be built to any desired level of comfort, although there is more cost impact for using lots of electricity and water than in a normal home. In an Earthship, you have to ensure that your renewable water source will supply the volume of water you intend to use, and if you use lots of electricity you will have to invest in more and more solar panels or windmills or whatever. It is not just as easy as paying a slightly higher electric bill from one month to another.
But even the basic model Earthship we toured was comfortable enough. Most of the kitchen had been taken over as an office, so it didn't really look like it would in an actual home. But the kitchen sink had been located out in the hall area near the windows, probably so that whomever was working there could take advantage of natural light and save electricity. The bathroom seemed normal enough, although not nearly so large as the typical master bath in a suburban home. The tub and sink were both formed using one of the thin-wall construction techniques and then a covering of plaster to provide a smooth surface. Again, the bathroom was located at the window wall to take advantage of natural light as much as possible. The commode was in a separate "room" in the bath (as it often is in normal homes), but here the reason was that it needed to be elevated to accommodate the treatment equipment below it (this so that digging into the earth for a foundation could be minimized). It consequently had a step up and a little door for privacy.
Throughout the home, and particularly in the bathroom, the builder took advantage of natural materials for decoration as they did here using bits of colored glass inset into the plaster to form a decorative outline at the top of the tub. Similar decoration was found throughout the home, as you can see here outside the bath.
We found the Earthships to be very interesting, and, of course, they pushed a lot of Fred's buttons. So, we spent quite some time there, and by the time we headed off northwest it was lunchtime and we started looking for a place to eat.
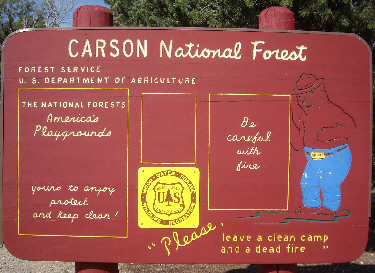
Driving Through the Carson National Forest
 |
We were hungry, so we drove right to one of the picnic shelters to have some lunch. We were on the shore of a small lake but up high enough that we had a good view of the lake and one or two fishermen that were trying their luck. We spread out our lunch stuff and just relaxed in the cool air. Here's a picture of me at lunch and here is Fred.
Around the end of the lake there was a small cabin built a short way up the hillside. Neither of us were sure exactly what it was; it couldn't have been a private building because it definitely seemed to be inside the boundary of the small park. Looking at a closeup of the cabin we could see the usual outbuildings indicating that it was more than just a fishing cabin, but we never did find out much about it.
 |
Hiking to Piedra Falls in Pagosa Springs
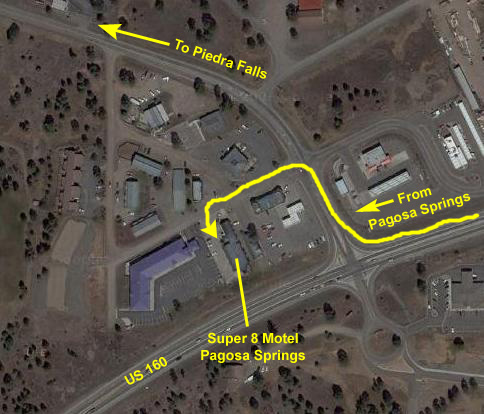 |
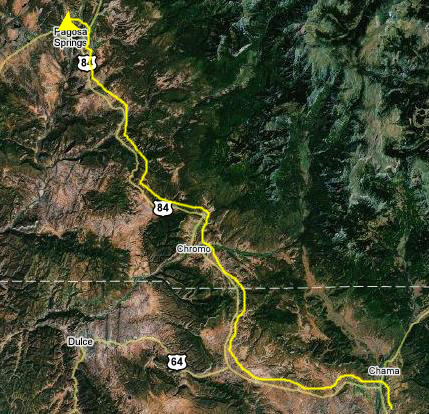
When we got to the intersection of Highway 84 and Highway 160, we turned west and drove through the town of Pagosa Springs, so named because of the hot springs there. We didn't stop in the town just then, wanting to leave as much daylight as possible for hiking, so we headed about three miles out of town to the west to find the Super 8 Motel. We got checked in, and then got back in the car for the trip to the trailhead for the Piedra Falls hike.
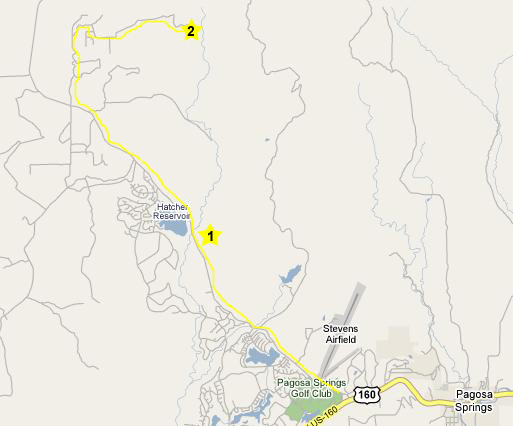 |
About five miles down the road (#1 on the map), we crossed a very picturesque stream. On one side of the bridge there was a fellow walking his dog, a dog that apparently loved swimming in the water (probably a Labrador Retriever). On the other side of the bridge someone was fishing.
It was about at this point that it started to rain intermittently. By this time in our trip, we'd realized that mountain weather was going to follow a pattern- nice weather until the mid- to late afternoon, and then showers. We hoped that the rain would be intermittent enough that we could still hike, and we'd brought our umbrellas. One major downside of the rain was that it got the unpaved road wet, and the car began to collect an incredible amount of dirt; the road seemed to have been oiled recently. But there wasn't much to be done but press on to the trailhead.
As we drove through the rolling hills, we were presented with one beautiful vista after another. The houses had thinned out, and now all we saw was the occasional ranch house. We saw quite a bit of livestock, and so assume ranching is the common activity here. We were far enough up the road that commuting into Pagosa Springs would have been time-consuming if done daily. As we drove, the clouds got thicker and the rain got steadier, but we were still hopeful and still being treated to one mountain vista after another.
Eventually, the route to Piedra Falls turned off the main road through ranching country and ascended up into the mountains The trees got taller and thicker, the road got narrower and more twisty and, unfortunately, the rain got heavier. After about an hour's drive, we reached the end of the road and the trailhead for Piedra Falls (#2 on the map). By this time it was raining steadily, but the clouds above us still looked broken, and so we thought it might let up enough to allow us to hike (even though we'd still need our umbrellas). We sat in the car for almost half and hour at the trailhead (the only car there) but the rain, if anything, got heavier.
Reluctantly, we decided that even with the umbrellas, we'd be soaked by the time we returned from the hike to the falls, and so we decided to head back to Pagosa Springs and hope that we'd be able to return here sometime in the future to hike to the falls. The return trip was a little trickier than the ascent since the rain had made the road a good deal slicker, but we got back down into ranch country with little problem.
As we descended, the rain slacked off, but we could see that the heavy clouds were still stuck around the tops of the surrounding mountains. We were almost back to the hotel when we encountered that most beautiful of atmospheric phenomena- a rainbow.
At the hotel, it wasn't really raining at all. We took the car immediately to the carwash at the service station near the hotel to try to get some of the dirt off, but were only 90% successful. For the rest of the trip, the car had a stripe of dirt down the side that I had to scrub off when I finally got home.
We made a frozen margarita and relaxed in the room for a while, and I got some restaurant recommendations from the lady at the front desk. She recommended Boss Hogg's Saloon and Restaurant (varied menu and salad bar), and so we drove over there. There was a bit of a wait, but we eventually got in to be seated. As soon as we got inside, I recognized the restaurant; Fred and I had stopped here once before, about five years ago, I think, when we were coming back across southern Colorado from a trip out west.
The meal was very good and, after dinner, we drove down into Pagosa Springs to walk along the river for a bit. There are no pictures here of downtown; it was too late at night to get any good ones, but our plan is to stop here again tomorrow when we drive back through town on our way east.
You can use the links below to continue to another photo album page.
|
July 18, 2007: New Mexico/Colorado Trip Day 5 |
|
July 16, 2007: New Mexico/Colorado Trip Day 3 |
|
Return to Main Index for New Mexico/Colorado Trip |
