|
October 17, 2010: More Hikes Around Sedona, AZ |
|
October 15, 2010: Hiking in Phoenix |
|
Return to the Index for our Western Trip |
Today we will be spending all our time in the Sedona area, and Fred has a number of hikes planned. We'll also visit some Indian ruins and take in a vortex or two. I can feel the energy already.
We began our day by having breakfast at the La Quinta. Breakfast was served in what appeared to be a meeting room beside the pool- or you could eat outside beside the pool. This was the most extensive breakfast we've had at a hotel in recent memory; it was almost like a restaurant with both hot and cold stuff. Quite a change from the juice and danish that is the norm at the budget hotels we frequent. When Super 8 has waffles we think we're in high cotton; the La Quinta not only had waffles and pancakes, but eggs, sausage, all kinds of cereal, fruit and numerous beverages. It made the room rate seem much less of an extravagance.
We checked out of the hotel since they were full for Saturday night (and we'd planned to stay in Camp Verde anyway) and by 9:30 or so were heading off to our first hike of the day.
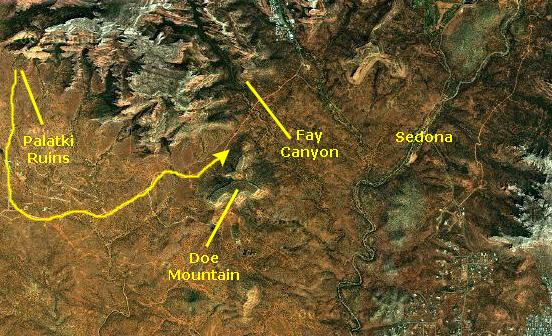
The Fay Canyon Hike
Getting to Fay Canyon
|
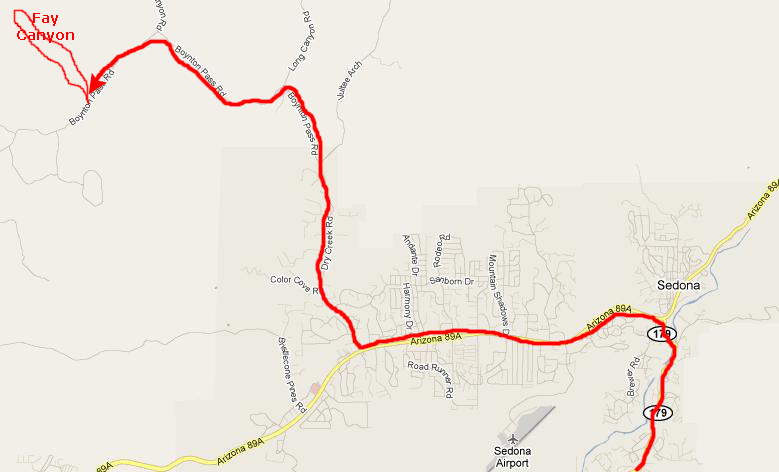
Then we turned right (north) onto Dry Creek Road. We stayed on that road about 3 miles until it came to a "T" intersection with Boynton Pass Road. We made a left on Boynton Pass and went another couple of miles to another "T" intersection. Here turning left again keeps you on Boynton Pass Road. Another three-quarters of a mile brought us to the parking area for the Fay Canyon hike.
The parking area was on the south side of the road and we had to cross it to pick up the trail heading northwest. Just before we did that, I snapped a picture of Fred looking towards Fay Canyon. I usually make a movie at the beginning of a hike which is a useful way to record the name of the trail, but this time I forgot right at the beginning. I did, however, get a picture at the beginning of the trail of Fred acting silly.
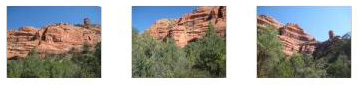
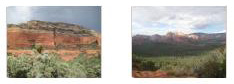
The drive up to the trailhead was very scenic, and Fred took a number of excellent pictures out the car windows. You can see why this entire area is called "Red Rock Country" and have a look at some of these pictures if you will click on the thumbnails below:

|
The Hike to Fay Canyon
|
|
The trail was a little over a mile to the back of the canyon, and the red rock cliffs were our constant companion off to our right. About halfway along, we noticed up in the cliffs to our right there appeared to be a natural bridge high up on the side of the canyon wall. We thought we could hear voices from up there, and we supposed there was another trail that led to it. We thought we'd investigate that and perhaps do that trail later in our stay.
Just before we came to the end of the trail at the back of the canyon, Fred took a picture of me in front of the cliffs. I also took some pictures of the cliffs as we were walking along the trail, and you can have a look at them by clicking on the thumbnails at right.
In Fay Canyon
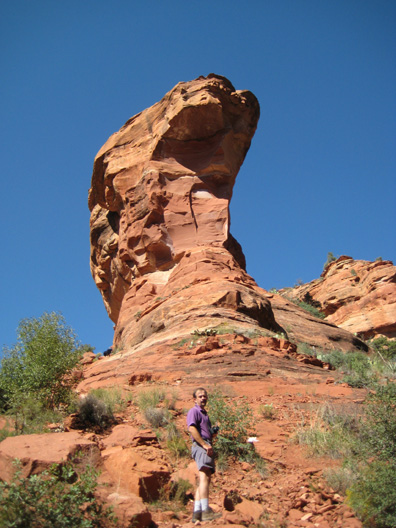
When we got to the end of the trail, we found ourselves in front of a towering rock monolith that looked for all the world like a Sphinx (except perhaps for the folded legs). As you saw in the movie, Fred clambered up a ways at the base of the rock formation, and then I joined and passed him so he could get a picture of me with the rock formation in the background. You can see that picture here. The rock formation actually seemed to stick out with the canyon splitting and going back further on both sides. On it's right side, the canyon didn't go very far, but the rocks wrapped around and flowed back towards the trailhead. It was on this side of the canyon that we saw the arch. I climbed up on the rock formation so I could get some better views, and I could certainly see that Fay Canyon went back a good deal further on the left side of the rock formation. Fred, who was a bit below me, took a picture of the canyon wall to our left (west). In coloration and form it looked like some formations we'd seen years earlier in the Black Canyon of the Gunnison up in Colorado- notably at Ship Rock there. From my vantage point up high at the base of the sheer cliff of the formation I got an amazingly beautiful view looking back the way we had come all the way down the canyon, and it is in this picture that you can get a really good idea of what the canyon was actually like. Please have a look at that picture here.
Standing up at the base of the sheer wall of the Sphinx formation, I made a movie looking up the remainder of the canyon and panning around to show where we had hiked up here. We stayed here at the end of the trail for a while, enjoying the views, but we eventually retraced our path along the trail back to the parking area and headed off for our next stop at the Palatki Indian Ruins.
The Palatki Indian Ruins
Getting to the Ruins
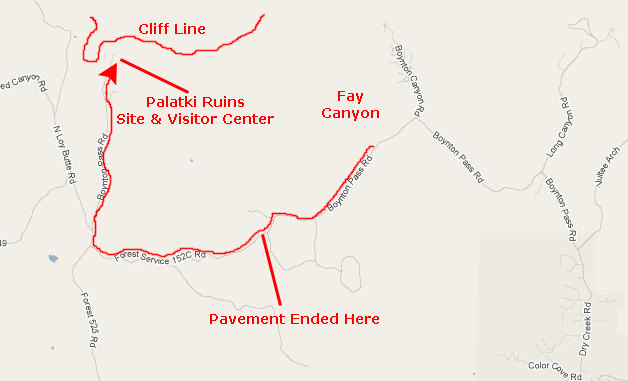
When we left the parking area for Fay Canyon, we continued west on Boynton Pass Road. After about a mile, the pavement ended and we were on an improved gravel road. We rode along for about 4 miles; it was slow going because the road was bumpy in some sections. When we got to FR 525, we followed the signs and turned north. This road forked about a quarter mile north, and we stayed on the right fork, continuing for another two miles to the parking area. When we left the RAV4, we walked the rest of the way down the road, just a few hundred feet, to the Visitor Center. We went inside briefly to find out about what we should see and got directions on where to go around the site. Outside, we each took a picture of the other here at the Visitor Center; here are the pictures of Fred and myself. Having officially recorded our presence here, we went over to where the trail began.
Before we go off to see the ruins and the pictographs, I wanted to show you the peaceful area here, and comment on its attractions. Archaeologists estimate that the people responsible for creating the Palatki ruins lived in the region for some six thousand years. The Southern Sinagua people, sometimes referred to as Western Anasazi people, arrived in the Arizona's Red Rocks Country about A.D. 650 and flourished between A.D. 1150 and 1250. They were primarily a farming people who included wild plant and animal foods in their dite. Those who lived along the streams may have specialized in farming while those who lived in the uplands may have predominately hunted deer and antelope and gathered wild foods such as agave, pinyon nuts and prickly pear. The exchange of foods between the uplands and lowlands may have unified the Sinagua into formal communities, each focused on a large pueblo such as those at Montezuma Castle and Tuzigoot National Monuments. One of the largest and most important communities was the cliff dwelling of Palatki which was probably the center for numerous smaller sites that dominate the landscape. The ruins here were named by Dr. Jesse Walter Fewkes, Chief of the Bureau of American Ethnology of the Smithsonian Institution, who studied it in 1895 and again in 1911. He thought it was the ancestral home of the Hopi people and gave it Hopi name "Palatki." Although the Hopi people have no other name for this site, their traditions affirm that their ancestors lived in the large ruins of the Verde Valley.
Viewing the Indian Ruins
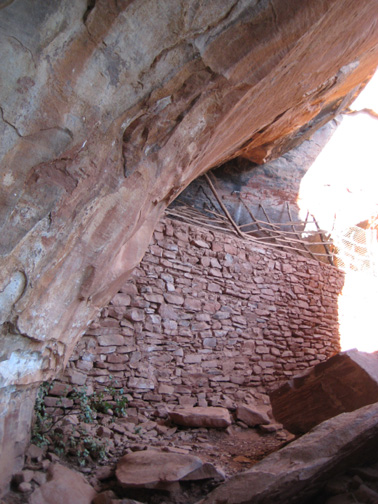
To get to the cliff dwellings, we took the first of two trails here, this one leading off to the east. After about 500 feet of an easy easy walk across a meadow, we came to a square canopy that had three or four folding chairs under it. No one was there, but we could see a park ranger coming back towards us from further along the short trail; she was explaining something to three other visitors who were walking back with her. While we waited for her to return, I snapped a picture from under the canopy of the cliff dwellings. When she had finished answering their questions, and they had gone on down the trail back to the trailhead, she began to talk with us about the ruins. Sadly, the first thing she told us was that visitors were no longer allowed to hike right up to the ruins themselves, and the policy had been changed only fairly recently. The reason, of course, was that people were climbing up on the ruins and they were being damaged. So now, visitors have to look at them from a distance, perhaps using the binoculars that the ranger offered for our use. With his excellent zoom lens, Fred was able to get some good pictures of the dwellings, and you can see them here and here. After she'd given us the background on the cliff dwellings here, she took us a bit further up the trail towards the rocky cliffs where we could get a different view of the ruins. We were also able to and, like the folks before us, she answered the questions that Fred and I asked. She also pointed out some very difficult to see cliff paintings that Fred was able to zoom in on. I was disappointed that we couldn't get close to the ruins, but I understood the reason why. I took some additional pictures of the cliff dwellings and the incredible red rocks that surrounded us, and you can have a look at them if you will click on the thumbnails below:
In these pictures you see again, as you've seen in earlier photos today, why this area is known as "Red Rocks Country." As for this particular box canyon, water and wind sculpted it from the Supai Sandstone that forms the cliffs above. 300 million years ago, this area was part of a huge system of flat swampy river deltas and shallow ocean inlets where sand was deposited. Eventually, it became the pink colored sandstone of the Supai formation which gives this canyon, known as "Red Canyon," its name. Today, water flowing over the "slickrock" continues to cut channels in the sandstone cliffs and stains them with dark stripes of "Desert Varnish," a thin, shiny coat of manganese and iron. The iron content is also responsible for the red color of the standstone.
While the ranger was talking to the two of us, I made a movie of the cliff dwellings and the surrounding area. As I mentioned, it was unfortunate that the cliff dwellings were now closed to hikers. They would have been interesting to see close up. I have found four good pictures of them on the Internet, though, and I thought I would add them here in place of the pictures we couldn't take ourselves. Click on the thumbnails below to view the larger images:
We spent about a half-hour with the ranger; she was entertaining and informative. After we'd gotten all the pictures we could, we headed back to the trailhead for the second trail to the petroglyphs and pictographs.
Petroglyphs and Pictographs
The short walk up to the area where the petroglyphs are was pretty easy; it was mostly a sloping trail followed by a long series of steps. When we got to the top, we found ourselves under a rock overhang where we found the interpretive guide and some other visitors. This area, called "the grotto site," had numerous carvings and paintings on its walls. The shaded overhang would have provided a welcome way to get out of the summer sun, and it also offered a beautiful view across the valley. As the guide was talking to us and to the other visitors, I made a movie of The Grotto Site, looking all around the "room" and out across the valley. The rock art, which is located a half mile to the west of the cliff dwelling, features a myriad of pictures and symbols that were rendered in various colors like red, yellow, black and white. Among the pictures are humans, grizzly bears, horses, coyote, deer, and even rattlesnakes. One of Fred's interests is petroglyphs, and he took a great many pictures. I've eliminated the duplicates and selected some of the best ones to include here. Just click on the thumbnails below to have a look at these petroglyphs:
After we looked at all the petroglyphs, Fred and I walked around the end of the overhang to see what was there and found, ahead of us, what we learned was a cliff shelter constructed by an early frontiersman in modern times. As you can see, whoever built the shelter only needed walls high enough to either keep out animals or protect against the wind that would naturally blow around the overhang along the cliff face. There were wooden poles added at the top of the wall, perhaps so that in winter hides or other material could be draped on them to keep the inside as warm as possible. In summer, they would be taken down providing natural ventilation. I went inside the shelter, and took a picture of Fred coming through the doorway. Inside the shelter there were simply bare rock walls showing the same manganese and iron deposits that I talked about earlier. These same colorations made the ceiling quite ruggedly beautiful. We were done here at the petroglyph site, so we went back down the trail to the Visitor Center, back to the RAV4 and headed down the dirt road back to Boynton Pass Road and our next hike at Doe Mountain.
The Palatki Experience
A Hike Up Doe Mountain
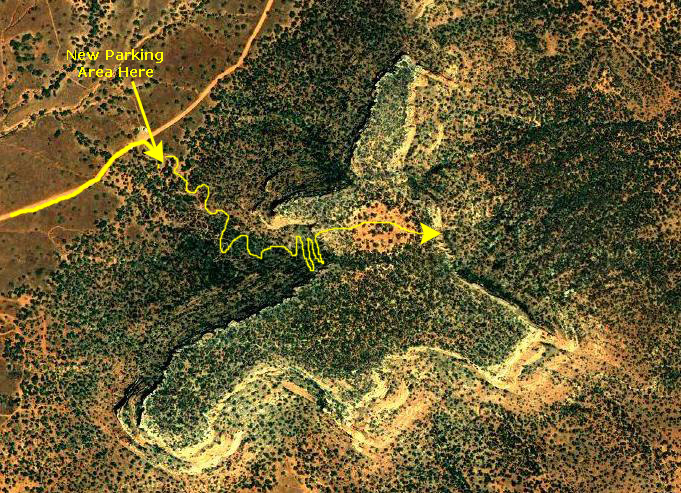
Getting to the Doe Mountain Hike
We'd actually passed the trailhead for the Doe Mountain hike earlier in the day, but we had reservations for a specific time at the Palatki Ruins, so we did things a bit out of order. To get back to the Doe Mountain trailhead, we just went back out the farm road we'd come in on, and turned back east on the unpaved portion of Boynton Pass Road. Shortly after the pavement began again, we found the trailhead for Doe Mountain on our right.
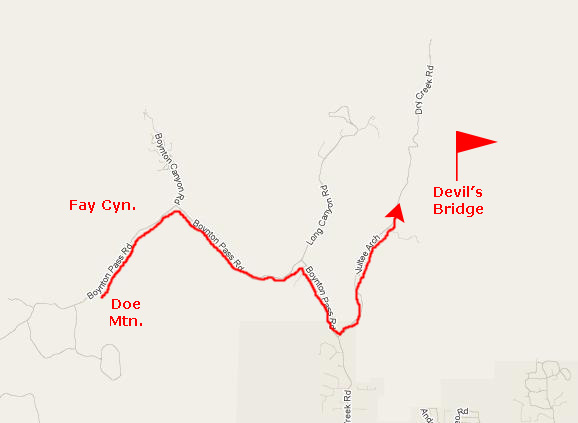
The aerial views that I have used for the hikes today are not as good as those I've used elsewhere. I find that when I want an aerial view of someplace outside a populated or heavily-traveled area, the resolution is not as good as it is elsewhere. That's been true of the aerial views of the entire Sedona area. They are not nearly so detailed as are, for example, the ones I used yesterday in Phoenix. It seems to be like cell-phone coverage. All the populated areas and all the heavily-traveled roads and highways have it, but if you get off the beaten path, service can be spotty. So the aerial views I've used here are, necessarily, higher level than those I might have used elsewhere. I also noticed in the aerial view of this area that the picture seems to have been taken some time ago; I could not locate the parking areas for either Doe Mountain or Fay Canyon, possibly because the pictures were taken years ago and the parking areas have been built since then. They were both certainly large enough to have shown up, even at the resolution of these aerial views. But parking areas aren't important; the hike is. I have marked the general route of our hike this afternoon. From the parking area, it ascended quickly to a series of switchbacks which led up and onto the mostly-flat top of Doe Mountain.
The Trail to the Top of Doe Mountain
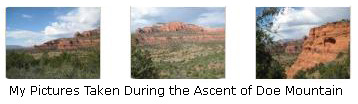
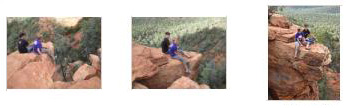
The trail was much like Fay Canyon starting out, but it got much steeper pretty quickly. This hike gains 500 feet in elevation along its 1.2 miles, most of that occurring during the switchbacks in the last third of a mile. By the time we'd gotten well into the switchbacks, I had my shirt off again. The scenery on the way up was much more spectacular than in Fay Canyon because we were ascending rather than hiking along flat terrain. The views just got better and better as we ascended. I've selected three of Fred's pictures from the hike to the top and three of mine; you can see the elevation gain in each sequence. Click on the thumbnails below and have a look at the scenery from the Doe Mountain ascent:
As our information advertised, the final twenty feet of ascent was through a rocky notch and climbing up through this notch brought us out onto the top of the mountain.
On Top of Doe Mountain
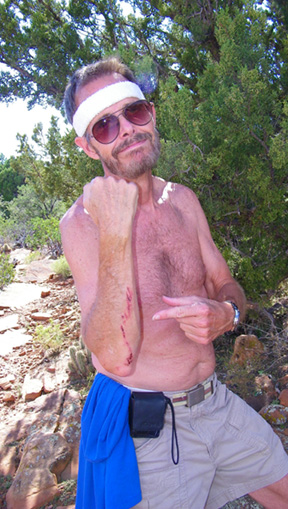
The first picture we took on top of Doe Mountain had nothing whatever to do with our hike up here, or the views from here. You may remember that yesterday, when we were hiking on Camelback Mountain in Phoenix, I mentioned that when I was on the way down from the summit I encountered a girl who'd broken here ankle. And I also went on and on about how the fine powder dust could make footing hazardous on rock surfaces. All true. I was somewhat above the girl with the broken ankle when I noticed that I was being followed closely down by someone else- another girl as it turned out. Since I sometimes hesitate when looking for where my foot will go next, I didn't want her to run into me. So, without thinking carefully for the first time this trip, I stepped sideways onto another rock to let her pass. That turned out to be the rock with the fine dust powder on it; my foot slipped and I fell forward. Very fortunately, there was a small flat area ahead, so I didn't tumble down rock after rock after rock and do something like Ruckman did in the Hemez mountains a few years ago. I did, however, get severely skinned on the underside of the arm that broke my fall. For the rest of the day, I was stopping at every opportunity to keep the scrape clean until I could do a good job of cleaning it up at the La Quinta last night. It has started to scab over and is no longer bothersome, but Fred, who'd said yesterday he thought he should take a picture of it, noticed it as I was climbing through the notch ahead of him, and had me stop so he could take his delayed picture. That's it at the right. My own personal badge of honor.
On Top of Doe Mountain When we came up through the notch we were on a flat plateau which, at first glance, wasn't particularly scenic. But as this movie shows, appearances can be deceiving.
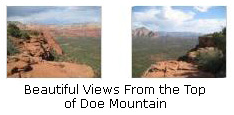
Doe Mountain seems to actually be a large, irregularly-shaped table-top mesa with stunning views all around. There is supposed to be a trail most of the way around, but we just followed a marked trail across the top to the southeast to the point where the most spectacular views are supposed to be. The views were all that was advertised- and more. Click on the thumbnails at left and you will see what I mean. We are looking generally east in the two pictures; we can see all the way across Red Rocks Country and past Sedona. It was really inspirational, and I just sat for a while taking it all in. I could imagine climbing up here before the sun comes up, and watching the sunrise from this side of the mountain, spending the day, and then watching the sunset from the other side. Beautiful. I snapped a picture of Fred setting up his tripod and then sat down to admire the view. Looking along the mesa walls I could see that there were probably very few routes to the top that the average hiker/climber could negotiate. The whole scene was very, very beautiful. After a short while, Fred was through taking pictures with his tripod and he showed me the result in his camera. He'd stitched together a couple of good pictures into a panorama, and you can see the result below:
We stayed on top of Doe Mountain for about half an hour, just reveling in the views. You can see a couple more pictures of these expansive views by clicking on the thumbnails at left. Then we went back across the mesa to locate the notch through which we'd ascended and we headed back down the trail to the vehicle. Doe Mountain was a beautiful hike.
The Hike to Devil's Bridge
The Hike Up to Devil's Bridge
Getting to the trailhead for the Devil's Bridge hike was something of an adventure in itself. To get there, we had to head back the way we'd come towards Sedona but turn northeast off Dry Creek Road onto a dirt road (also called Dry Creek Road). We had to travel about three miles along this dirt road to get to the trailhead. I was driving, and no sooner had we turned off onto the dirt road and gone a half mile or so than the road became extremely rough, and I got very nervous driving Fred's vehicle along it. At first we thought we'd park in an area off to the side before the road got real bad and then walk down it to the trailhead, but when we met some folks on the way back they said that it was quite a ways. So Fred took over the driving and we headed down the rough road. I was still nervous at times; some of the ruts were pretty deep, but the combination of Fred's careful driving and the high clearance of the RAV4 got us to the parking area in about twenty minutes. (We noticed when we got there that all the vehicles save one were trucks or SUVs. I wouldn't have wanted to be the one group that came in the mid-size sedan.) We parked and headed off up the trail just ahead of another couple who were making the same hike with their dog.
A short distance from the parking area I made an introductory movie for this hike. The dog you see belongs to a couple that is about a hundred feet or so behind us.
Initially, the Devil's Bridge trail was very broad, but that lasted only until we got to the foot of the mountain we were going to be climbing up the side of; then the trail became narrower with multiple switchbacks. The scenery on the way up was really beautiful, and you can see some examples of it if you will click on the thumbnails at left.
On Top of Devil's Bridge
The natural bridge was just simply spectacular, and this was the first time in many, many years that we have hiked to a feature like this one that you could actually walk across. Fred stayed on the broad rock slope up-mountain from the bridge itself, while I and the couple that had been following us walked across the bridge and explored the rock pedestal that it rests on at its far end.
It was odd that the dog the couple brought with them would not cross the bridge; even on a leash the guy could only get it to go so far before it balked and refused to go any further. They ended up tying its leash to a tree off to our right for the duration.
They went ahead and crossed the bridge together and took up a position on a rock point that jutted out from the pedestal out over the valley below. I got close to where they were, but where they were sitting even gave me the jitters and I did not attempt to do the same thing. If you will click on the thumbnails at right, you will get some good views of where they were sitting. The third picture (rightmost thumbnail) will show you plainly that were either of them to slip and fall then that would be all she wrote; it was at least sixty or seventy feet to the sloping mountainside below them. The natural bridge was incredibly beautiful, and I took a great many pictures of it and from it. Have a look at some of the best of these pictures by clicking on the thumbnails below:
Underneath Devil's Bridge
The trail crossed the area in front of the natural bridge so you could get from side to side and look at it from different angles. As we traversed this trail, Fred took pictures of me at the base of the pedestal and, after we'd crossed to the other side, me standing by the red rock cliff that formed the support for the natural bridge's attachment to the mountainside. You can look at that second picture here. When I crossed back over and got closer to Fred, I took a picture of him at the base of the pedestal. Then we actually went under the bridge into the area that was open to the sky between the mountain proper and the top of the bridge itself. This was the area I looked down into from my perch on top of the bridge earlier. When we got inside, I could see that there were possibilities of being able to climb up onto the bridge from either end- from the pedestal or from the place where the bridge joined to the mountainside. In fact, I tried climbing up the mountainside end, but it was just a little too steep for me, although if I'd waited longer or followed someone else up, I am sure it could have been done.
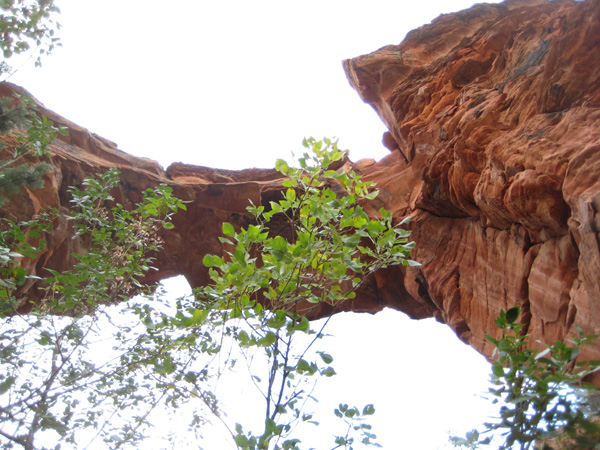
Climbing Under Devil's Bridge When I'd climbed up as far as I felt comfortable (in trying to get back up to the bridge from underneath), I stopped to make a movie looking across the area and down at Fred. In the movie, I mention that I'd just seen some kids climb up the pedestal end to get up to the bridge; I had taken a picture of them just before making the movie, and you can see them here. Finally, from my perch up on the cliff I took what I thought was an excellent picture looking through the opening under the natural bridge out to the valley beyond. Take a look at that picture here. For you Star Trek fans, the arch reminded me of a larger version of the time portal that was featured in the episode of the original series entitled "City on the Edge of Forever." Devil's Bridge is the most beautiful and interesting natural formation that Fred and I have seen in quite some time. I am glad it is relatively hard to get to; that keeps it from being spoiled, I think. We climbed around underneath the bridge for a while, and then headed back down the trail to the RAV4. Our next stop would be an energy "vortex" almost back in downtown Sedona.
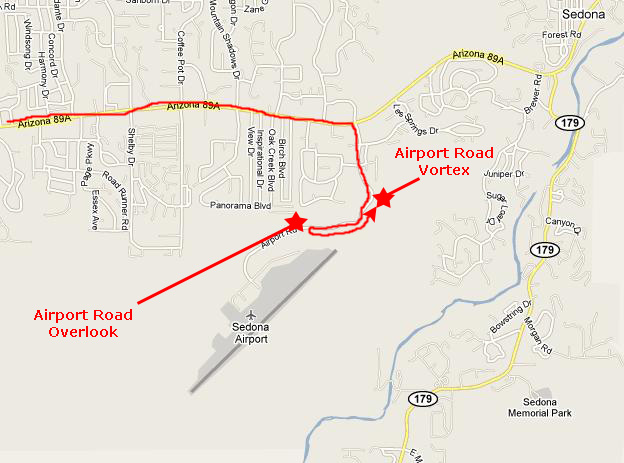
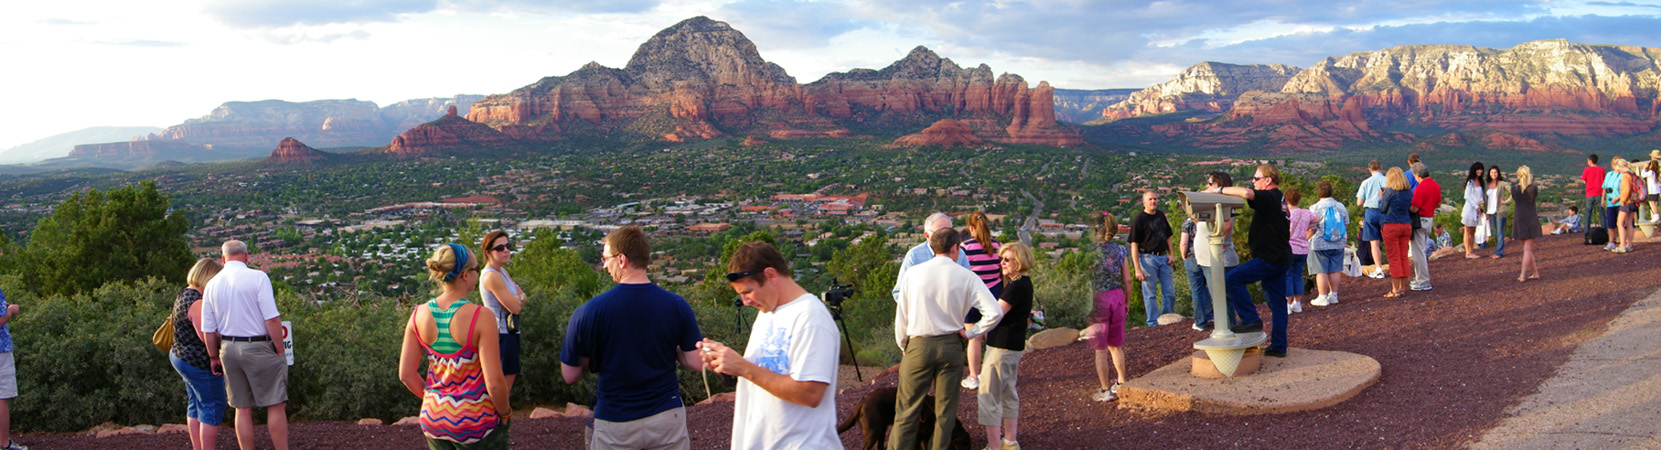
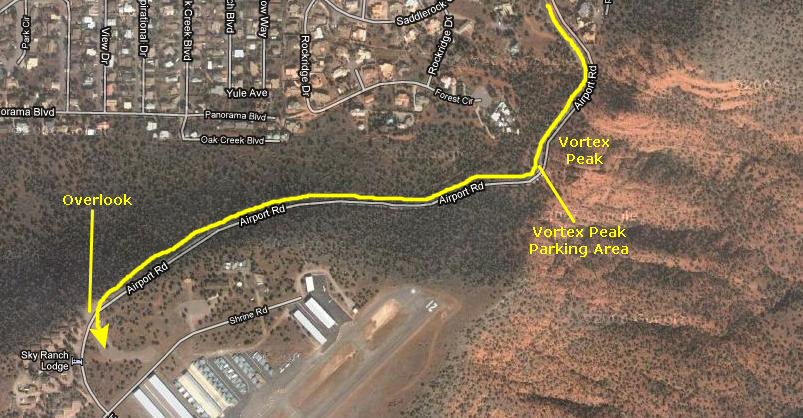
The Airport Road Overlook
Our next stop was going to be an "energy vortex" that was conveniently located just off Highway 89A back in Sedona. So we took the RAV4 back up the rutted dirt road to Dry Creek Road and then went back to Highway 89A. We took that almost all the way into town until we saw the signs for Airport Road. We turned right (south) on Airport Road and climbed quickly a few hundred feet. We came to the parking area for the vortex, but it was quite full, so we headed on up the road to find a place to turn around or perhaps a nearby place we could park. We didn't find either until we got to the top of the small mesa where the Sedona Airport is actually located. Just before we got to the Sky Ranch Inn (oddly enough, we would be staying there tomorrow night) we found a large parking area on our left where we could turn around. But we decided to park as there were a number of people on the other side of the road with cameras and other equipment waiting, apparently, for the sunset.
From this vantage point there was, indeed, an incredible view to the west and to the setting sun, so we left the RAV4 and walked across the road to join the other folks there. We milled around for a while taking pictures of the crowd and of the surroundings and of the setting sun. You can look at three excellent pictures that Fred took from this spot by clicking on the thumbnails at left. Fred also took the time to use the panorama feature of his camera to stitch together a couple of pictures into a panoramic view as seen from the overlook. That panorama is in the slider window below.
Before the sun had completely set, we headed back down to the energy vortex to see if a parking space had opened up.
The Airport Mesa Vortex
A vortex is the funnel shape created by a whirling fluid or by the motion of spiraling energy. Familiar examples of vortex shapes are whirlwinds, tornadoes, and water going down a drain. A vortex can be made up of anything that flows, such as wind, water, or electricity. The vortexes in Sedona are (reputed to be) swirling centers of subtle energy coming out from the surface of the earth. The vortex energy is not exactly electricity or magnetism, although it does leave a slight measurable residual magnetism in the places where it is strongest.
There are, reputedly, several of these vortexes of subtle energy located in the Sedona area. (In Sedona, the energy centers are referred to as vortexes rather than vortices.) The energy from these vortexes saturates the whole area in and around Sedona, and can be noticed in a subtle but general way anywhere around town. If you actually go to one of the vortex sites, which is where the energy is strongest, it can be a very uplifting experience. The energy you take in at one of these energy centers can stay with you and affect you positively for days afterwards. The vortex at Airport Mesa is the first of these locations we will visit; in all, we will visit three out of the five known vortexes here in Sedona. (Although the Sedona area has many hiking trails that only a vigorous hiker can enjoy, the vortexes are all easy to get to, and no strenuous hiking is required to get to any of them. Perhaps this is nature's way of ensuring that all sentient beings can experience their positive effects.) The Airport Mesa Vortex is just down the hill from the overlook and, when we got down here from up there, a parking space opened up just as we arrived. Whether this was the universe's way of demonstrating the positive effect of the energy vortex to the admitted skeptic, or just a happy coincidence, I cannot say for sure. In any event, we took the parking spot and climbed up the eighty-foot knoll that was the vortex. I must admit here that I did not feel any particular energy emanating from the vortex but then, as Fred and Barbara Reynolds would be quick to tell you, I am sadly not, apparently, attuned to the subtler vibrations and energies that figure prominently in their belief systems as regards our relationship with the universe. On the other hand, if you count the pleasure that I got looking at all the fantastic scenery all around, maybe I did experience the vortex after all. Fred, as he usually does, took some very good pictures here on the vortex, and you should have a look at them by clicking on the thumbnails below:
I took some of my own pictures from the top of the Airport Mesa energy vortex, and you can have a look at them if you click on the thumbnails below:
When the light had faded, there was little more we could do today here at the vortex or here in Sedona. As I said earlier, we'd be staying south of here tonight, so we thought we'd best have dinner before we left Sedona.
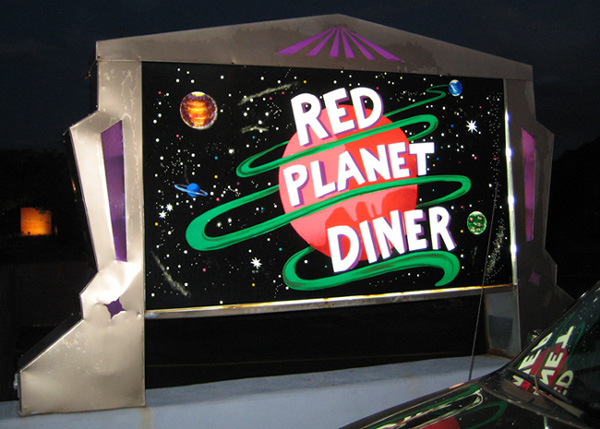
Dinner at the Red Planet Diner
Before we started out this morning, we'd done some searching on the Internet for quirky or unusual places that we might eat around Sedona this evening. One of the top contenders had been a place called "The Red Planet Diner," and, as it turned out, it was quite nearby when we finished at the Airport Mesa Vortex. All we had to do was go back down the hill to Highway 89A and then go west about a half-mile and there we were. The place certainly lived up to its quirkiness quotient. Out front there was a series of fountains, turned off at the moment, that featured a flying saucer that would appear to be landing in the fountain, if it were on and obscuring the obvious support. The Red Planet Diner was not a huge affair, but it was certainly interesting from the outside, so we went on in. I guess if we'd landed in a flying saucer or something we could go seat ourselves, but, being earthlings (well, I am, but I can't vouch for Fred) we had to wait to be ushered to a booth in the front window. The food was quite good, with large portions (I had a huge burrito) and the inside of the restaurant gave us plenty to look at while we were waiting. It was certainly an interesting place!
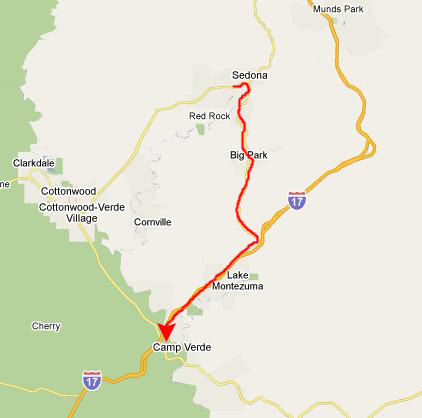
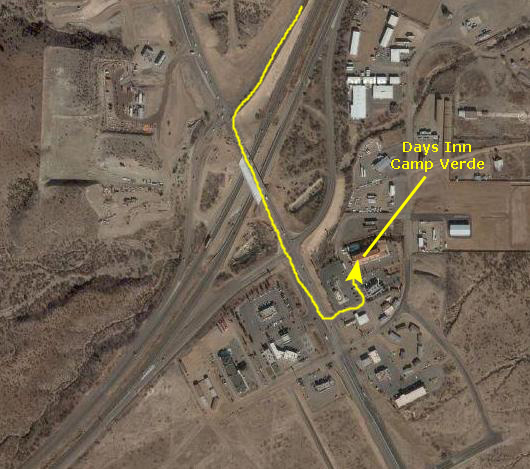
As I said earlier, we'd made reservations at the Days in in Camp Verde. There wasn't anything in Sedona, and we wanted to do a couple of things tomorrow down in that area anyway. So when we were through with dinner, we just took the familiar Highway 179 back south to I-17 and then the expressway south about fifteen miles to Camp Verde.
We found the Days Inn with no problem and by midnight we were heading off to bed.
You can use the links below to continue to the album page for different day.
|