|
October 18, 2010: Sedona to Flagstaff |
|
October 16, 2010: Hikes Around Sedona |
|
Return to the Index for our Western Trip |
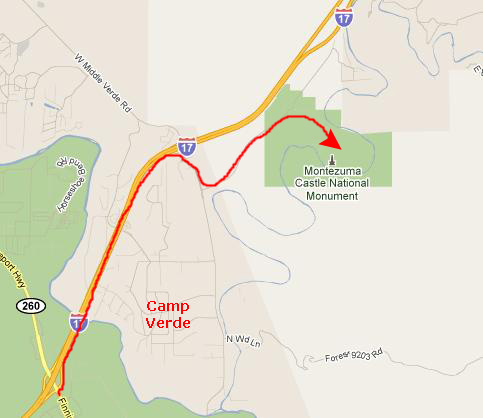
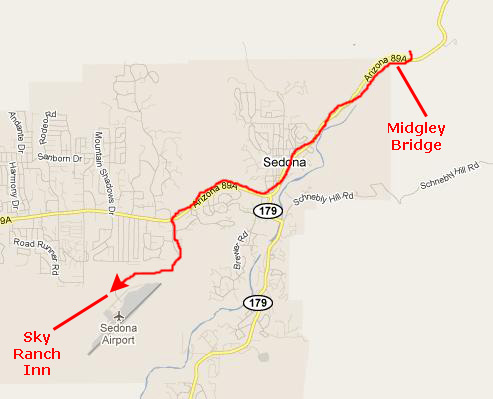
Today we will be spending the first part of the day down in the area between Camp Verde and Highway 179 to Sedona, visiting Montezuma's Castle National Monument, Montezuma Well and the V-Bar-V Petroglyph site. Then we will head back up to Sedona, stopping at Bell Rock to experience the vortex there, and ending up with a hike in Wilson Canyon below the Midgley Bridge just north of Sedona on Highway 89A. We are going to play it by ear for accommodations tonight; we hope that the Oak Creek Canyon Campground will have cleared out with everyone going back to work, but we shall see. Fortunately, from our last hike we will be just a few miles from the campground and can check it out easily.
The Montezuma Castle National Monument
|
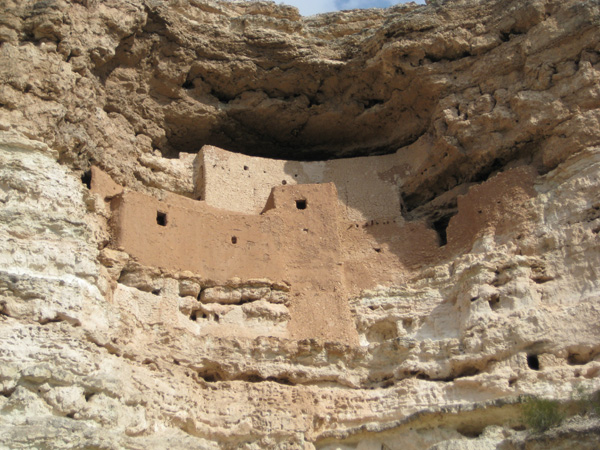
Montezuma Castle National Monument features well-preserved cliff-dwellings. They were built and used by the Pre-Columbian Sinagua people around 700 AD. Several Hopi clans trace their roots to immigrants from the Montezuma Castle/Beaver Creek area. Clan members periodically return to their former homes for religious ceremonies. As you can see from the sign at the entrance, the dwellings were inaccurately named, but the name has stuck. There are many theories as to why the cliff dwellings were built just here, but no one knows for sure.
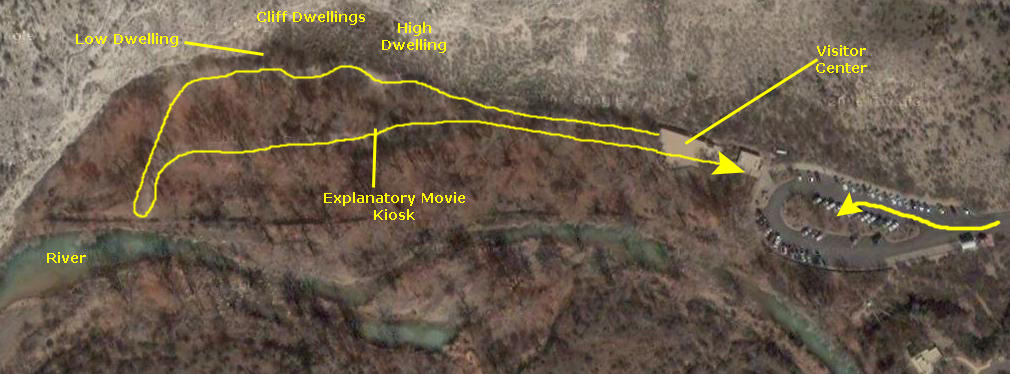
After we parked, we headed in to the Visitor Center to pay our entrance fee and begin exploring. I've put an aerial view of the National Monument below so you can get an idea of where our walk took us. The entire round-trip through the National Monument was only about three-quarters of a mile.
|
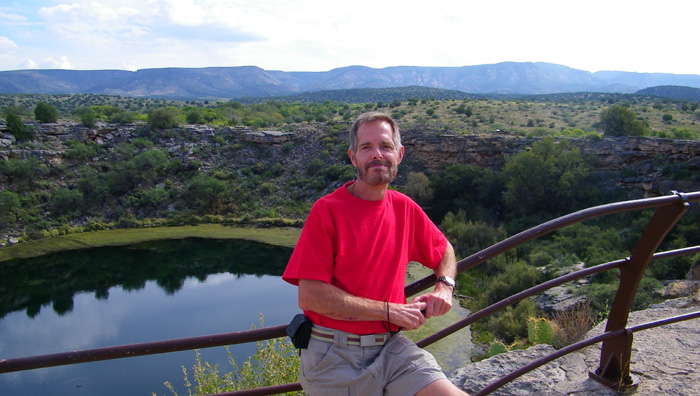
As we walked down the shady path along the cliffs, we could see the dwellings up ahead. Just before we got there, another explanatory sign talked about the community of early Americans who called this place their home. As we came out from underneath the trees, we could see the first of the two dwelling sites, the "high dwelling" ahead of us. A short distance further on and we came to an observation area right in front of the high dwelling, and so I got a picture of Fred with Montezuma's Castle behind and above him.
|
Fred took a series of excellent pictures of Montezuma's Castle- some with his extreme closeup. You should have a look at these pictures by clicking on the thumbnails below:

|
The walkway continued towards the southwest along the cliff face. Presently, we came to the ruins of another dwelling, this one down at walkway level. This dwelling was called "A" by the archeologists who excavated it in the 1930s. Like neighboring Montezuma Castle, Castle A was occupied by Sinagua farmers between A.D. 1200 and 1450. However, with 45 rooms and an estimated occupancy of 100, it was much larger. It's not nearly as well preserved, both because it is easily accessible and because sometime before the Sinaguas' mysterious disappearance in the late 1400s a fire destroyed almost all interior features. All we could see now were parts of afew collapsed walls and a partially reconstructed foundation. Fred also took a picture of one of the few remaining upper‑level rooms here at Castle A.
The walkway turned south a ways after Castle A and then went back east again towards the visitor center. All around in this area were beautiful sycamore trees with their distinctive, multicolored bark.
|
When we got down to where the walkway turned back to the visitor center, we could see all the way around the area, and so I made a movie of that 360-degree view. |
There was a spur path that led further south to Beaver Creek, and you can read about the importance of the creek to the residents of this valley by reading the interpretive sign.
|
On the way back to the visitor center there was a model of the high dwelling, and a recorded voice pointed out all the features in detail. I started the presentation and then filmed it. |
That was all there was to see here; what there was seemed impressive. We got in the RAV4 and headed off for Montezuma Well.
The Montezuma Well
|
There was a little guardhouse with a ranger at the parking area who gave us directions; there was no fee here. So we set off on a mostly circular route that would take us to all the major features here.
Montezuma Well is a natural �sink hole,� 368 feet wide. The cliffs tower seventy feet above the water�s surface. Every day, over 1.5 million gallons of warm water (74F) flows through the Well. It is fed by three to four large underground vents, some as deep as 56 feet below the surface. The water exits the well through a 300 foot long stream.
How was Montezuma Well formed? The best guess begins with Lake Verde which, millions of years ago covered an area 27 miles long and 15 miles wide. Then, 2 million years ago, Lake Verde broke through the sediment dam at its southern end and enabled the water to flow out to the rest of the valley. Today, the Verde River is all that remains of this ancient lake.
Over millions of years, underground streams dissolved away the soft limestone formed by the sedimentation from Lake Verde. It produced caverns below the surface of the Verde Valley. 11,000 years ago one of these caverns collapsed into a sunken pool, creating Montezuma�s Well.
|
Then we went back up the trail to the rim again, and around the southern side of the Well. Next, the path took us generally downward towards Beaver Creek. Close to the creek, an offshoot trail took us down to the creek itself, and we found that the water exit from the Well was down here. We walked along a channel where the water exiting the Well flows beside the creek until we came to the actual exit point amid some rocks. We spent quite some time in this restful, shady area before going back up the offshoot trail to the mail pathway and following it around through highland meadow back to the parking area.
I'll organize the pictures here into groups for each of the major stops we made.
Overlook Views of Montezuma Well
|
The water is highly carbonated and contains high levels of arsenic. At least five endemic species live (only) in the Well: the diatom, the springtail, the water scorpion, the amphipod (Hyalella montezuma), and the leech (Erpodbella montezuma). This is the largest number of endemic species living in any spring in the Southwestern United States. It is also home to the Montezuma Well springsnail.
In 1968, Montezuma Well was the subject of the first ever underwater archaeological survey to take place in a National Park, lead by archaeologist George R. Fischer. The Yavapai people believe they emerged into this world through the well, and as such, it is a very sacred place to them. In recent years Illinois Pondweed (Potamogeton illinoensis) has invaded the well. Weekly maintenance is required to keep water from the well flowing.
|
|
From the overlook area I filmed a movie of Montezuma Well showing the Well, the cliff dwellings and the surrounding area.
There were a number of informational signs scattered around the overlook area, and you might want to read them (as if you'd been there). Just click on the links below to do so:
The Cliff Dwellings
|
Fred took a couple of other pictures of the cliff dwellings here, and you can look at them if you click on the thumbnails below:
|
Hiking Down Inside the Well
|
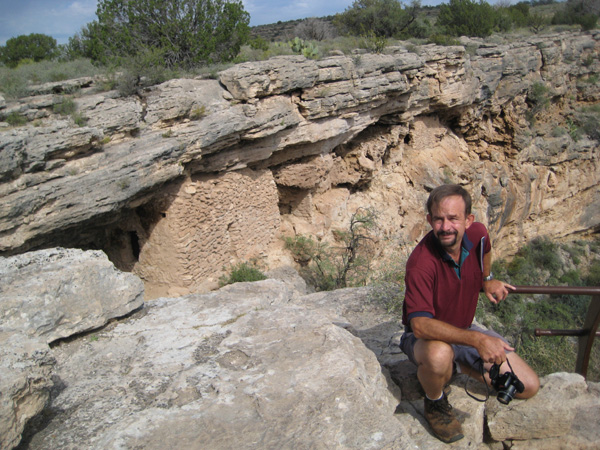
There wasn't much left of the cave homes down here. There were some low walls and doorways but not much else. I was able to get a good picture of Fred standing next to a series of rooms under the cave overhang, and you can see that picture here. It may be that the outlines of the rooms have been reconstructed; I don't know.
There was one room whose wall seemed to be pretty much intact, and you can see a picture Fred took of me beside that room here.
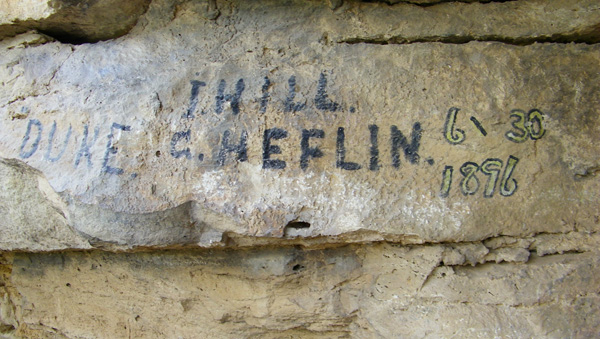
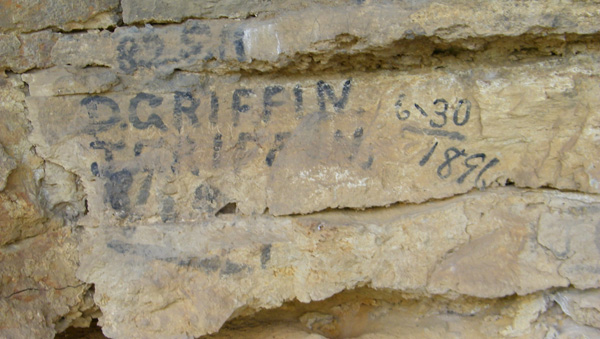
One thing that we found interesting down here at the swallet ruin was the graffiti that has been left- most of it from the mid- to late-1800s. Fred took some pictures of the most prominent examples. I was just going to include them here for you to look at, but my curiosity has got the better of me and I have done some research about what you see scrawled here. Beside each photo below is what I found out:
|
"Here is American graffiti near the Swallet Ruin. Two cowboys or soldiers named T. Hill and Duke Heflin came along and carved their names and the date they did it: June 30, 1896. Chances were, they were US Army soldiers who were bored with nothing else to do but deface sacred Native American places."
|
|
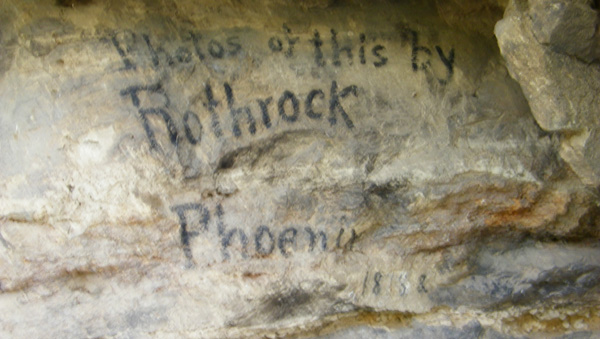
Many of the pioneering photographers who worked in Arizona and the West left ephemeral trails of letters, articles, and stories telling the tale of their lives and work. George H. Rothrock came to California as a teenager, later engaging in a twenty-five-year photographic career that produced a body of hundreds of cartes-de-visites, cabinet cards, stereographs, and mounted photographs that document the height of the Apache conflicts and the development of Arizona Territory in the last quarter of the nineteenth- century. His career, like those of most of his peers, followed a varied path of travel, adventures, tribulations, and coincidental meetings across California, Arizona, and the West. These experiences changed and shaped him, as he created a photographic legacy of his life and times.
I read much of the article and found it immensely interesting, and you may want to read it too. If you will click on the link below the picture of Rothrock's graffiti, I'll open the article in a new window and you can read through it.
We explored the swallet, and then started back up the trail to the rim of the Well. On the way, we were treated to an excellent view of the cliff dwellings, and a few minutes later we were back on top.
Hiking Down to the Well Outlet
|
|
From where the stairs down ended, I made a movie as we walked along northeast towards where the water from Montezuma Well emerges near Beaver Creek.
|
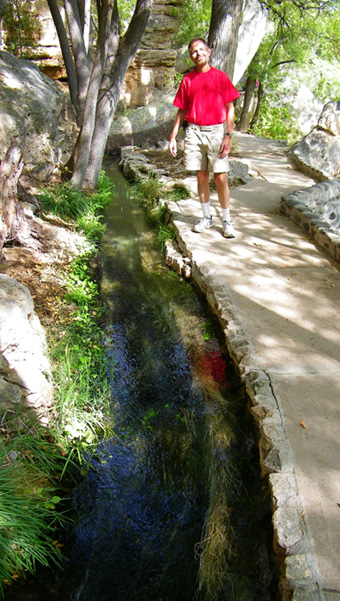
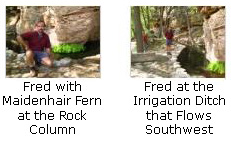
But instead of simply draining into the creek, it makes a right-angle turn around a huge rock column and then flows through an irrigation ditch that hugs the rock walls of the canyon. This irrigation ditch was originally constructed almost a thousand years ago by the Sinagua people, a culture who lived and farmed in this area for centuries. Right at the point where the constructed irrigation ditch makes a turn to go around the rock cliff and continue southwest, there is a huge sycamore tree- one of a number that are down here in this picturesque dell. Fred got a picture of me sitting underneath the sycamore. I think you may already have seen a picture of the distinctive bark of this tree. I took a couple of good pictures of Fred down here at the outlet; have a look at them by clicking on the thumbnails below:
|
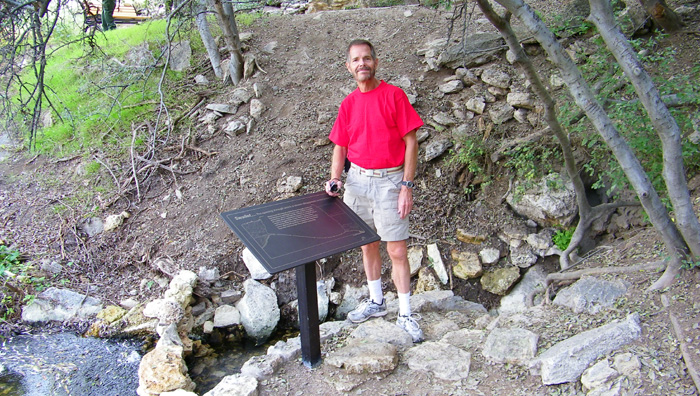
The ditch originally ran all the way to an area of settlement about a mile away. Learn a bit more about it by reading the informational sign. Now it runs first to a monitoring station that tracks water flow. Then it continues through the original ditch towards the picnic area near the entrance to the park. It passes the picnic area on the east and then continues outside the park boundary. Private property owners beyond this boundary still still have water rights today!
|
Before we left this area, I stopped to make a movie focusing on the water flowing through the irrigation ditch and the plant life that has adapted to living in the water. |
We left the creekside irrigation ditch and went back up the staired pathway to the meadow again, and continued around the circle back to the parking area. Along the way, we past one interesting plant that we hadn't heard of before- "Winter Fat." If you want to know what the plant is and why it is named so, read the informational sign.
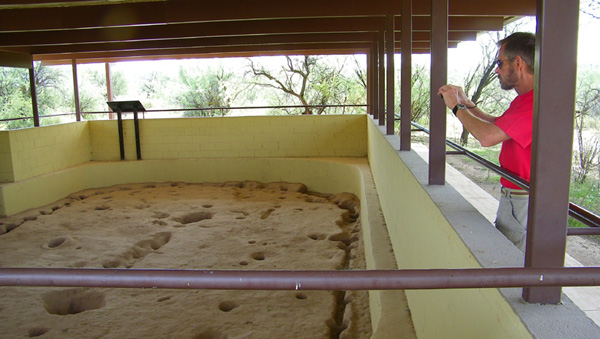
The Pithouse
|
|
|
Before we leave the Montezuma Well portion of the Montezuma Castle National Monument, I'd like to give you the link to a blog that I found very helpful in my research. Particularly if you are interested in anything vaguely "New Age," I think you may be prompted to read other pages in the blog. If you click on the link below, the blog page I was using will open in a new window, and you can navigate where you please. When you close that window, you'll be returned to this place in my photo album.
The V-Bar-V Petroglyphs
|
We had actually looked for the site yesterday afternoon as we were driving down from Sedona. We had driven under the Interstate and followed the directions we had, or so we thought. We stopped in the wrong place, and since the light was fading and we couldn't find the petroglyphs, we went on down to Camp Verde. Last night, we went on the Internet and found much better directions.
We could have gone back out to the Interstate, but our drive yesterday clued us in that Beaver Creek Road, which we used to get to Montezuma Well, would, if we continued along it, intersect with National Forest Road 618. We turned right, crossed Beaver Creek and passed by a campground, and then came to the driveway for the V-bar-V site.
|
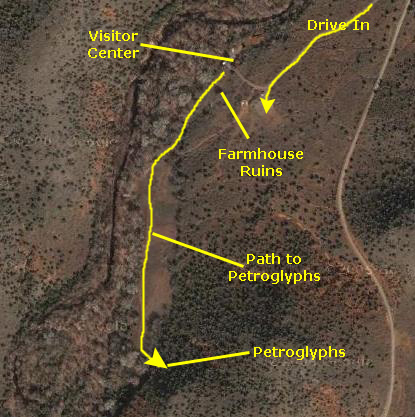
On the aerial view at right, I've shown the entrance road that we'd missed the evening before. We drove in, parked and then went by the visitor center to get the lay of the land. We followed the marked path to the petroglyphs, spent some time there, and stopped in the little store on our way back.
A visitor center, restroom and bookstore, operated by the Forest Service and the Arizona Natural History Association, is located on site. The fenced petroglyph site is an easy half-mile walk from the parking lot. For most of the year, there is a resident on-site custodian.
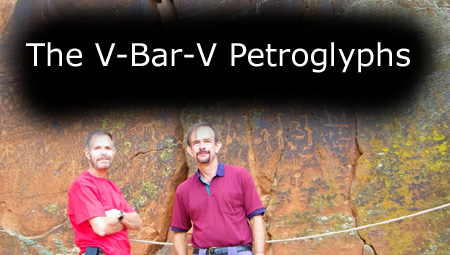
The petroglyphs that we were going to see were created by Southern Sinagua residents between about 1150 and 1400 AD. The site was known to early American settlers, and became part of the historic V-bar-V ranch around 1907. The ranch headquarters were nearby, and the ranchers protected the site from vandalism. Some historic ranch buildings remain near the Visitor Center. One building, the main ranchhouse, was erroneously torn down years ago (it was supposed to have been protected), and all that is left now is the stone fireplace. You can still see the V-Bar-V brand on the outside wall of the fireplace/chimney. The US Forest Service acquired the site in 1994.
|
Rock art is one type of archaeological data that can be used to identify prehistoric cultures and time periods. The Beaver Creek Rock Art Style has been identified and formally described through studies of rock art sites in the Beaver Creek area, especially at V-Bar-V. The Beaver Creek Style, found throughout the eastern half of the Verde Valley, is diagnostic of the Southern Sinagua culture between A.D. 1150 and 1400.
About 20% of the petroglyphs are zoomorphs, including snakes, turtles, coyotes, deer and antelope. The next most common types are anthropomorphs and geometric figures, such as spirals and grids. You can see one of the major rock panels with many examples of all three of these types here.
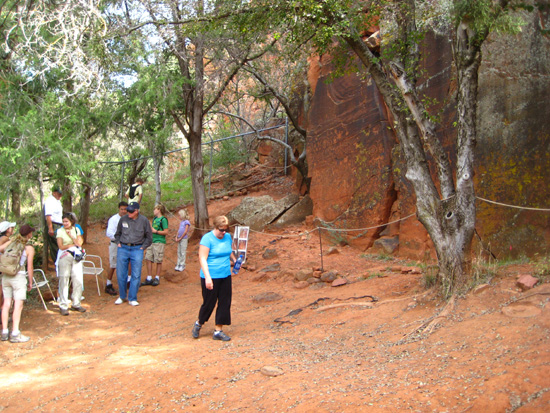
The documentation of the V-Bar-V Heritage Site has provided important information for defining the characteristics of the Beaver Creek Style. V-bar-V is unusual in that all of the petroglyphs are of this one style, and almost all are well-spaced, without overlap or newer designs drawn over older. When we first arrived, the volunteer was an older gentleman, but while we were there he was relieved by a female volunteer. She had an excellent voice and was very knowledgeable as she answered questions from the visitors. After being asked by one member of a couple of girls to take their picture, they returned the favor and took a picture of Fred and I at the V‑Bar‑V petroglyphs.
|
When we arrived at the petroglyphs, there was already a small group of people with the interpretive volunteer. I made this movie of the scene. |
|
To view the slideshow, just click on the image at left and I will open the slideshow in a new window. In the slideshow, you can use the little arrows in the lower corners of each image to move from one to the next, and the index numbers in the upper left of each image will tell you where you are in the series. When you are finished looking at the pictures, just close the popup window.
|
Shortly before we left the petroglyphs, a new volunteer, this one female, arrived and began offering explanations and answering questions. I thought I would film a short movie of her. |
We left the petroglyphs and walked back along the path to the visitor center and gift shop, spent a few minutes there, and then headed off back up towards Sedona for some more hiking.
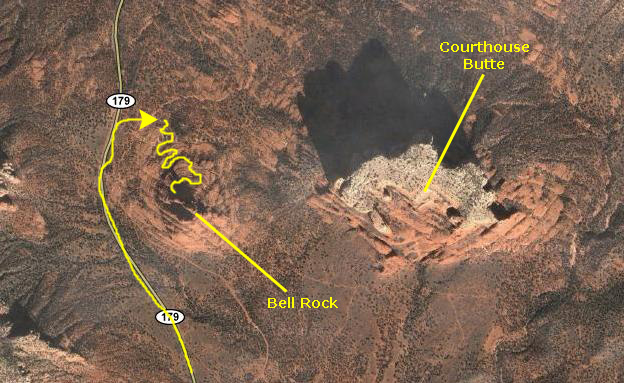
The Bell Rock Vortex and Hike
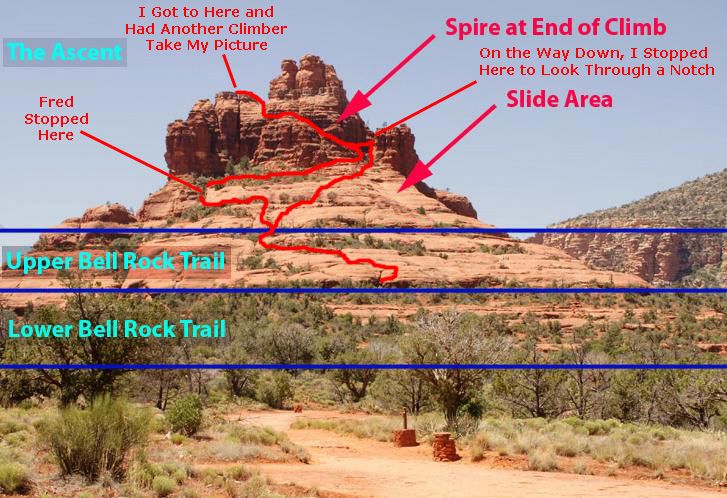
|
Below, I've included a picture of Bell Rock that I found on a hiking site. I thought it useful to illustrate the "sections" of the hike up Bell Rock. The view of Bell Rock looks towards it from the parking area, generally from the direction we were coming; indeed, you can see at the front of the picture the trail that we took. The first section of the hike is the "Lower Bell Rock Trail," and covers the relatively flat ground between the parking area and the first twelve-foot "cliff" that you have to scale to get to the "Upper Bell Rock Trail."
|
At this trail intersection we continued forward on the Bell Rock Trail. This brought us, in another few hundred feet to a sharp rise in the level of the trail. There were numerous pathways up a twelve-foot rise in the level of the rock, and when we'd clambered up one of those well-marked pathways, we found ourselves at the beginning of what is marked on the diagram as the "Upper Bell Rock Trail."
The next section, the Upper Trail, rises I would guess about sixty feet before one crosses a rather arbitrary boundary into "The Ascent" portion of the hike. In navigating the Upper Trail, we pretty much made our own way and as it turned our we seemed to work our way a bit around to the Courthouse Butte side of the mountain before we crossed into the Ascent portion. I got a bit ahead of Fred for a while, as you can see here, but we met up again fairly quickly. Along this portion of the hike there were increasingly beautiful views back towards the highway and parking area, towards Sedona and towards Courthouse Butte.
|
|
After we'd ascended quite a ways, Fred decided that he'd prefer to let me go on ahead if I wished while he stayed on more solid ground and just enjoyed the scenery. Just in case, I took a picture of him with Courthouse Butte in the background before I headed off, and you can see that picture here. For the same reason, I guess, Fred let me go on a ways up the trail before he took a picture of me pulling myself up onto a ledge. You'll notice the other couple in the picture; they pretty much followed me all the way up the trail, and the guy, at least, went as high as I did. You can see all of this in Fred's picture here.
Fred took a number of pictures while he was waiting for me. My favorite is the stitched panorama he made of the view east from his stopping place on the hike. From Courthouse Butte on the right to the mountains southeast of downtown Sedona on the left, it is an amazing view, and I've included it below:
 |
|
Sometime while he was waiting for me, he heard me calling to him from up above. I was about two-thirds of the way to the highest point I reached, and I'd found a rock platform I could step out on and see him below. I waited until I saw him take my picture, and then I continued on my solitary ascent.
As for the pictures I took while I was away from Fred, after I'd climbed up on that ledge you saw earlier, I looked south along the east side of Bell Rock and could see that was not the way to go up. (Actually, I learned later, one could take that narrow trail around to the south side of the rock and find a way to the very top. It's just as well I didn't know that then.) I turned to my right and took another slope up coming back around the Sedona side of Bell Rock. As I came around, I had a great view up Highway 179 towards Sedona. Sedona is actually to the right of and behind Cathedral Rock (one hike we didn't have time for); Cathedral Rock is the mountain right in the center of the picture.
|
|
Well, I have come around back to the side of Bell Rock that faces the parking area; I am at a point where the sloping bare rock seems to end, there are some small trees and bushes, and the steep part of the ascent begins. From here, I could look across the face of Bell Rock to Courthouse Butte, and if I turned and looked back at the mountain where I was standing, I could see the way up. I was able to scramble up through that notch, and I found myself crossing between two pedestal rocks. Between these two pedestals, I had a view down the east side of Bell Rock, and I could actually see Fred standing way downbelow. I was able to get his attention, and he took one of the pictures of me that you saw earlier.
|
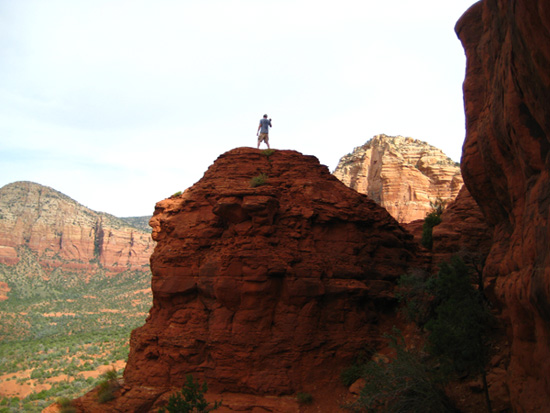
I can make it clearer where I was standing if I show you a picture I took a few minutes after climbing down from the pedestal rock and working my way back across the face of Bell Rock to see another feature. From my vantage point below and some feet from the pedestal, I can show you the picture at left of the climber who followed me himself standing on top of the pedestal where I was a few minutes ago.
When I left the top of the pedestal, I came back down to the notch where I'd seen Fred down below, and continued to look for an easy way to the absolute top of Bell Rock. I did not see one that I felt comfortable following; as it turned out, the best ascent is on the south side of the rock, not the north and northeast sides where I had climbed up. So I went back down the way I'd come up. From the base of the pedestal, I took a picture of my route back down. I did not continue directly back down to Fred, but went laterally across the face of the rock to the notch that you can see in the previous picture. When I got there, I found it was like a rock window looking west from Bell Rock across Highway 179. It was a really neat view.
|
While I was here looking through the rock window, I made a movie that begins by looking back at the pedestal that I had climbed, pans around the area east and north of Bell Rock, and then ends up looking through the rock window. |
That is about all there was to our climb up Bell Rock. I took some more pictures from my vantage point near the rock window, and I took a few more pictures as I descended back down to meet Fred and together we walked back to the parking area. You can have a look at some of these pictures if you will click on the thumbnails below:

|
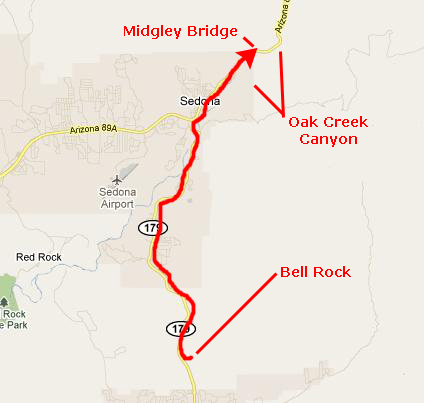
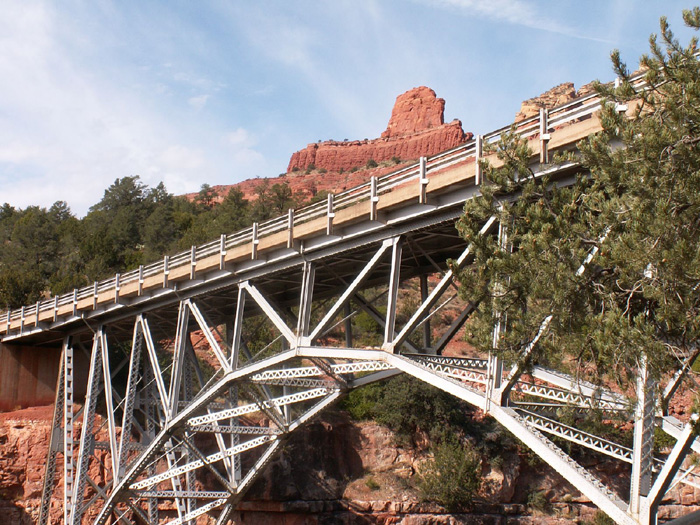
We got back to the RAV4, and then headed off to our last hiking stop of the day- Midgley Bridge.
The Midgley Bridge Hike
|
We left Bell Rock and headed up Highway 179 into the center of Sedona. Just before we got into town, we made a stop at an art gallery that we'd seen as we'd passed here in the last couple of days. It was a pretty place, with a nice building and also a sculpture garden beside it (and a creek beside that). We thought we'd look around and see if, by chance, Doug Fountain had any of his gourd artwork in the gallery. He didn't, but we took a look around nonetheless. We got back on the highway and continued into Sedona. At the traffic circle, we took Highway 89A north from town. We drove through and out of Sedona and after about five miles we crossed Midgley Bridge and found the parking area on the far side.
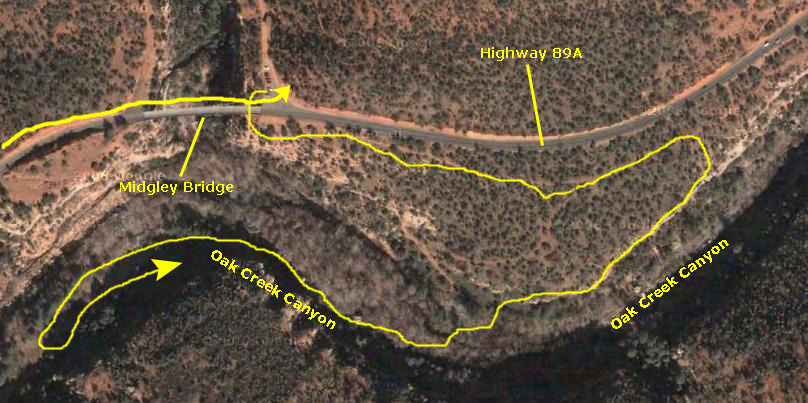
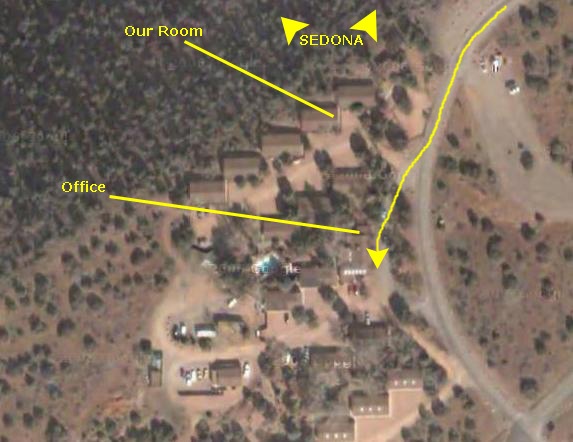
We parked in the last remaining space in the parking area. It seemed as if there was some bicycle club here; there were lots of bicyclists and a couple of support vehicles, and they were doing a few repairs and stuff when we arrived. On the aerial view above, you can see the bridge and the parking area, and I have also marked our approximate hiking route down a trail that led underneath the bridge and then down into Oak Creek Canyon.
|
This picture was taken from the trail that we hiked, from a spot just after it goes underneath the bridge and then turns to follow Highway 89A northeast a bit. Above and behind the bridge you can see a feature known locally as Steamboat Rock.
So, we began the trail by descending a short flight of stairs to the northwest side of Midgley Bridge and down to the rail at the edge of the canyon under the bridge. With Fred standing against this railing, I could look west from the bridge out towards the areas west of Sedona where we'd done our hiking the day before. The trail came around underneath the bridge where Fred got an excellent view of Midgley Bridge above us.
After the trail came underneath the bridge, we could get another great view of Midgley Bridge, and we could also now see the views first to the southwest down Oak Creek Canyon and then to the cliffs and mountains across the canyon. At this point, the trail turned to follow the road northeast, descending slowly below it and eventually moving fifty feet or so down the side of the canyon. After about a half-mile, there was a trail to our right that descended the side of the canyon much more steeply before turning back southwest and descending more slowly all the way down to Oak Creek.
|
I did take one movie along this trail, the movie being from up underneath Midgley Bridge. It will show you the trail, the bridge and Oak Creek Canyon. |
The trail ended right beside Oak Creek, which turned out to be a very pretty stream with lots of neat boulders, rocks and stepping stones, surrounded by thick vegetation.
|
When we got down to the side of Oak Creek, I made my first movie as I was sitting on a rock just enjoying the cool, verdant stream and the restful sounds it made. |
We spent a few minutes walking along and across Oak Creek, looking up and down the canyon. We took a number of pictures here, and you can have a look at some of them if you will click on the thumbnails below:

|
We walked along the creek for a ways downstream, heading back towards Midgley Bridge.
|
After we'd walked a ways along the creek, it divided and there were some stepping stones to the island created in the middle. We walked to the downstream end of that island where I made this movie. |
Eventually, as we neared the area underneath Midgley Bridge where the side canyon and stream joined Oak Creek, the canyon opened up, and Fred got a picture of me standing on a particularly large rock right in the middle of the confluence, and you can see that picture here. We continued on downstream just a short ways, and then we could see the Midgley Bridge above us and to our right. Here in the canyon, we are at the point where the stream that flows underneath the bridge joins Oak Creek, but there did not seem to be any water coming underneath the bridge at the moment.
|
As we came alongside the bridge (some hundred feet or more above us) I scrambled up to get right underneath it, and I made this movie of the bridge. |
When I came back down from making my movie underneath the bridge, I found Fred beside Oak Creek waiting for me. We continued our walk downstream as the area opened up. From this area, I could look back and get a picture of Fred and Midgley Bridge. A few minutes later, he got a picture of me beside a huge boulder looking back upstream.
|
From our vantage point down here in the canyon below the bridge, I made a movie of our surroundings, ending by looking further downstream towards Sedona. |
I took a couple more pictures of Fred down here in Oak Creek Canyon, and you can have a look that those here and here. Fred got a picture looking downstream at the canyon walls and, just before we headed back, I got a nice view looking upstream.
It was really pretty down here in the canyon, but for the last fifteen minutes or so we'd heard the rumblings of thunder and the clouds had thickened, so we thought we had best head back up to where we'd parked. When we got back up to the part of the trail that paralleled the highway, Fred got a really nice picture of me with the bridge in the background, and you can have a look at that picture here. And, as we got closer to it, I got another nice picture of Midgley Bridge in the fading afternoon light. Finally, as we approached the bridge, Fred used his camera to stitch together two pictures of the eastern side of Oak Creek Canyon into one panoramic shot, and you can see that shot below:

The Sky Ranch Lodge
|
I thought I was talking directly to the hotel but, as it turned out, I was actually talking to someone at Hotels.com. I was a little leery of booking through them since I'd had a bad experience with a similar organization a couple of years ago, but I decided to go ahead. The quoted price was actually a bit better than we'd seen online, so I made the booking and we drove back down towards Sedona in the rain and back out to Airport Road. We passed the vortex and the overlook from yesterday, neither of which had many people on this rainy afternoon, and we found the Lodge with no problem.
|
We got all settled in and used the wi-fi to download our pictures and look for a different restaurant to try for the evening. We picked an American place just a bit further in Highway 89A- the Olde Sedona Bar and Grill. It was pretty good and we certainly got all we wanted to eat. The rain had tapered off, so it was a nice end to a day of varied activities.
You can use the links below to continue to the album page for different day.
|
October 18, 2010: Sedona to Flagstaff |
|
October 16, 2010: Hikes Around Sedona |
|
Return to the Index for our Western Trip |